
Raise shadows and decrease highlights. This is how many photographers start their post processing workflow. Sadly, this often leads to an unintentional mistake.
I will start out by defining “mistake” as this is the internet and anyone who can interpret a word differently always will. Therefore, a “mistake” is an unintentional effect, which decreases the overall value of the photo such as distracting from the intention behind the photo.
When I first started out with post processing, I learned that you more than often want to decrease the highlights and raise shadows to preserve the details in both. This is for the most part still true. Doing so in Lightroom or CameraRaw most often leads to an unwanted effect especially in high contrast areas. This unwanted effect is called haloing. You often create the base for this mistake in this initial phase of your editing and the effect will only worsen as you add local contrast and sharpen your photo later in the process.
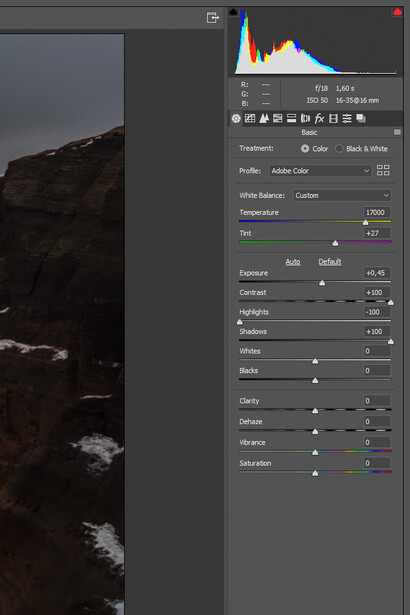
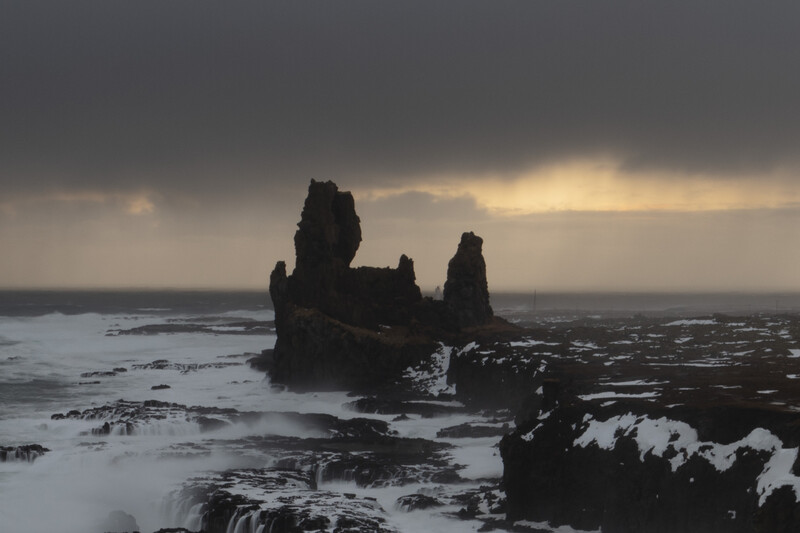
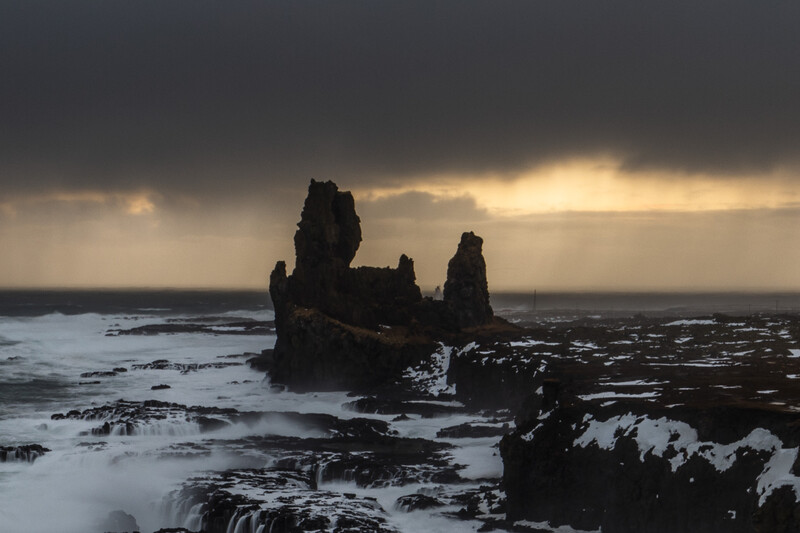
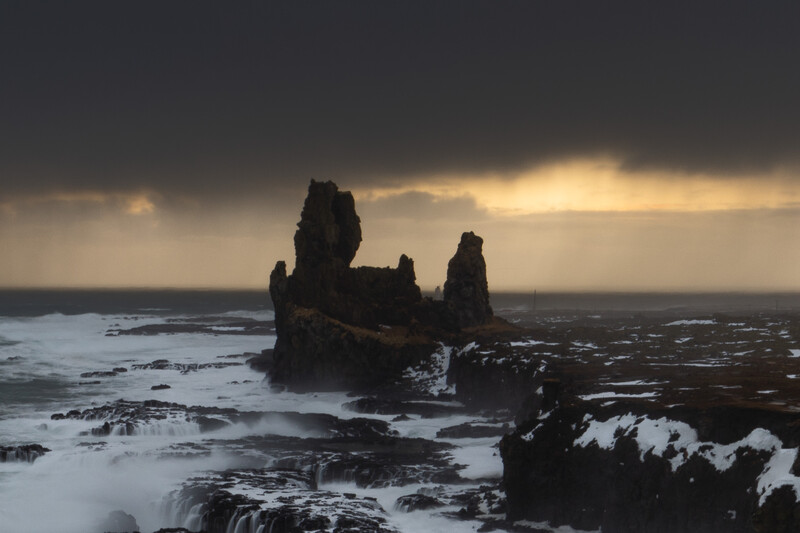
On the before/after photo below from Lóndrangar in Iceland you can see a typical example of this. Along the edges of the cliffs where you will go from a highlight area to a shadow area within a few pixels the halo becomes very visible. But first the settings:
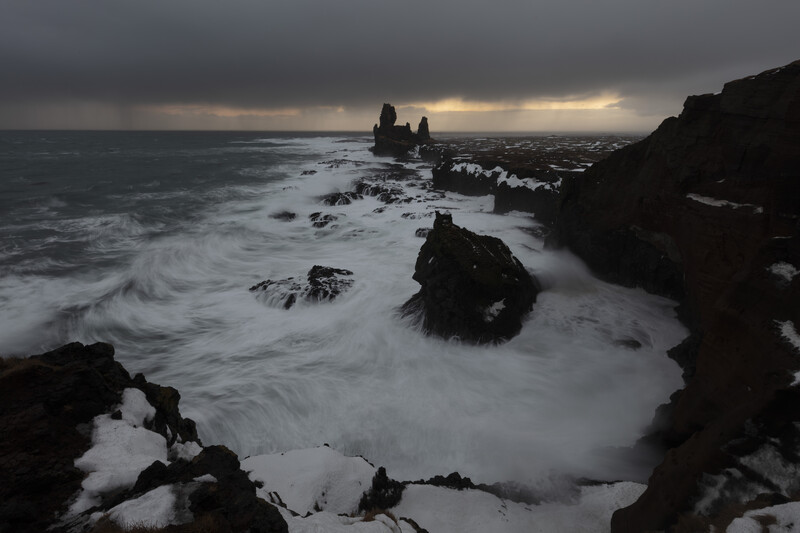
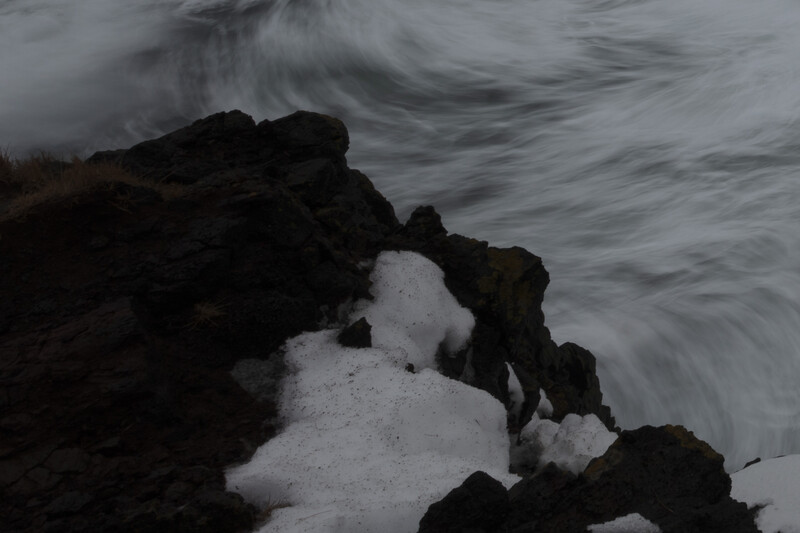
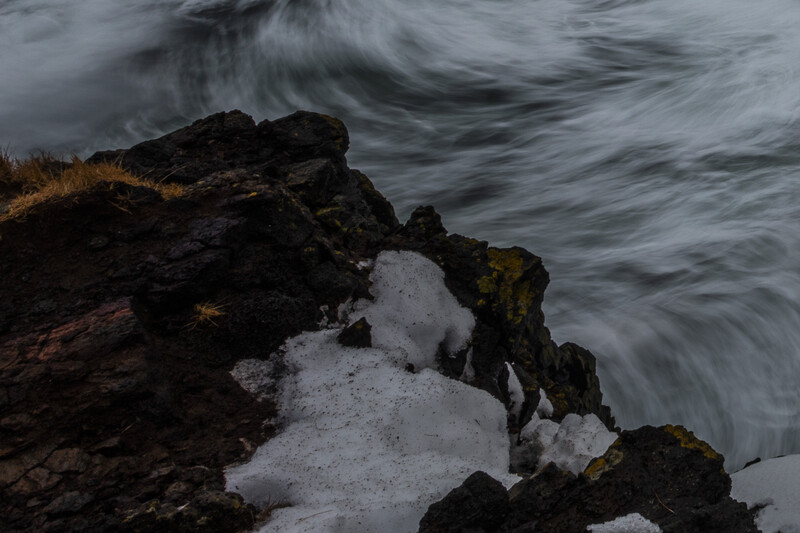
Zooming in to the photo the halo along the edge becomes very obvious. Personally, I absolutely hate this effect and despite there being many solutions to it, I still see it on a daily basis in all sorts of photography. As I am a landscape photographer, it is, of course, most pronounced for me in landscape photography.

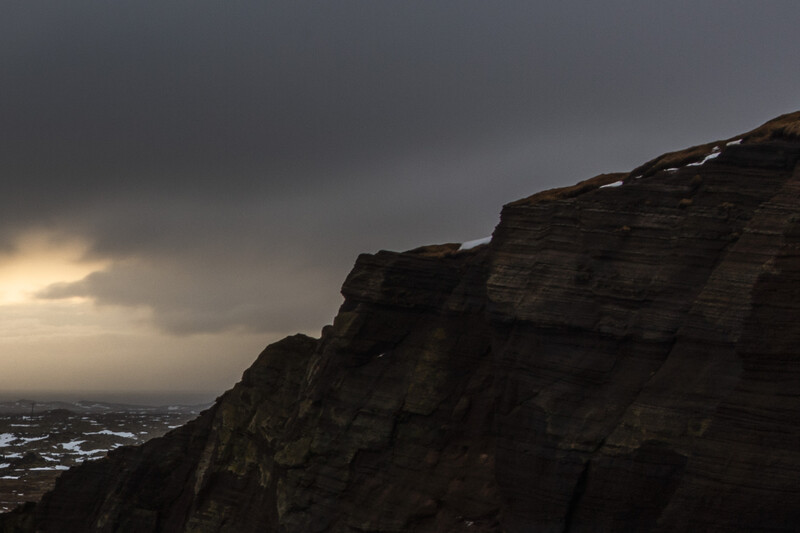
Here is another example from the other corner.
If we zoom into the center for a look at the cliffs. We not only get the bright line around the edge we also get a dark halo around the cliffs as if the darkness/shadows from the cliff has been smudged out into the bright background of the sunset.
I do not want to use words like “unnatural” or “unprofessional” to describe the effect but it sure looks unintentional, as this effect is unwarranted. There is no reason to add it to the photo. And as already mentioned, adding clarity or sharpness will only worsen the effect.
How To Fix It
Luckily, there is a quick fix to this problem in Lightroom or CameraRaw. It is probably the simplest form for luminosity masking you can get. If you would want to raise the shadows and decrease the highlights without creating the weird halos this is one way to do it.
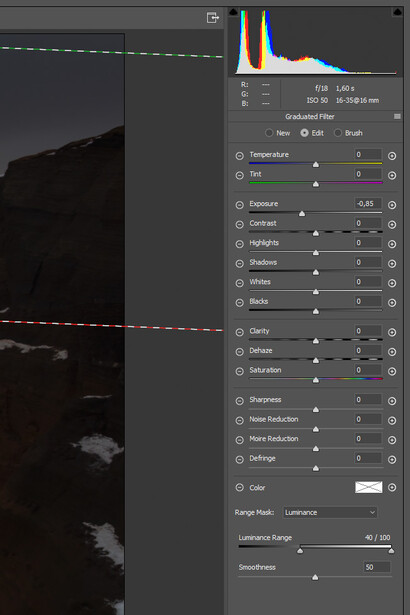
In this example, I create a graduated filter for the sky with the intention of decreasing the highlights in the clouds. I do this by decreasing the exposure. I also create a graduated filter for the bottom with the intention of raising the shadows in the cliffs. I do this by increasing the exposure and shadows.
The graduated filter for the sky/highlights will not only affect the sky but also the cliffs and the graduated filter for the cliffs/shadows will not only affect the cliffs but also the sky. To get around this you will have to choose the option of range masking for each graduated filter and select “Luminance.” That gives you a slider called “Luminance Range” (check out the bottom of the picture below). The slider ranges from 100% black on the left to 100% white on the right. By changing the range as in the example below you can choose what luminance values the graduated filter should affect. For the graduated filter, which is supposed to affect the cliffs, you simply exclude the luminance values for the sky pulling the right pointer towards left.
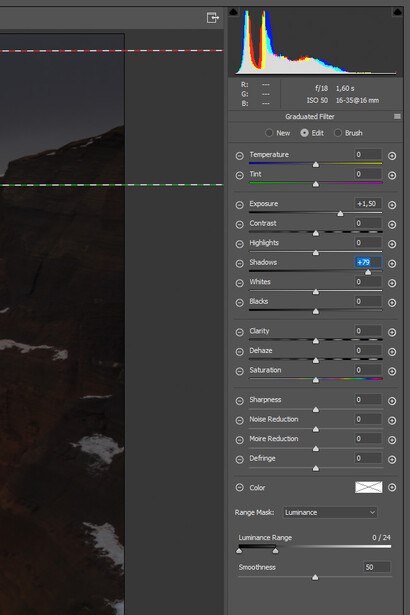
For the graduated filter, which is supposed to only affect the sky/highlights, you simply pull the left pointer towards the right thereby excluding the luminance values for the cliffs/shadows.
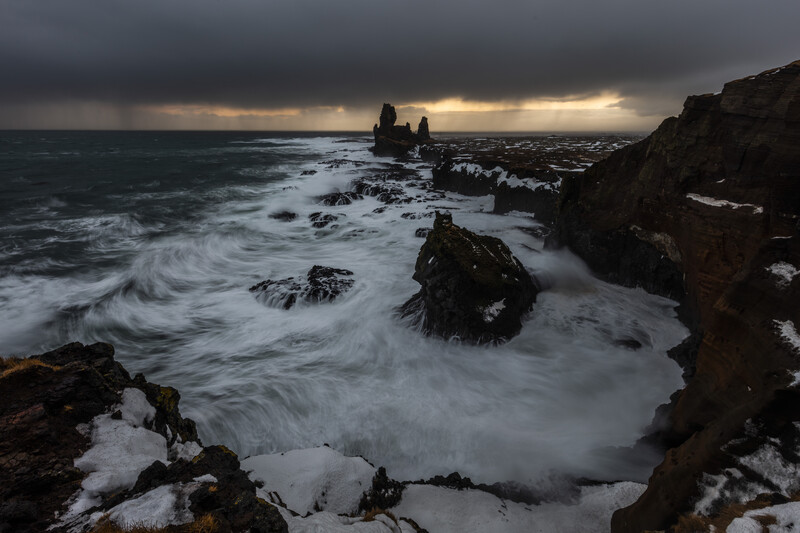
In this way, we have managed to raise the shadows and decrease the highlights based on luminance values, which does not create these unwarranted haloes. Check out the results underneath here with the difference between the “classic edit” and the “fixed edit.” From here you can continue and add both new graduated filters or brushes. Brushes also work with the Luminance Range.
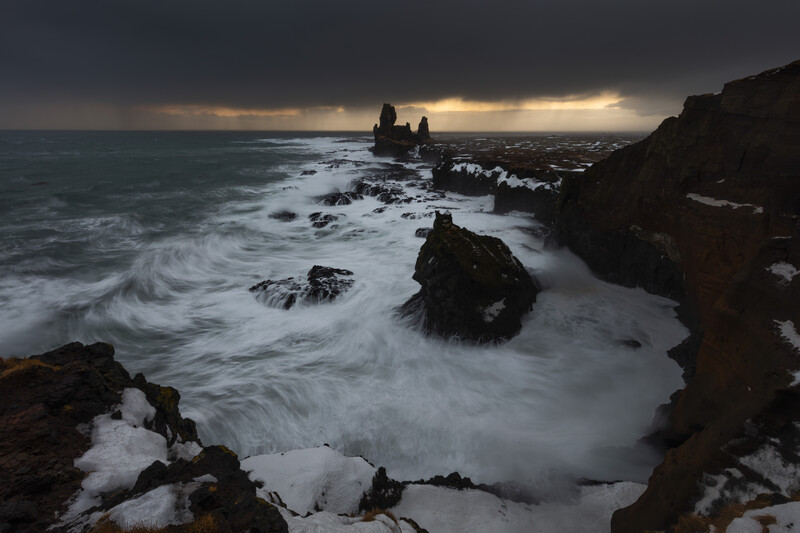

This gives an overall way cleaner edit without distracting elements. I hope this small tip will help you out in your editing.

Join the Fstoppers community for free
-
Post comments and join in the discussions
-
Browse the site ad-free
-
Share your work and get featured in the community
-
Compete in the photo contests for fun and prizes
54 Comments
Great article as always. You are one of the best outside Fstoppers contributors. And your YouTube channel is excellent.
Thank you so much, Felix! :)
Hey Mads, was with you up in Iceland last winter ;) On this article, it's interesting, but in latest LR CC I just did a test. I just moved shadows up and highlights down (no grads or masks) and got almost no halos (very very very slight, almost unnoticeable even zoomed 400%). I then reset the photo and added 2 grads and constrained them both by luminence and color, and did what you suggest above, but got horrendous halos...so I'm not sure why I'm seeing something different than what you see. Thoughts?
well, interesting. I did one with color constraint on the grads, and that one had horrible halos. I did one again with luminence and did exposure (not highlights/shadows) and didn't get halos.
Hi Robert! :) Yes, exactly. Reading your first comment I bet it's because of the "shadows/ highlights" adjustments. Even with the luminance range mask, those sliders don't work.
This is freaken great! I’ve used Lightroom since the first beta and never knew about the luminance masking ability. Thanks!
It's relatively new.
It is indeed relatively new :)
Excellent tip, man. I see this mistake often with portrait photography and it leads to some unpleasant mistakes in the shot.
You're much welcome, Francisco! I don't do portraits anymore but I can imagine halos are even worse in that genre.
Really great tip. Thanks for this!
You're very welcome, Wayne! :)
Nice post! Halos drive me crazy. I consider the Range Mask feature the most important upgrade to Lr in years and years.
I completely agree. It's such an easy way to get around the "algorithms" inability to properly increase shadows and decrease highlights :)
I don't understand the examples with the Before/After sliders. Am I wrong to expect both of the Befores to be the same? They're not; in fact, in this detail shot, the original After and the "How to Fix It" Before are identical.
Let me elaborate. The "befores" are not the same. The first "before" is before any editing. The second "before" is with the first editing as to make a comparison to the "fixed" editing, which is the last "after". Your observation about the first "after" and the second "before" is right as to illustrate the point I hopefully just elaborated.
First "Before": No editing
First "After": Original editing
Second "Before": "Original editing
Second "After": Fixed editing
I hope that illustrates it.
Thanks for the explanation.
If the premise of the article was "Here's how you can do the same edits but without the halos", the examples given didn't illustrate that very well. The first edit made a much more extreme local contrast boost, and the second edit actually reduced the contrast in the sky and the ocean (relative to the original). It's not clear whether the halos were gone in the second edit because of the technique used, or simply because the tonality changes were smaller.
Personally I didn't find the slight haloing in the first edit all that objectionable, but I guess that's a matter of taste. Pre-Version-3 ACR/Lightroom, which had Recovery and Fill sliders instead of Highlights and Shadows, really did make noticeable halos with extreme adjustments, but the current version is very well-behaved in that respect.
I forgot to mention I kept the contrast at 100 for the second edit ;)
I am new to this and am still learning, but in the second set of photos, I think the before looks much more natural. In the after, the sky looks too dark in my opinion and you also lose the detail in the rocks. Just curious if this is intentional or just a side effect of this method?
The examples did come out a tad dark on this white background. The entire photo should have the exposure pushed a little, but that has nothing to do with the technique. This technique allows you to push the shadow details almost as much as you want. The point of using this technique is to not get the halos.
Is this in Capture One?
I've never noticed this happening in capture one, the highlight and shadows sliders seem to be 'smarter' than Lightroom's
I honestly never use CaptureOne but many people recommend it. So might be good to look into :)
The effect is similar in Capture One. Sometimes the decreased highlights and increased shadows impact a larger area so it is not only a halo but worse. But if you have to deal with halos, use (in Photoshop or Affinity Photo) a new layer with blend mode darken and clone the nearby sky to the halo. It's only 5 minutes work.
Do you ever use the colour masking, or do you always mask using the luminance slider?
I haven't applied the color masking yet to any of my photos no.
Thanks you for replying! I began with the colour masking as I had mixed results with the luminance slider so thank you for demonstrating how to use it properly!
In addition to haloing, raising the shadow slider higher than 40-50% like that is an invitation for noise.
Really like the technique. Thanks!
Yes, that is true. It does however often come down to what camera took the photo. The 3rd generation of Sony cameras and the new Nikon D850 are excellent at raising shadows without destroying the photo.
Very few of us are wealthy enough to casually throw away our old gear and buy new every 6 months. We have to shoot with what we have.
The "halo" issue is far less of a problem for most shooters than the noise issue.
Excellent advice! Some time ago I was discussing this issue with a peer. Many youtube videos start always with that "formula". At a first glance it seems nice, but when you look at it those problems come and another, noise on very dark areas.
Thanks for sharing!
You're welcome. As a Youtuber myself I think it's because many Youtubers just copy already established knowledge without being critical towards it. Same thing as when they present composition. They all start with the rule of thirds.
i've literally never had this issue and those are my first 2 adjustments on just about every image i edit :/
That's interesting as it is something that often happens to me. It does depend on how much contrast is in the photo and far you push the sliders though.
I have to agree with this, although I shoot portraits mostly. It's good to know this could happen though, and keep your eyes on that haloing when doing the initial postprocessing steps!
Amazing tip, just tried this out with an image I was having this exact same problem with and it works great!
Very happy to hear that! :D
It's even worse in other applications. Luminar produces ghastly looking halos in the RAW develop module, even though it shouldn't. The tone module is better and comparable to LR. So I avoid the RAW module, even though I think I shouldn't need to.
On1 is impossible, too.
Even C1 V10 produced some extreme results by using the shadow HDR slider, which is the only slider I avoided (mostly).
I find LR to be the best looking by far. Which is why after all the testing I returned to Adobe. "Ghastly" is the word which comes to my mind when thinking about all the other so called "alternatives" out there.
All these tests out there conveniently overlook these issues.
Interesting considered one of the above said he never had the problem in C1. It does have a lot to do with the photo, how much contrast and how far you push the sliders. It is true that it is something they ought to fix.
Great article! I shoot a lot in low light and the halo's have been a PITA in some cases to deal with when adjusting shadows and highlights. MANY THANKS!
You're much welcome, Robert! :)
Personally, I think this is overkill, 99% of my clients can't see the difference from a .500 sensor to a FF Sensor. I don't care for sharpening halos, but this is negligible for me, I'm also not bothered by it in large prints. I'll give it a try, just to experiment with it. Interesting.
Most people can't I completely agree with that. But personally, I always see the halos (and overused graduated neutral density filters). Better to be aware it can be an issue and be able to fix it than to just ignore them ;)
New to F Stoppers. Tonight if the first night in fact. Enjoying the articles, and this one is very helpful. I appreciate very much Mads.
I'm very happy to hear that, Tim. Welcome and thanks a lot :)
Thanks for the tip !
You're welcome, John :)
Very interesting thank you. Subtle and correct adjustments are so important.
https://rickmcevoyphotography.com/
You're welcome, Rick :)
I tried very hard to follow this post, but I cannot make sense of your writing.