Whether you're shooting stills or moving images, lighting is just about everything when it comes down to it. This excellent guide will show you how lighting shapes and sculpts the face, adding dimension and helping you to tell a story, and how you can use it to better your own work.
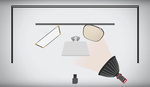
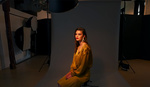
Coming to you from Parker Walbeck, this helpful video focuses on cinematic lighting and how to use it to create more engaging shots. In it, Walbeck focuses mainly on light direction and using it to shape the subject to not only add dimensionality but also to create a sense of drama (or comedy, etc.). Light is what helps our eyes to distinguish depth in a two-dimensional image, and it can be easy to make the mistake of going too flat, which in turn diminishes the unique topography of a person's face. Notice how Walbeck discusses how different facial shapes and topographies may demand different lighting to best accent them or bring out their depth; it's easy to fall into a favorite lighting setup, particularly if you're shooting something like portraits, and while there's nothing wrong with that, always be sure to consider each subject individually and make whatever adjustments might be necessary to bring out the best in them.


Why is this now called Cinematic, I guess it's better than "awesome" or "gritty"?
Why is this called "cinematic" when all the terms and techniques he used date back hundreds of years and have been standard in portraiture since forever? What called "checkerboard" is called "chiaroscuro" and painters were using it hundreds of years ago.
Correct me if I'm wrong, but doesn't chiaroscuro deal with the lighting on the subject, going from dark to light? I don't remember it having anything to do with using opposing tones behind your subject.
Yes, it includes using opposing tones behind the subject. See: Rembrandt's "Self Portrait with Lace Collar"
Looking at it. But that’s not checkerboard. The lighter tones in the background are on the light side of face. Checkerboard would be opposite, wouldn’t it?
No. Light background to dark hair to light face to dark face and darker hair to light background.
K
Really LOVE this video...I know this is picky, but there is only one thing that made this video extremely hard to watch. It was the gum chewing of the model you were using to show the different lighting. It was really distracting and did not want to see the gum in his mouth. Loved the tutorial but something to consider when making videos.