
Traveling with just an ultra wide-angle lens is a powerful way to improve your landscape photography, but my first trip without a telephoto was rife with mistakes.
As a nomadic photographer, I travel with one lens and one carry-on bag (here’s my entire minimalist packing list). For six years I’ve shot landscape photography with Canon’s 24–105mm f/4L lens. I owned a 50mm prime and 70–200mm telephoto, but in time I sold everything thanks to the 24–105mm’s exceptional versatility.
A few weeks ago I took a 15 day landscape photography trip through western Oregon. I’ve always shot with the super flexible 24–105mm, but this time I left it at home and took a new lens: Canon’s 16–35mm f/4L. I had reviewed my portfolio and found that most of my better work was in this focal range, but having nothing above 35mm radically altered my shoot mentality.
After setting my shoot goals for the trip, I left with the expectation of snapping two keeper shots a day. I had no idea just how challenging it would be — at best, I got one keeper a day. Even though I was shooting the same genre, the ultra-wide proved to be limiting and incredibly challenging. However, the constraints forced me to take fewer, but better shots.
Here are eight lessons I learned shooting landscapes on a dedicated ultra-wide lens.
1. Take off the Polarizing Filter
My B+W circular polarizing filter (CPL) has been on the front of my lens for six years. But because of the wide field of view, a CPL can only polarize a sliver of the image at a time, which creates this post production mess:
Fixing that dark spot of sky in post is incredibly time consuming, so just take the polarizing filter off or turn it 90 degrees. Sadly, this means I couldn’t use the polarizer to rescue midday skies when shooting on the ultra-wide lens.
So what does this mean for the #1 filter in landscape photography? I never thought I’d say this, but despite my love for the polarizer, my only reason to use it is to protect the lens. As I shoot at better times of day anyway, the intended uses — darkening the sky and blocking out water reflections — become irrelevant. However, there’s one remaining use: cutting out reflections from small bodies of water. Since the effect is less noticeable than a polarized sky, it’s possible to get away with polarizing a sliver of the water, or the body of water may be small enough to be entirely polarized.
2. Don’t Shoot Panoramas
Panoramas are one of my favorite formats for print, but ultra-wide panos are hard to work with because they exhibit extreme fisheye distortion. So as a rule, I’ve stopped shooting panos with the 16–35mm.
However, I discovered an exception on the trip: if the image is full of curves instead of straight lines, the distortion can work to your advantage! In particular, this pano of Crater Lake looks natural because the crater is already elliptical, and the distortion just emphasizes the roundness.
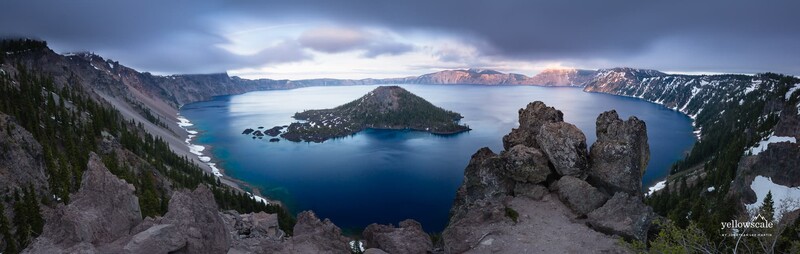
So if you decide to shoot an ultra-wide pano, look for compositions with curves and without horizontal lines. Keep in mind that panos will be severely cropped during stitching, so shoot wider than you expect to keep from cutting off your foreground.
3. Don’t Slack off on Composition
Good composition is important for any image, but when shooting on an ultra-wide lens, there is no way to mitigate a poor composition by zooming. If your vantage point doesn’t have a clear foreground, mid-ground, and background, you have to move on to a different angle without hesitation.
Although I knew this would be the case before the trip, experiencing it was completely different from what I imagined. From habit, I kept reaching for a nonexistent telephoto lens to shoot panos and zoom in on textures in the mountains. It’s a severe handicap, but I learned more about intentional composition on this short trip than I have on much longer ones!
4. You’re Never Close Enough
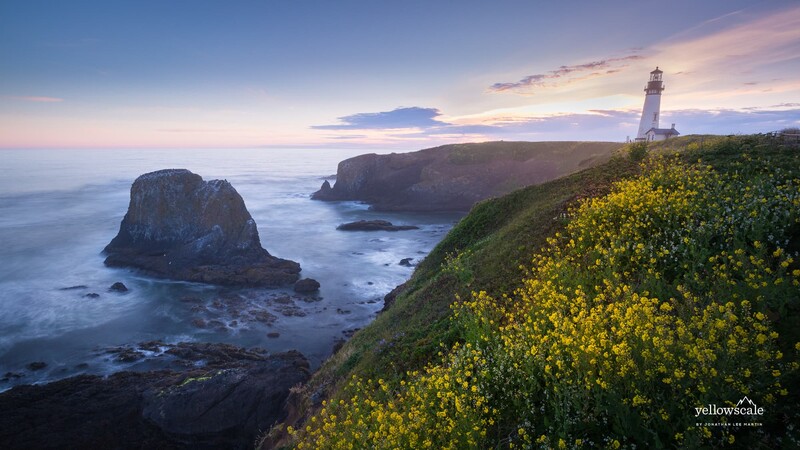
Part of the challenge to composing shots with an ultra-wide is that you’re rarely close enough to the subject. Mountains, lighthouses, and buildings become tiny at 16mm, and zooming to 35mm won’t always address the size discrepancy between foreground and background.
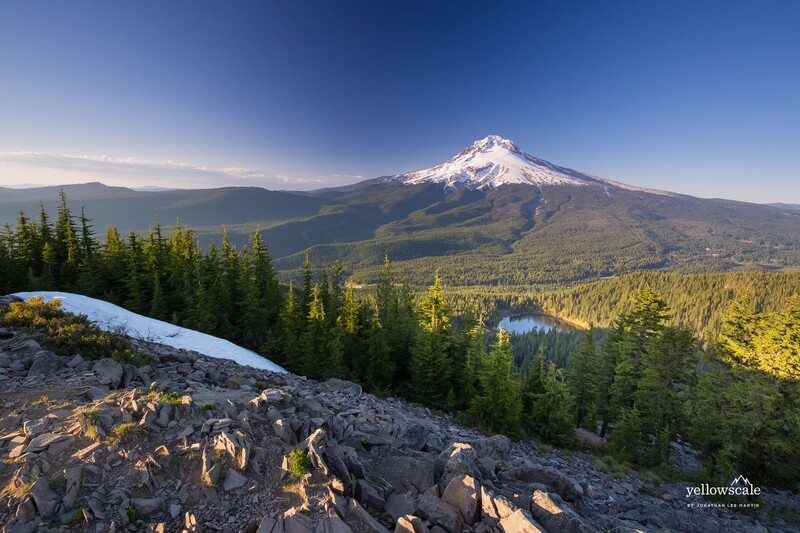
So if the subject doesn’t feel big in person, move closer — even when it means abandoning a good vantage point. To communicate the magnitude of the subject, it needs to overwhelm you in person before it can make an impact in camera. For this 16mm shot of Mt. Bachelor, it meant trekking through some questionable wetlands to strike a compelling balance between the streams and mountain.
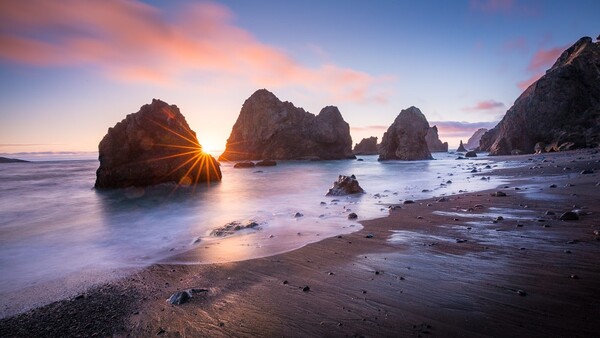
5. Enjoy the Sunbursts After Thorough Cleaning
High-end lenses often have a high number of diaphragm blades that allow you to create striking sunbursts. The 16–35mm has 9 rounded diaphragm blades, so you’ll get a total of 18 gorgeous spikes around point light sources. Since wide-angle shots typically need a large depth of field anyway, you’ll get sunbursts for free when shooting with a small aperture like f/14.
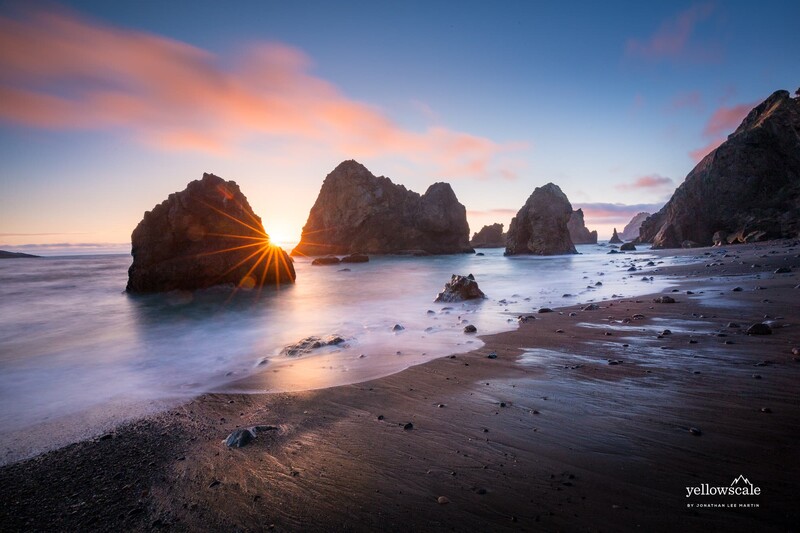
But take care: anything on your glass will show. I took this shot of the Oregon coast not long after cleaning my lens: notice the subtle bokeh around the sunburst? Those are from the salt spray! I couldn’t even see it on my neutral density filter, but at f/18 the camera certainly did.
So plan to give your lens and filter(s) a thorough cleaning immediately before incorporating sunbursts into your landscape. Or don’t go to the beach.
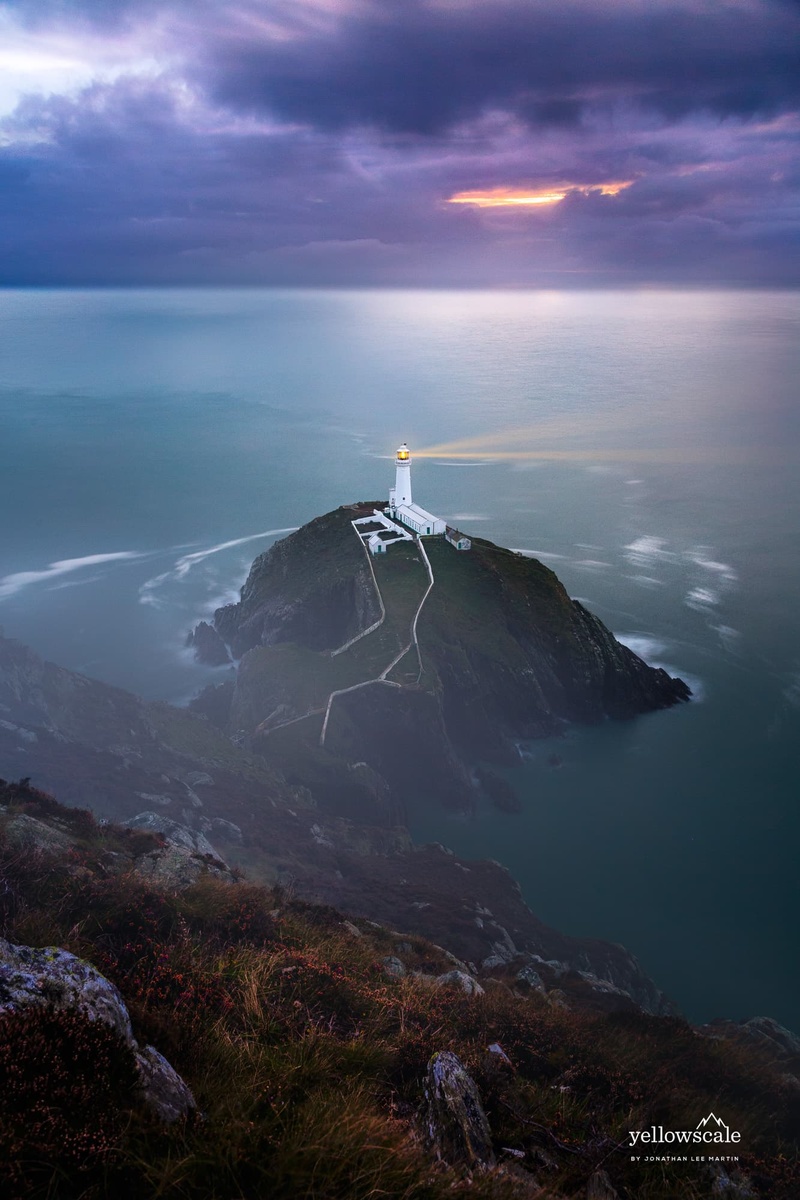
6. Go Wider Than You Want
The ultra-wide look doesn’t always flatter the subject, and sometimes you have to fix it in post. So leave yourself margin for cropping and correcting distortions by shooting wider.
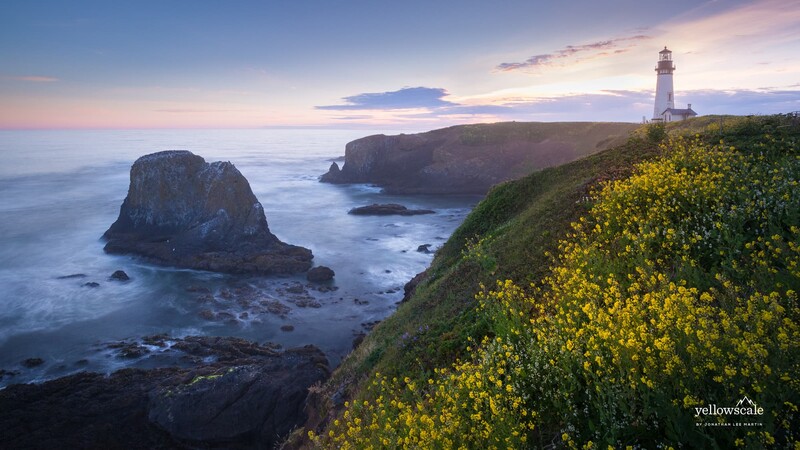
This lighthouse was far enough to the side of the frame that the distortion caused it to lean noticeably. I usually wouldn’t mind, but since it’s a man-made structure and the subject of the image, it was important for it to look upright. Thankfully, I shot a little wider than I wanted to make allowance for correcting the distortion.
7. Shoot More Verticals
An ultra-wide lens emphasizes proportions to the extreme. That can be problematic for distant backgrounds, but it can flatter vertical shots. So if you don’t want to emphasize the scene’s width, use the ultra-wide to exaggerate the feeling of height and exhaustion. As a bonus, the exaggerated proportions will help lead the viewer through the image.
8. Wait for the Light
An ultra-wide tends to cover more lighting conditions and angles in one frame, so it takes longer to get everything properly exposed. Since you can’t zoom to isolate an area or use a polarizer to darken the midday sky, the only choice is to wait for the right light between golden hour and astronomical twilight. I should have been diligent on previous trips anyway, but with an ultra-wide I didn’t even have the option to be impatient or lazy.
Have You Ever Traveled With Only One Lens?
As I packed for my trek through Oregon, I strongly considered bringing the 24–105mm as a backup in case the 16–35mm didn’t work out. But like Cortés burning his ships, having one lens forced me to exercise some weak skill-sets — and wade through some marshes — to get the shot. The fastest way to improve your composition instincts may be to shoot with an ultra-wide and no telephoto backup.
What lessons have you learned from shooting on an ultra-wide angle lens? Do you travel with it as your sole lens? Share your experience in the comments!

Join the Fstoppers community for free
-
Post comments and join in the discussions
-
Browse the site ad-free
-
Share your work and get featured in the community
-
Compete in the photo contests for fun and prizes
54 Comments
Yes, that's correct, and it turns out it's almost never an issue. Sometimes I'll need to get higher and as such purposely capture keystoning that requires PP correction. Usually it's to get up a wee bit higher to show kitchen counters, and in extreme cases, quite a bit higher to show a water view filling more of the window. But to be honest, even with verticals corrected, it looks a bit unnatural when I have to do that so I limit it as much as I can. Here's a shot taken this week with no vertical correction, and it feels very natural in my view.
That makes sense, looks like it worked out well!
I am in a dilemma. I have a Canon TS-E 17mm lens. I bought it for it's Ultra Wide angle (plus tilt-shift). I am also building up X-T3 lens collection (so far 3 prime and no soom). My dilemma is whether I should sell off TS-E 17mm and go for a zoom lens "Fujinon Zoom Lens XF50-140mm F2.8 R LM OIS WR" or I should keep the TS-E (I have used TS-E, but not for it's T/S functionality).
Thanks to mirrorless push, the DSLRs might go out of use in another 5 years or so. I own a Canon 5D IV and Fujifilm X-T3. These days I am leaning more towards X-T3 than the beast 5D IV.
Any advise?
I’ve been using the Laowa 12mm 2.8 for about a year now and I really enjoy the wide angle and clarity of glass that you get with it. It’s one of my favorite primes.