
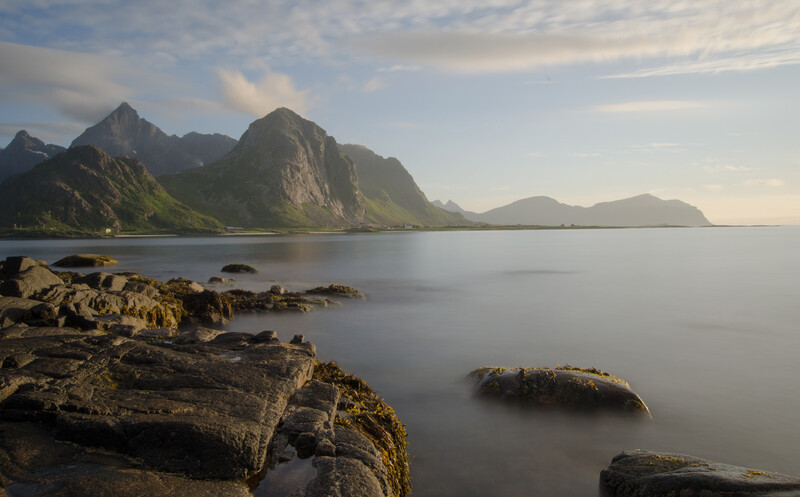
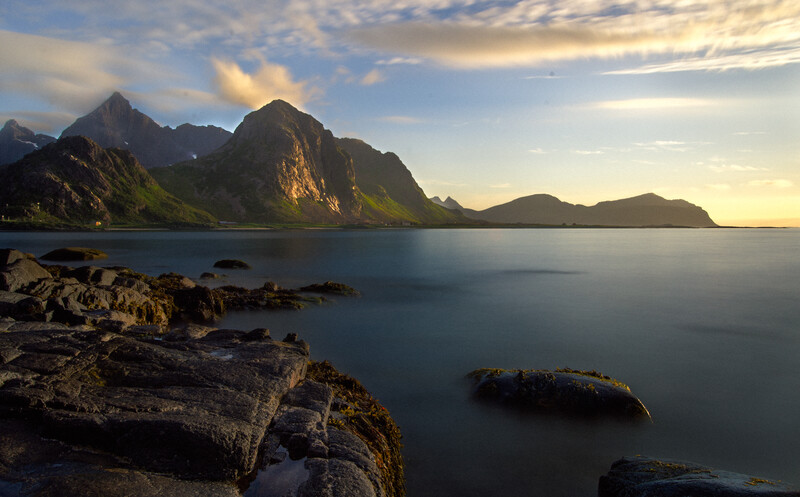
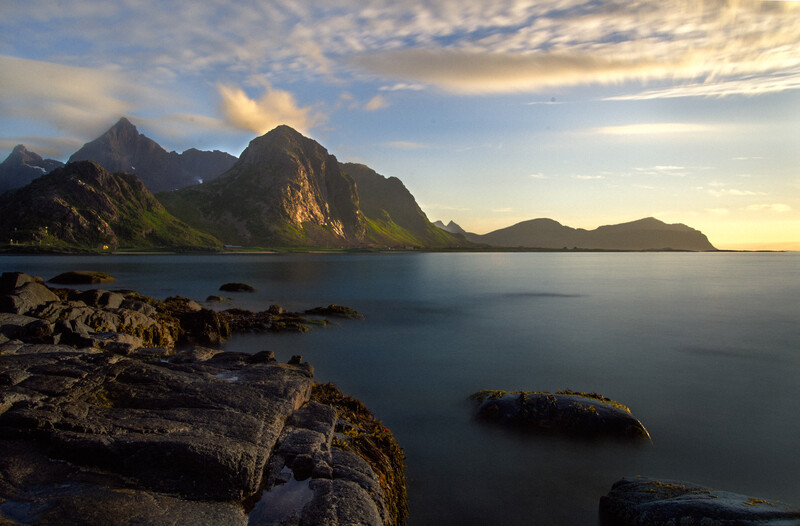
This week's winning image comes from Photographer Daniel Nordholm. It's a stunning landscape image that he captured in Lofoten, a beautiful archipelago in Norway. I was very excited to break from my norm of beauty and fashion retouching to tackle and share a landscape retouch. Many of the techniques and the workflow of a landscape can be very different from portrait retouching, while the philosophy can be quite the same. In this article, you will see the full retouch of the image in the short two-minute video. In all, the retouch took about an hour. I will also share some specific techniques for landscape editing that you can use in your images as well.
Submission Guidelines
I want to quickly remind you all that ANYONE can submit their image in the comments below for a chance to get their image retouched by me for free and to be featured in next week's "Retouching Monday," Here are some of the submission guidelines:
• Any genre of image is acceptable: Fashion, Beauty, Landscape, Art, Portrait, Etc.
• Post your image in the comments below and tell me a little bit about it.
• Submit by midnight on Wednesday of this week.
• If your image is not selected, you MAY submit it again.
• Check back on Fstoppers to see if you were selected on Thursday and Friday.
• It helps if you leave an email.
I will leave a comment with my email address on your image on Fstoppers if you are selected, so you can email the raw file. If you are able to leave your email address in the comments, please do, but if no,t please check back on the article to see if you have been selected.
Landscape Retouching
The philosophy of a landscape retouch mirrors that of a beauty or portrait image in that you start by giving attention to each specific area. Each section of the image and each element will require their very own retouching to get them where they need to be. So, just like a model's hair, cheek, forehead, jawline, etc. will need individual editing, the sections of this image: the water, sky, mountain, and foreground rocks need their own individual attention and editing.
It's also important to keep moving. Edit the area, move to the next, and then come back to the first area. By continuing to move and not getting stuck in one area, you are more likely to not go overboard on one particular section and have it look very different from the rest.
You will notice in the video that I start with adjusting exposure and luminance in each section. But also, a lot of time is spent with color grading each element separately before doing global adjustments.
A Landscape Retouching Tip
Here is a Photoshop technique that I like to use when retouching landscapes that may be very different from other genres of retouching. The process centers around the "Apply Image" function in Photoshop.
Apply Image can be found by going to the "Image" menu and selecting "Apply Image." Apply Image will create a copy of the image you have on-screen, not too different from creating a stamp visible layer. The magic of Apply Image comes when you apply it to a mask. A mask will only accept grayscale values, so the result is a grayscale version of your image. When this is applied to an adjustment like a Curves layer, it becomes a very powerful tool.
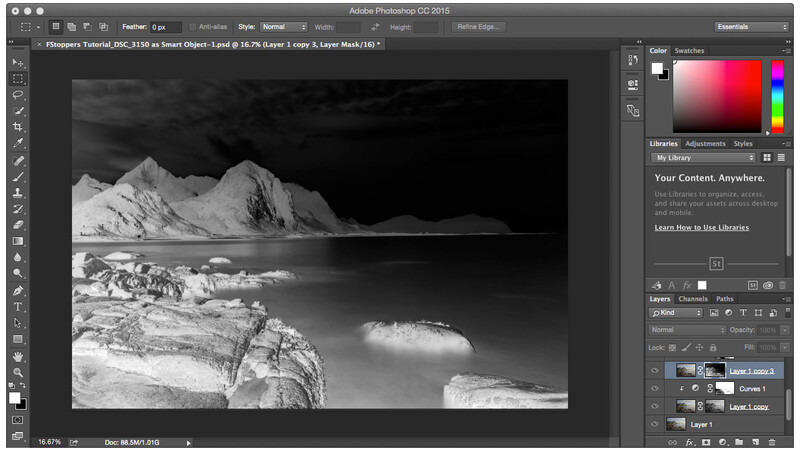
So, using Apply Image in normal mode will create a mask the reveals the lights and masks out the darks while giving a gradation that will also affect midtones accordingly. You can also add a second Curves adjustment while using Apply Image, but while selecting the "Invert" option so that the darks are white on the mask, meaning they will get affected by the mask, while the lighter areas are masked out.
Why is this so useful? Well, you can now edit the shadow areas of your image and the highlight areas completely independently of each other. Landscape images present a particular challenge because the strength of the lighter areas can greatly vary in the image and the density of shadows from one area to another can also vary greatly.
What's Next?
There's really only one thing in my opinion that requires attention and that is the small elements on the land section of the horizon lines. The small houses and man-made elements can be easily removed with fundamental retouching tools like the healing brush and clone stamp.
The other thing to consider would be the color toning. I consider color toning to be adding a color adjustment globally to my image and color grading to be creating selective color and value adjustments to change the appearance of the image. At this point I would leave the color grading as is, but adjusting the color toning is something that can be done to taste. For instance, adding more magenta to the highlights or green to the midtones could change the general color aesthetic of the image. You could spend hours just experimenting with color and with multiple beautiful results; it all depends on personal taste.

Join the Fstoppers community for free
-
Post comments and join in the discussions
-
Browse the site ad-free
-
Share your work and get featured in the community
-
Compete in the photo contests for fun and prizes
28 Comments
One of my favorite images taken in Myrtle Beach under the pier. Taken with Sony A6000 and kit lens.
Thank you so much for your retouch editorial Lance, I really appreciated it! And I love the outcome, even though it is a bit different from how my own retouch turned out (i tweaked the pic a bit more ;)... ) You can see my version here in 1x1 (https://instagram.com/p/6nE1nHpIJc/?taken-by=pho2uppsala)
Below is a three frame panorama shot using manual exposure on a Canon A-1 with a Canon FD 28mm f2.8 and Kodak Ektar 100 film.
I thought about giving you guys the easier one at a different location. But I had difficulty using Corel Paint Shop Pro to merge the three frames. There was just too much dynamics going on with the clouds and the waves.
https://www.flickr.com/photos/ralphhightower/8436106459/in/album-721576…
If you want easy, there's this:
https://www.flickr.com/photos/ralphhightower/8436105383/in/album-721576…
I took this picture in Sarasota, FL a few days ago. This is my first attempt at taking beach sunset pictures. We live in Montgomery, AL. I've edited the picture to the best of my ability as an amateur, but I'd like to see what can be done to make it better! Thanks for the opportunity to participate! BamaBob@elmore.rr.com
A photograph taken this weekend
Took this of Yosemite Valley last weekend with a Nikon d819 iso 100 70mm f/11 1/8 sec
can you email me this RAW files tonight or tomorrow morning? me@lancenicoll.com
Taken with Nikon D3200 and 55-200 lens. Taken on a recent trip to Lake Lure, NC.
I took this last week, I normally photograph weddings but I tried my hand in a mock up studio I made in a hair salon, all the models were the student’s friends or family, I shot 27 different looks and models over three days all had no experience and fear of the camera! :D
The sensor dust spot has not been removed!
Yup, noticed that as well! (There are actually more than one unfortunately, but I think I got them all removed in my own retouch)
Other than that man, amazing result.
Deleted
I love this photo, I took it in Bariloche, Argentina during my vacations. It was taken with my Nikon D5200 and kit lenses. This photo is already retouched, but I want to see a different approach. e-mail: gd.nino91@gmail.com
Photo taken in the Azores, Portugal. Did a small photo shoot with my girlfriend in one of the tidal pools. Sun wasn't really out so it was hard to get the right exposure underwater, while also trying to not overexpose the skies. Thanks for the opportunity to participate! e-mail is daniel@danielvandphoto.com
I took the below image a year ago. While the car is amazing in person the color is a light beige and I felt was extremely hard to shoot. Especially when the owner could on meet to shoot in the middle of the day so the sun was directly overhead. This image was taken with a Canon 60D with a canon niffty fifty fixed lens. This image has had some color correction done in Adobe Camera Raw through photoshop. Other than that no other retouching has been done. Thank you for considering my photo for the Monday Retouch. Email is quentin@ArtDirectorAndHotRodder.com *EDITED: To add Straight Out of Camera jpeg*
Hi, I really liked watching the retouch. I am having trouble learning photoshop, I do all my editing in lightroom 6. I took the image below in McCall, Idaho at my nieces wedding. The first one is processed second is straight from the camera. It's a 300 second exposure and there are some hot pixels in the shadow area that I can't fix. The lonely tree is one of my favourite types of pictures. I love the mood that can be created by that one single tree. This was also one of the most impressive sunsets I have seen and the colours were closer to the processed version then the unprocessed one. Would love to see what you can do with this one.
Cheers,
jaycrockett@mac.com
This was shot recently in Venice, Italy. I tend too use Lightroom and Nic plugins but have more trouble with washed out skies and adding pop to day time images. thank you for considering. swmbkrun99@gmail.com
RogerBatchelorPhotography.com
This is from a trip in Santorini I just took with Canon 5d Markiii 24mm. emmielh@gmail.com
vista de la ciudad Iquique en Chile hardy.aly.arenas@gmail.com
Hey Lance - I submitted this image last week so why not try again! I took this photo of my daughter at Sherkston Shores on Lake Erie with a Nikon D610, 50mm f/2.2, no flash or reflector (obviously). I tried to maintain all of the colours of the sunset in the background but it came at the price of underexposing the subject and I've been struggling with finding the best approach to bring that back. Below is the unretouched version - many thanks! My email is nathan.nash1@gmail.com
Nubble Light is one of the most photographed lighthouses in the United States and it is located in York Maine. This image was created using the new Canon 5Ds with a Canon 24-70mm L USM F.2.8 lens. The settings where six minute exposure at F/9 ISO 100 taken at 8:08 P.M. This image has not been fully processed and I would love to see what you would do with this image using your post processing procedures.
Wood for the trees. Scotland
www.ronniedayphotography.com
Taken with Canon 60D and Sigma 18-35mm
I like version BEFORE)
you have a tonal perspective, but the contrast and texture of the background has been lost. Why do you work so long with the contrast of the background at the beginning?
And so I want to remove the dust in the sky in the final version)))
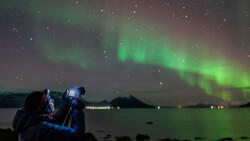
This is a shot that I took a couple of weeks ago near Banff, Alberta. I had been shooting Aurora shows all night and turned around (finally) to see this scene behind me! Canon 5D2, Sigma 35mm 1.4.
Here's my submission for retouching. I've messed around with it a ton, but I'd be interested to see what you come up with. I do shoot RAW so that's an option if you need it.