
One of the most commonly heard pieces of advice within creative circles certainly seems to be the need to find your “style” and market that. What is your style? How to find it? These questions we’ve been told should plague us and drive us get inside our heads if we let them and begin to dictate what we do and how we do it. However, if you take a look at the popular sharing platforms, you will see a few patterns emerging. Instagram, Facebook, and even Fstoppers have a certain style of imagery that rises above the rest as you look at a volume. It can be tempting to emulate a popular style and fit in with the crowd, but it may not be ultimately satisfying to the inner artist. So how exactly do we find our own style?
That would be the question, wouldn't it? Everyone has an answer for you and a technique to help you out. The reality is, it comes from you. If it doesn't, it’s most certainly not your style. This isn’t to say that you can’t pull from influences and emulate others in finding that style, but the final result must come from a surrender you make to your own preferences. Today, I’m going to walk you through one way to find out just what they are; one way to begin searching for your style. Remember I said that everyone has a technique for you? This is one of mine.
Preparation
You won’t need much for this. Start with a camera and a lens. The gear isn’t the point, so pick what you like. If you plan to do this on film, toss a box of the same film in your bag so you won’t run out or begin considering which type of film you’re going to use. If you’re shooting digital, clear your card and tape over your LCD. This isn’t about being able to review your images or limit your exposures, I want you to focus on the world in front of you. You may never use any of these pictures. That isn’t the point. The point is that you take them and look at them when you’re done.
What to Shoot
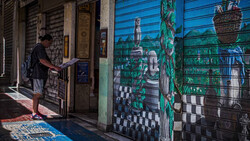
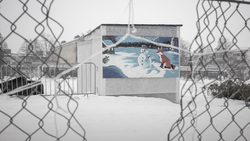
This is where it gets tricky. This shouldn't be anything you set up. It should come spontaneously from the heart. Even if you’re a studio shooter, we’re headed outside today. We’re going to a place you’ve never been filled with things you don’t know. This is the key to this technique. You’re not trying to shoot things you’ve shot before in a way you’ve shot before. You’re just trying to make pictures of the things that catch your eye.
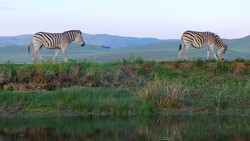
You’ll want to arrive at your chosen location, take out your camera and start walking. Limit yourself to only being still for long enough to get a steady shot (if that’s what you’re shooting), but otherwise, you’ll want to keep moving. The idea here is to see as many things as you can and quickly make frames of them without your conscious thoughts getting in the way. Think of it as being a tourist: “Oh, that’s pretty! Click!” This is what we’re aiming for. It could be light, a character in the scene, a single boat out in the harbor, or a particularly nice flower. The subject doesn't matter, as long as you don’t spend time thinking about it before you press the shutter.
Optional Additions
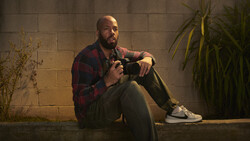
You can also add a couple of spices to the mix to “warm you up,” as well. Although these things can change the way you approach your shooting, and thus the results, they can also relax you and prepare you to respond to your own feelings.
I like to have a glass of wine before I go out (just one, we’d hate to get sloppy!). It helps me to cut down my inhibitions and listen to myself more closely. My linguistics professor used to encourage us to have a glass of wine before we began speaking a foreign language as it would take the edge off our reservations and allow us to explore and make mistakes. You could also put on your favorite music or have a nice meal before heading out. Do whatever it takes to get you to a relaxed state of mind.
After the Shoot
Finish up the shoot whenever it suits you. If you feel like you’re ready to sit down and relax for the day, stop there. There’s no sense in forcing this exercise. Give yourself a bit of time between shooting and reviewing these images. You don’t need to rush this.
For this step, I like to print what I shot. If you’re comfortable looking at a screen, that’s fine too. You just don’t want anything getting between you and studying what you shot. You’re looking to analyze what you shot at why.
First of all, spread the images out in front of you, or bring them up in the grid view that your software offers. Can you see any patterns, anything that stands out overall? Usually, I notice that I will shoot in a specific way each day I do this. Sometimes I’ll be shooting textures, sometimes light, sometimes moments. I gravitate towards a certain pattern each time. See if you can find something similar, then try to figure out why you’re attracted to these things.
Next, take a look at each of the individual images. Don’t worry about technical details like focus and exposure here. That’s not what you’re looking for. Try to get yourself back to the moment you shot it. Why did you press the shutter? Was it a moment of humor that you saw? Was it the way the light was bouncing around the scene? After you have looked at all the images, look again for patterns. This will start to give you an idea of what you are drawn to.
Finally, I like to make a list of the elements I find. This helps me to remember what I discovered, but also gives me a something I can compare to my previous work. The process of reflection is essential here if you hope to learn from the images you shot. The care is to be taken after the fact, rather than during the shoot. This way you can free yourself while shooting but still learn.
In Conclusion
This is an exercise that can be used at any stage. I like to do it every couple of months just to get a handle on how my sensibilities are changing. Give it a try and see if it helps you. Feel free to share your thoughts here in the comments.
2 Comments
Covering the back of the LCD works. I turned off the image review on my 5D III. I don't chimp my photos after I've taken a shot. I may review images later, but not right afterwards.
I must say this is a great technique! Planning to take a walk soon!