
If there's one thing that triggers me, it's a crooked photograph. I'm not talking about a dutch angle or an intentional angled composition; I'm talking about merely not straightening your photograph.
You've spent all that time going out to a location, waiting for the right moment, carefully choosing your settings, and taking your photograph. Next, you've spent quite a bit of time editing it. You've adjusted, tweaked, and crafted the tones carefully to best present your vision for this composition. You then post your photo online, and the very first thing I think when I see it is "aaaaand it's crooked."


You made no effort to straighten it. You either didn't want to lose resolution (that went away years ago) or maybe you just forgot. Most people I ask about it say they didn't notice it was crooked. The human brain is partially to blame; It "fixes" stuff like that as we look at things. However, If you're looking to perfect your craft, straighten your images!
The Lightroom Crop Tool
The Lightroom crop tool is the first adjustment tool in the Lightroom develop panel. The keyboard shortcut is the letter R. I work mostly from the top down in the adjustment panel, so the first thing I do is straighten my photo and crop out distractions along the sides. I'll usually leave it in its original image ratio while I make my initial edit, then create different crops later if I need other aspect ratios.
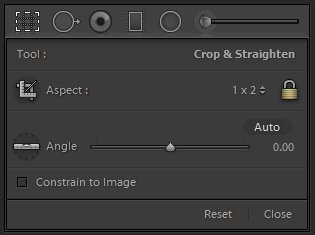
The Lightroom Crop Panel
There are four methods of cropping with the crop tool. Which way you use will depend on the image and your personal preference. The critical factor is that you do it. I know you leveled the camera while in the field. However, camera and bubble levels aren't very accurate. Tripods also settle into the sand and move. No matter how careful you are to take your image level, it can be off.
The Auto Button
The auto button works just as you would expect. Lightroom tries to detect either horizontal or vertical straightening, depending on the lines in the photo. I've found that it works great with some images, but others, it doesn't, so I only use it with simple compositions. If you use it and it doesn't work, you simply resort to using one of the other methods, so it's not like it wastes time.
The Straighten Tool
I use the straighten tool most often. Click the tool that looks like a level, then simply draw a line with the mouse along the horizon or other portion you wish to be level, and the straightening angle will be set for you. This works for horizontal or vertical straightening. You can even fine-tune it with the angle setting afterward. Here's a quick tip: Holding down the control key at any time while in the crop mode will instantly enter the straighten tool mode. Simply hold the control key down and draw your level.
The Angle Adjustment
The angle adjustment slider can be used to change the image's angle, but it is often used to fine-tune straightening after using one of the other tools. You can either slide the adjustment trackbar or type in an adjustment angle. If you find the trackbar adjustment a little too touchy, hold down the control key before clicking the trackbar, and it will move more slowly.
The Mouse
Clicking and dragging outside of the crop area will rotate the image. I occasionally use this method when there is no definite horizontal or vertical line in the photo, but I want to rotate it until it looks good. A grid will appear over the image while rotating it with the mouse to aid in lining things up.
Other Tips and Tricks
Pressing the "O" key while your mouse is over the image will cycle through the crop overlays to aid in your composition. Shift+O will cycle through the various crop overlay orientations. Depending on the image, certain crop overlays can not only help with a pleasing composition but also show parts of the image that may not be straight or level.
A feature that I didn't even know existed until recently is using the Alt key (option key on the Mac) when using the straightening tool. This will show a grid that can help with the alignment of your image, similar to what happens when you use the mouse to rotate the image.

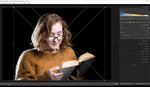
Transform Panel
The Transform panel is another tool that is quite useful when working with certain images. I usually use it to correct distortion when using wide angle lenses or when I'm taking a close-up of a product that I want to have perfectly horizontal and vertical sides.
The Lightroom Transform Panel
One thing to be aware of when using the Transform panel is that you may lose a fair amount of your image. Knowing this can be useful when taking a photograph so you can shoot wide in anticipation of this. Be aware, though, that if you have people or things that need to be a particular shape, this tool may distort that.

Before transforming, notice how the lighthouses tilt inward.
The crop tool after transforming; notice how much the image needs to be cropped.
Conclusion
We should always strive to perfect our images. I often ask other photographers: "what should I have done differently?" I'm always looking to improve. Sometimes, I take their advice, and sometimes, I don't. One must always be open to constructive criticism.


I totally agree with your sentiments here, Mike. People seem to differ in their sensitivity to this, though. Certainly with an edge-to-edge sea horizon, half a degree is obvious for me. My software corrects to 0.1 degree, and I sometimes wish I had 0.05!
Another way to reduce localised convergence issues, as with your lighthouses above, is to bend them e.g. using the Warp function in PS (I think that's the name; Liquify in my ACDSee). Obviously you need to be careful not to end up with wobbly lighthouses, but it avoids the cropping. I've found it useful for trees and rows of power poles, fence posts and the like in landscapes.
Looks as if you & I are the only ones who give a s%&# about this issues after all, Mike! But WE know we're right. ;-)