When traveling to a restaurant, you never know what type of lighting environment you will find yourself in. There could be a large window with beautiful soft, natural light, or it could be dark like a cave with only overhead fluorescent lights. If you want to add restaurants to your portfolio, reading the light in a room is a great habit to get into. Not sure what I mean by reading the light? Let me show you what I found on a stop for some Texas barbecue.
Whether you are dining for pleasure, or on assignment for a client, you will need to find the best available light to create a mouthwatering food shot. If you are shooting during the day, the easiest set-ups will involve natural light. If you are shooting at night or in a restaurant with no natural light, you will have to use an artificial light source. For the purposes of this article, I'm shooting during the day and won't be discussing using artificial light. Here is an article I wrote a few months ago that discusses shooting at a restaurant with artificial light.
On a recent work trip to Texas, I had a few days off and went on a search for great Texas barbecue. I wanted to enjoy the barbecue, but at the same time have a picture to remind me of the meal. When I arrived at the restaurant, I only had a Canon EOS-M with a 18-55 f/3.5 lens and an iPhone. You don't have to be a professional or have professional grade gear to get a great shot of your food at a restaurant. The key is finding the right light. The restaurant I was dining at had two dining rooms. Here is a look at the first room.
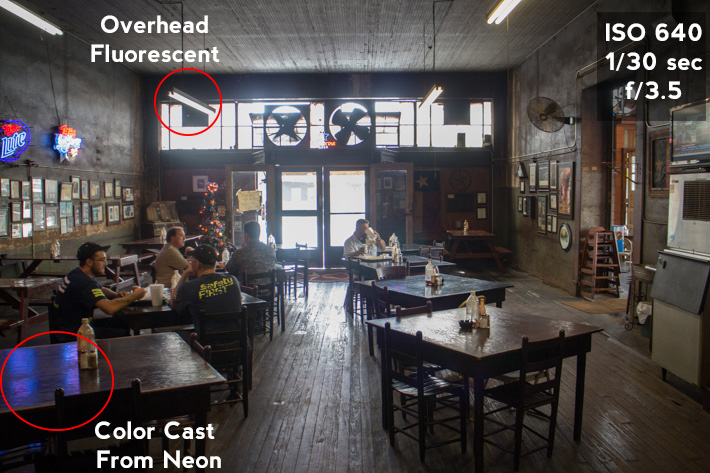
It may be hard to tell from the picture, but this room was dark. If you look at the exposure information, you can see that even with my aperture wide open, I was only able to shoot at 1/30 second. Without a tripod, it would be tough to get a steady shot. You can see on the table that there are some pretty dramatic color shifts from the neon signs on the wall. The overhead fluorescent lighting could also cause some problems with the color of the image. If this was the only room to dine in, I would try and sit as close to the back wall as I could. If I was shooting this for a client, this is the type of environment where you want to have an artificial lighting option. Fortunately, this wasn't the only dining room option.

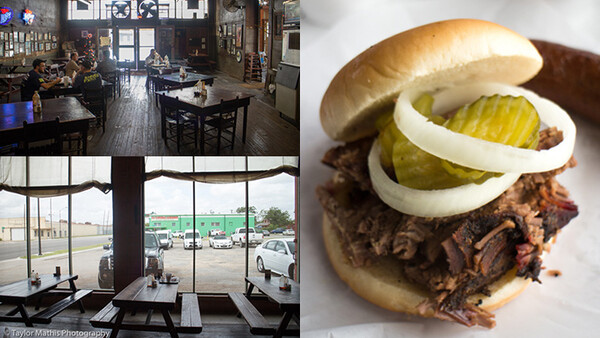
Above are two angles from the second dining room. From the exposure information, you can see that this room is considerably brighter than the dining room one. The large screen windows on the side filled the room with natural light. This is the kind of light that I wish every restaurant had! It has both a soft quality and a direction to it that make it perfect for shooting food without any additional artificial lighting. Here is what I shot with my Canon-M.

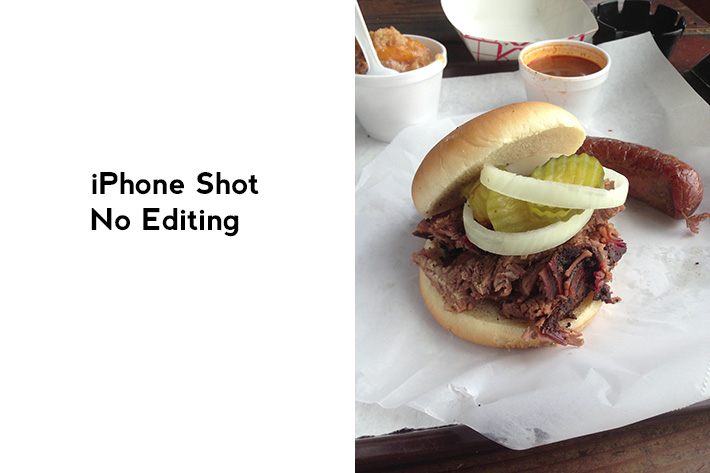
Here is a shot I took with just an iPhone and no editing.
Fortunately, this restaurant had great light in the second room. When you walk into a restaurant look around and see what table would work best for a picture. You don't have to sit down and take a picture right then, but it is great practice to ask yourself, "If I was shooting for a client, where would the best spot be?" A few things to keep in mind. Are there any lighting fixtures, signs, or other light sources that would cause color casts in the image? Is there a large window or opening that would provide for natural light? Even if your trip is a nighttime visit, you could take note of any large windows that would work for a daytime shoot. If the restaurant has no natural light options, then think about what you would bring for an artificial light solution. Next time you are in a restaurant, take a minute to look for the best available light. It is an easy way to improve your photography without shooting!
For more food photography tutorials check out Issues 1-8 of photographing FOOD.
Join the Fstoppers community for free
-
Post comments and join in the discussions
-
Browse the site ad-free
-
Share your work and get featured in the community
-
Compete in the photo contests for fun and prizes
10 Comments
With a tripod, why not take the ISO all the way down to 100 and crank up (down) the shutter speed?
Tony, you're right. But if you read the article you'll find out that he was more or less there by accident and only had a EOS-M with him.
I don't understand why ISO640 is arbitrarily used here and 1/30 of a second is an acceptable starting point. It's far more logical to start at ISO1000 or ISO1250 so a shutter speed that is above 1/60 can be used. Furthermore, why is the room being measured and not the plate of food on the table ?
As long as the subject was stationary I'd probably not go above ISO 800 on an EOS-M to avoid shadow noise, but you're right I don't know why you wouldn't go at least that high.
Great article. I like the process of thought; that if you want to take photo of a meal you don't sit down at a table and start thinking about lighting, you start thinking about lighting and then sit down at the *right* table.
For those arguing the camera settings for the room shots... I think you're missing the point. Taylor is just using them to show the layout of the rooms, the different light sources and the quality of that light.
I think it's pretty obvious that you want to sit where the light is best. Big window or dark room...no rocket science going on there. I don't think anyone with common sense needs to be told to sit in the bright room near the window if that's an option. It's pretty tough to try and be an authority on photography when you don't have a grasp on the fundamentals though, and what Taylor has proved here is that he is starting his calculations from a flawed perspective. This article is a missed opportunity to approach the subject with a real sense of authority. All it did was erode Taylor's credibility.
For beginners and hobbyists these are good fundamentals.
The problem is that this article is the equivalent to a soda or candy bar - empty calories with no nutritional value. Beginners and hobbyists already know to sit in the bright room near the window if possible.
Let's also discuss why the dynamic range is better on an unedited iPhone photo. The shadow area behind the pickles and onions on the left side is awful on the EOS-M photo. Why couldn't Taylor pick up the empty fry container and bounce some light into the shadow area ? Or is this just a case of bad editing, which is another issue entirely.
You seem aggrieved by the content of this article. Do you feel like you're not getting enough value for your money from the writing here on fstoppers?
As far as image quality goes, I'd be more worried about not having my choice of lens than having an EOS-M. That little guy has the same image quality as canon's APS-C slr lineup.