
Auto ISO is one of those features that I ignored for a long time, considering it not much more than a gimmick. It wasn’t until recently that I decided to try auto ISO, and I quickly realized that I was missing out on a valuable and practical feature.
Auto ISO Explained
As the name suggests, in auto ISO mode, the camera will pick the correct ISO value for the scene being metered. Initially, the idea of letting my camera pick the ISO value seemed not only silly to me, but also like a genuinely bad idea, since I was afraid of winding up with grainy images if the camera chose a very high ISO. I was also firmly entrenched in a film shooter’s mentality, since I grew up in an era when using ISO 800 film was pushing the boundaries of grain and typically only used as a last resort. Obviously, the world changed a long time ago, but as many of us know, old habits die hard, especially for us photographers!
The beauty of using auto ISO is in the customization possible. The camera doesn’t simply pick any appropriate ISO for your exposure, but gives you a number of other options to ensure you don’t wind up with extremely grainy or blurry photos. In this article and video, I explain how these features work using a Canon EOS camera, but the basics will work with any camera that has auto ISO, although the customization levels will vary by brand.
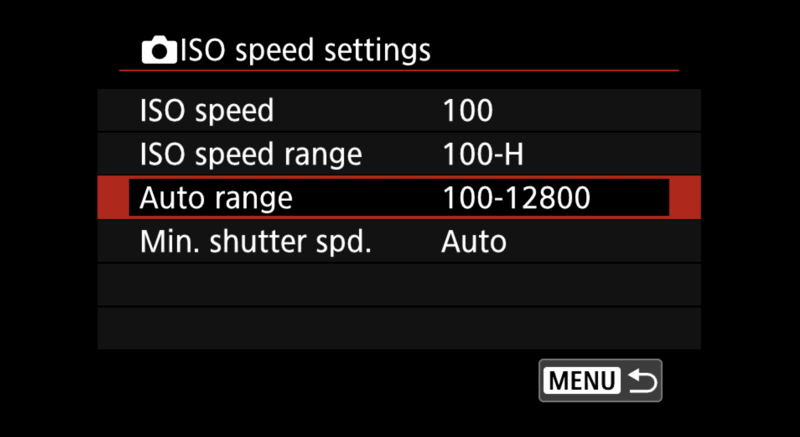
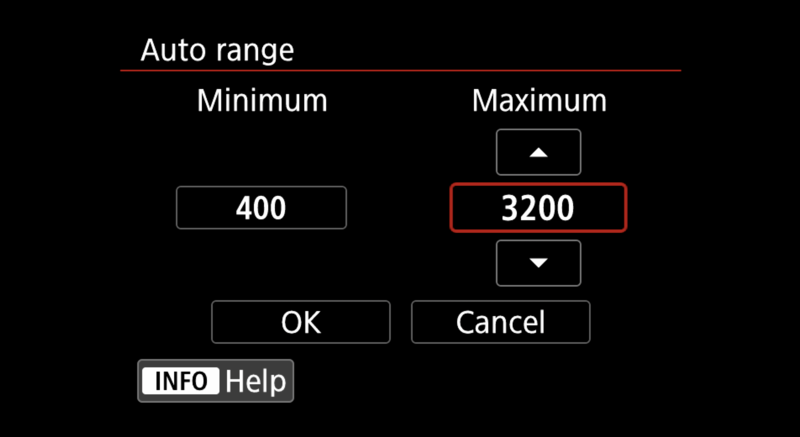
Auto Range
Once you’ve set your camera to auto ISO, you can tell the camera the lowest and highest ISO it is allowed to use using the “Auto Range” menu. At first, I thought of the auto range as a high-ISO cap, leaving the low ISO at 100 and setting the high cap at around 3200, which I felt was the most grain I would want to see in my images. I quickly realized that this was not the best way to use the feature and now fine-tune it a bit more based on the specific shooting conditions and not just on acceptable grain levels.
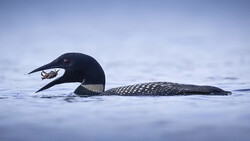
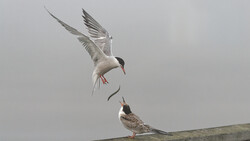
For example, suppose you are taking portraits of sports, kids, or any subject that moves around a lot, outside on a bright sunny day. In this situation, the minimum ISO level is just as important as the maximum, because in general, you don’t want the camera to use ISO 100 for any moving subjects, even outside on a bright day. It’s much more practical to have the minimum ISO set to say 400 in this situation, since you want the camera to pick as fast a shutter speed as possible if you are when shooting in auto or aperture priority, and the difference between 100 and 400 for most applications is negligible. If the camera picks a slower shutter speed because you let it decide on an auto ISO of 100, for instance, the photo may come out blurry. As another example, if you know that you will be in a dark room where 100, 400, or even 800 ISO isn’t going to cut it, make sure that your low ISO auto range reflects that. In general, my suggestion is to keep the low and high range of the ISO closer rather than far for best results.
All of this might seem obvious, but it took me a while for it to sink in, probably because I come from a time when we did our best to use the lowest possible ISO at all times, when possible. Nowadays, I don’t think that applies anywhere as strictly as it used to, and I will even shoot at ISO 400 or 800 in my studio if the situation calls for it.
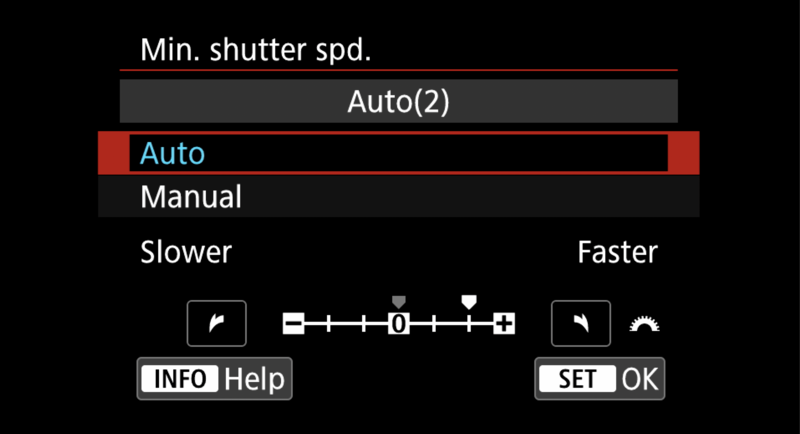
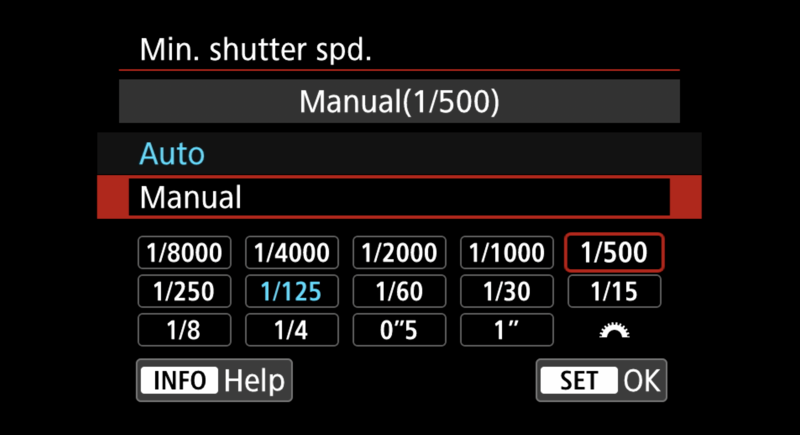
Minimum Shutter Speed
With a Canon EOS body, you can also choose whether the camera automatically or manually picks the minimum shutter speed it will use when you are shooting in program or aperture priority. When set to manual, you can tell the camera the slowest shutter speed you want to use is 1/500 s. This is another customizable safety measure that helps to ensure sharp photos, and the camera will not use any speeds below the one you dial in.
The Minimum Shutter Speed Auto setting, however, is much more interesting. With this setting, the minimum shutter speed is set automatically, but it’s based on the focal length of the lens you are using. By adjusting the menu slider, you can tell the camera to use a shutter speed faster, or slower, than the focal length of the lens attached. This way, if you are using a 200mm lens, for example, the camera will not use a shutter speed lower than 1/200 s in the default mode. By sliding the auto setting to “faster,” you can force the camera to use a faster shutter speed in one-stop increments, up to three stops. By choosing slower, the opposite is done. This, in my opinion, makes auto ISO a very practical and flexible feature, even for someone like me who primarily shoots manually.
Auto ISO and Aperture Priority: An Excellent Combination
By far, the most common way I use auto ISO is when shooting in aperture priority. In this mode, the camera picks the shutter speed and ISO, and I just dial in the aperture that I want. As a portrait photographer, selecting a wide aperture is almost always my main concern, and with two small children, I find this to be one of my favorite ways to shoot. I love not having to worry about the camera picking a shutter speed that is too slow for fast-moving kids or an ISO setting that’s so high my images are too grainy. By dialing in my auto ISO settings, I am able to retain creative control in situations where I don’t have a ton of time to fiddle with settings, in other words, any situation where kids are involved! I have found myself using Aauto ISO with aperture priority more and more when I leave my studio and work in natural light, whether it's taking some snaps of the kids or a concert in a dimly lit venue.
Exposure Compensation
The last benefit of using auto ISO is that you can still dial in exposure compensation and fine-tune your image. I often like to intentionally over- or under-expose images to create certain effects, which is why I generally shoot in manual mode. But, as with my other misconceptions regarding auto ISO, I initially thought it would cancel out exposure compensation, and this is not the case. This adds to the flexibility of auto ISO even more, since I am still retaining a good amount of creative control. And, I often find myself changing ISOs on the fly during a shoot, especially if the lighting situation changes fast, so auto ISO is an extremely practical tool that can save you a lot of time.
Try It!
Auto ISO, like any other feature in a modern camera, is something that should be experimented with. It’s not for everyone, but I think that a lot of photographers may dismiss this valuable feature as not for them. I know that I did, and I’m glad that I finally tried it out, because I have added a valuable tool to my photographic toolbox.


34 Comments
I was skeptical and of the mindset that I needed to control the ISO myself. Just started using it a year ago or so and I love it. The only time I don't use it is when I'm shooting astro or landscape and using full manual settings. Other than that, Auto ISO it is ! If you're shooting with a modern dslr or mirrorless that can handle higher ISO's comfortably it really is a setting to use.
Yep it’s an awesome feature for sure. Hey Will your landscape photos are sick by the way!
thank you Pete, much appreciated !
I didn't realize folks considered auto iso a "gimmick"...
Not necessarily folks Colin, just me! Lol. Chock it up to my old school mentality.
To many people's annoyance, the minimum shutter speed in Auto ISO didn't make it to Canon's EOSM series except the M6 MkII. The only workaround I've found is to shoot in either Shutter Priority which will open the aperture as wide as possible for the lowest ISO or Manual Mode and set Shutter and Aperture myself. Works okay, but not as good as having the safety net of a minimum shutter speed setting.
I remember working with film as a kid, where we would select a higher ISO film purposely for the coarse graininess, or push the ISO up or down specifically for the effect. We also would experiment this way with astrophotography. Even ISO 400 was grainy or noisy. Camera sensors produce far less noisy results over a much greater ISO range, but I have to admit that I also have it in my head to avoid triple dugit ISOs greater than about 400, even though I haven't used film since 1989. Anyway, I use auto ISO almost exclusively nowadays and you bring a great point that I did not pay attention to, which is setting lower and upper limits of a self-defined range of ISO and shutter values.
Mine lives on auto unless I’m on a tripod. Would rather have a noisy shot than no shot.
I am quite the opposite. I would rather have no shot at all than a shot that isn't all that I want it to be, from an image quality standpoint. This is why I don't use auto ISO - because grain at the pixel level is extremely important to me, and is one of the things that I want absolute and precise control over.
But I understand your viewpoint, and see that it makes sense for people who shoot different things than I do, or who have different purposes or objectives than I do, inasmuch as what the final images will be used for and how they will be viewed.
I think that it's great that we have auto ISO available and that we have the choice to use it or not to use it. That way everyone can shoot the way that works best for them and their specific preferences and purposes!
The fact is with modern cameras you can easily shoot at ISO6400 and get usable images, even on APS-C. Any noise present can be cleaned up in post processing with modern software. So on say a street scene where you only get one opportunity to capture the moment, id rather not have a blurry image because I had to set the shutter speed too low to compensate for the low ISO level.
Ill use base ISO for none moving subjects where the shutter speed can be at any value, or my camera is stabilised, but otherwise I think its just pointless fighting with the camera in 2022, what with the tech that is available for us now.
If you want to zoom in to pixel level to look at your photos thats fine, but thats an ultra niche process in photography, the vast majority of people are viewing an image at image level.
Below is an example of a snapshot I took in my back garden at ISO6400 on an APS-C camera, perfectly acceptable and detailed.
Just to add another example, I was in a cathedral here so no tripods allowed, I was using a Fisheye lens with no contacts to the camera (so completely manual) and I had the camera held above my head with my arms outstretched. I had the Auto ISO set and it gave me 4000 in the dark room, seeing as my camera doesnt have IBIS I wouldn't have been able to get this at a slower speed, so I would have walked away with nothing. In my mind that would have been a wasted opportunity to capture this moon exhibition that ill probably never see again, and mean id wasted money paying the entrance fee to come away with nothing.
Stuart,
You don't have to convince me that auto ISO is right for you. I get it. Totally get it.
For me to try to tell you that you would do better setting the ISO to a specific value would be foolish and show a self-centered perspective. You and you alone know what you value most in an image and the best way to ensure that you get the images that you most desire.
Likewise, it would be foolish and self-centered for someone to try to tell me that I should use auto ISO instead of setting a specific ISO value. I and I alone know what I value most in an image and the best way to ensure that I get the images that I most desire.
You shoot wildlife don’t you? Are you honestly telling me you would rather turn down the opportunity for a once in a lifetime shot of a rare animal becasue you’re scared of bumping the ISO?
Imagining a situation where you pay for an African Safari, you’re out in less than ideal light and you come across some rare endangered animal, it’s moving and you need to freeze motion but you can’t because you’re stuck on ISO 100. The animal then disappears and you return home from your once in a lifetime, $10000 photography trip in Africa without the shot. All because you want to ‘zoom into pixel level’ on a PC screen.
Can you not see why people might find that a bit ridiculous? Regardless of everybody having a choice to do what they want.
If there are already excellent photos of that species, taken by others, then there is no need for me to take a sub-par photo of it, no matter how much time or effort I expended to get in that position to see the rare animal.
I have actually seen and photographed a heck of a lot of rare and/or endangered animals, and the only times that the photos of those animals were at all satisfying or fulfilling to me are when I was able to get shots with high image quality and high compositional quality.
"Getting a shot" isn't really of value to me if the shot itself isn't one that is completely satisfying. This is what is RIGHT FOR ME. I am the one who gets to determine what is right for me when it comes to what to shoot, and what compromises are worth it and what compromises aren't worth it.
You seem hell bent on telling others that they should be happy with whatever shot they can get, even if it isn't that great. Why not let other photographers decide that for themselves?
I am totally fine with you taking the best shots you can get, even if conditions don't enable you to get ideal images. Why can't you be totally okay with me passing up photos because the conditions won't enable me to get ideal, or close to ideal, images? Do you really think that every other photographer should think and feel the same way you do when it comes to image quality and rare opportunities?
I’m not discussing it further with you. You can never accept other peoples point of view on anything so what more is there to say, have fun with your pixels.
Stuart,
I am totally accepting your point of view. This entire exchange between us has been me repeatedly affirming what you have to say, and agreeing that the way you do things is best for you and your objectives. Hasn't that been super super clear?
I see a lot of people shooting Auto ISO when I critique their work and it's a bad crutch. There's very few instances where Auto ISO is needed. Concerts, should never ever use Auto ISO. Situations where you have dark shirts and light shirts in sports will be a bad choice for Auto ISO as it reads the scene different. When it sees a bright shirt it will go one way, dark the other, opposed to the proper exposure you select.
Hey Jared! I'm a huge fan. Thanks for weighing in and for the great points. I agree that Auto ISO shouldn't be used as a crutch, just as another tool in the old toolbox. Hey - can you help me think of a catchy name for my YouTube channel? I don't have a fro but I'm a short disgruntled New York Italian so maybe there's angle there??? 😆 😆 😆 Keep up the great work my man.
--- " I see a lot of people shooting Auto ISO when I critique their work and it's a bad crutch."
So, was the exposure bad? If so, was it due to Auto ISO; or because most of the people you critique are amateurs or are new photography?
A bad crutch would be setting your ISO to high a value like 10,000 (when you could have used a lower value) and only adjusting the shutter speed. Probably because you're not fast enough to set the shutter speed + ISO for the changing light conditions. Hence, why Auto ISO is awesome. :D smh
--- " There's very few instances where Auto ISO is needed."
Depends on what you're shooting.
--- " Situations where you have dark shirts and light shirts in sports will be a bad choice for Auto ISO as it reads the scene different."
Not necessarily. Bodies like Sony a7iii have exposure face priority so the exposure is biased on the face not the color of their shirt or the scene. It's on by default. Had you used Auto ISO when you review cameras, you would have noticed this.
I’m not sure this is the real Jared Polin, just a hunch.
I had the same thought, so I search other articles on here, and yep, it's him.
It certainly seems to be, maybe using capital letters at the start of his name an a profile pic would help lol.
Ya never know lol
I use it where things are happening quickly under changing lighting conditions like wildlife photography. Under more controlled circumstances, I choose the ISO, especially for landscape and portrait shooting.
I used it at an arcade with the family the other day and got some great results. Shooting in manual and aperture priority.
Yep! That's pretty much what I do; all manual except for ISO. Shooting in a forest is especially tricky because of light filtering through trees and brush. Just a 15° swing in one direction can produce a stop or two of more/less light. Trying to keep a moving critter in view is tough enough without having to change ISO settings.
When I'm not using flash, Auto ISO + Aperture Priority + Minimum Shutter Speed all day all night long.
Auto ISO. is handy in manual mode, especially if you know the boundaries of your camera sensors ISO invariance.
I often use it when I'm dealing with a set of shots that starts inside and ends up outside in the sun. I can concentrate on the content instead of the technology. I set it in a way that keeps everything between the rails.
Yes I think the key is to know your camera and what range makes sense for the gear and for your own eye as well.
I'm often using Auto ISO with my R5. But I do watch it like a hawk if it goes where I don't want it to go. I shoot in Fv mode which if you don't know the Canon system, is a way to shoot manual or auto in the different settings. It's like having Av, Tv, Auto, and P in one. Like I can full auto everything or pick which I want to be manual or auto without having to touch the mode dial (button). It's much faster for me to add or remove auto functions from the settings. I think all cameras should have Fv and Manual mode. Av, Tv, Auto, P, and those other scene options can just go away for good. It's also confusing for beginners having to spin a dial to switch modes.
I use my Exposure Compensation a lot to get the ISO near where I want it to be for the type and location of shooting. If it's just not happening or I really want 100 ISO then I lock it in and adjust my other settings from there. I think the key thing with anything auto is don't leave it and forget it. Keep an eye on it. Let it assist you to help reduce your workload. Also, check your minimum and maximum settings for your ISO. I have mine maxed at 6400 for C1 (general), and 3200 for C2 (weddings).
Great tips! I haven't experimented much with Fv mode but I will give it a try. Most of what I do is in manual mode and then sometimes Av.
Just thinking about the usefulness and the ease or convenience of using auto ISO .....
The way you describe the ability to change the parameters of auto ISO - the low and the high limits - and how those parameters can be changed based on what you are shooting and how you want to shoot it and how the ambient light is .....
well, if I end up changing the auto ISO parameters every time the situation changes, then wouldn't it be just as easy to pick the actual ISO value instead of picking an upper limit and a lower limit?
I will acknowledge that I often print rather large, with 48" by 32" prints that are viewed form 3 to 5 feet away being normal for me. And I often crop up to 30% of the image off before printing at these sizes. And I have never been any good at using noise reduction software, so I really need the original capture to be as free of grain as possible, or I won't be able to have it printed huge and still have it look great at close up viewing distances.
For those who have figured out how to use NR software such as Topaz, it probably isn't so crucial to get it so clean in the original capture.
I suspect that most people who think that noise grain isn't a problem these days probably don't print really huge prints, or they print huge, but the prints are viewed from a distance, or they know how to use noise reduction software to clean up the grain as part of their post processing workflow.
Sure that’s a valid point but I think it depends on the shooting situation and what you want to do with the final photos as you said. I don’t think it makes sense to set it from 100-400 for instance but it’s not a good idea to set it from 400-6400 for as well. For me it depends on the lighting situation, shooting mode I’m in, and subject. Thanks for the insight!
I have alwaya played with both. Feels situational to me.