
ISO can be used as a tool to adjust exposure, and you can even use an automatic ISO setting. I’ll explain how you can use auto ISO in the best possible way.
Today, we take auto ISO for granted and see it as a tool to achieve a correct exposure. It is the digital counterpart to the ASA/°DIN that indicated the sensitivity of negative film and slide film. Although the ISO setting on our digital camera has nothing to do with the sensitivity of a sensor, it does work in a similar way. With a high ISO setting, you need less light compared to a low ISO setting.
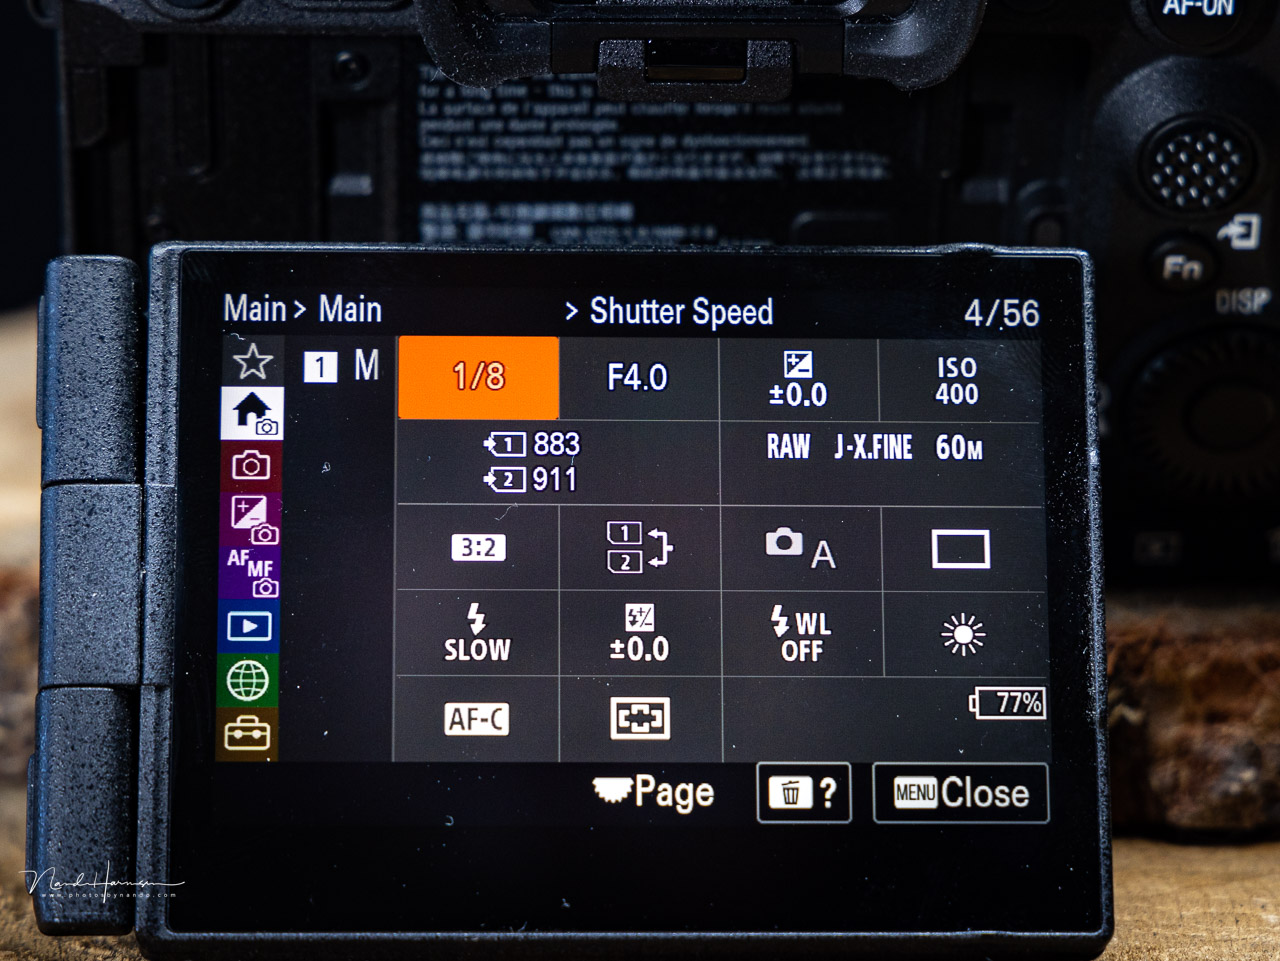
Compared to film photography, we now have three settings to think of when acquiring a correct exposure. The aperture controls the amount of light that goes through the lens. The shutter controls the time that the sensor is exposed to light, and the ISO determines (the digital version of) sensitivity. Each value can be set differently for each shot.
Auto Aperture and Auto Shutter
I remember my first camera that had the ability to set an auto shutter. This setting had the letter "A" on the shutter dial. It meant the camera could set the correct shutter speed for me, according to the light value it measured with the built-in light meter. Back then, the letter "A" could be considered the abbreviation of "auto shutter," but now, it's commonly known as "aperture priority."
This auto shutter setting gave the ability to anticipate changing light situations more quickly. It was soon followed by the auto aperture option, which worked in the opposite way. With that, I could choose the shutter time, and the camera would set the appropriate aperture.
These automatic ways of setting exposure are now common, although many amateur photographers have returned to manual because it’s widely believed to be the only professional way of operating a camera. The funny thing is, those who believe so, do use manual with an auto ISO setting.
Limitations of Auto Aperture (Shutter Priority)
I want to return for a moment to the auto aperture setting, which now is known as shutter priority, indicated with the letter S on the PASM dial. It allows the photographer to choose a shutter speed, and the camera will find the aperture that allows for a correct exposure.
There are some limitations to this setting that you need to be aware of. The range of settings that the camera can choose from depend on the lens and its maximum aperture. The lens opening of most common lenses is limited to f/2.8, which is considered a sensitive lens. Most photographers use lenses that are even f/4 or f/5.6.
This has consequences for those who are using the shutter priority setting. It means the range of exposure values the camera can choose from is limited. Let’s do the math. If you have a f/2.8 lens, the camera can use approximately 7 stops (f/2.8, f/4, f/5.6, f/8, f/11, f/16, and f/22) to set the exposure, with f/2.8 being the largest aperture.
If you choose a slow shutter speed, this won’t be much of a problem. But if you need a fast shutter speed like 1/1,000 sec or faster, the widest aperture isn’t often wide enough to allow the required amount of light to pass through the lens for a proper exposure. Fortunately, there is the possibility to raise the ISO setting.
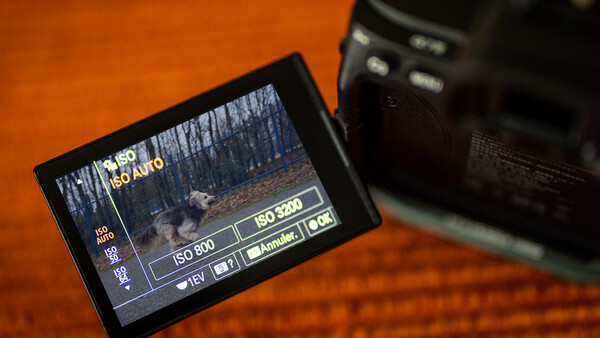
Using the Auto ISO Setting
If you’re using the shutter priority and a fast shutter speed, it may be necessary to play around with the ISO setting to compensate for the limitations of the widest aperture. You often have to choose a high ISO setting if you’re shooting fast action.
This way, you need to keep an eye on the light situation and raise the ISO only if needed. After all, we want the ISO to be as low as possible to keep the noise levels within limits. That’s where auto ISO comes in. It allows the camera to raise the ISO setting when the appropriate exposure can’t be reached with the largest aperture available. This way, you can concentrate on the action without worrying about the ISO setting. It will always be at the lowest setting possible.
Another huge benefit from auto ISO is guarding the shutter speed when shooting with aperture priority. Although aperture priority has a much larger range of stops available (at least 18 stops if you take the complete range of shutter speeds), there is a point when you need a tripod to prevent camera movement. Auto ISO can be used to prevent the camera from using a shutter speed that is too long for handheld photography.
How it works is easy. You set the lowest shutter speed that allows steady handheld photography. If the correct exposure needs a shutter speed below this limit, the camera will raise the ISO until the exposure with that setting is reached. It is also possible to let the camera decide which minimum shutter speed is set. It will take the focal length into account for that.
Auto ISO is a solution to the limited amount of stops for the shutter priority or the risk of motion blur with a longer exposure time with the aperture priority. But does it have any use for manual exposure as well?
Using the Auto ISO With Manual
As mentioned, there are photographers who use the auto ISO setting for the manual exposure setting. This way, the photographer will choose a shutter speed and aperture to their liking and relies on the auto ISO to achieve the correct exposure.
In theory, this way of setting exposure would give complete freedom of choosing any shutter speed and aperture. The auto ISO will make sure the right exposure will be set. In reality, there are too many limitations to make it work properly.
For example, you can’t choose 1/2,000 sec and f/11 and expect the ISO to fill in the gaps. You will probably end up with the highest possible ISO setting to get a proper exposure. Or, you can’t even get the ISO high enough to reach that proper exposure. Also, you can’t choose 1/60 sec and f/2.8 in full sunlight and expect the ISO to create a correct exposure. Even the lowest ISO setting isn’t enough to prevent overexposure in that situation.
In other words, the combination of shutter speed and aperture has to be set near the correct exposure for the auto ISO to work properly. The ISO range of most cameras allows only about seven stops before noise becomes a problem, although higher-end cameras will have a larger range of ISO settings available. That is not enough to make it work for every manual setting you choose.
The Best Use of Auto ISO
Although auto ISO can be used with every setting on the PASM dial, I think it’s most effective when used with shutter priority and aperture priority. Both these settings allow the most flexibility and take away the limits of those settings.
In my opinion, using the auto ISO for manual exposure setting is possible, but not always the best choice. The reason for manual exposure is the ability to keep the exposure settings fixed, no matter how the exposure meter is influenced by light or shadow. If you would add auto ISO to the mix, you lose this control, and it will be similar to aperture priority or shutter priority.
If you’re confident that manual exposure settings are the only way to get full control over exposure, auto ISO undermines this belief. After all, it will change the ISO according to the exposure measurement. Even the use of auto ISO to get a proper exposure in manual doesn’t make a lot of sense. Why use the limited amount of stops, when aperture priority, with or without auto ISO, allows so much more flexibility?
You have to choose your preferable way of using auto ISO, of course. Either way, auto ISO is a great feature on every modern digital camera. But it would be wise to use it to its full ability instead of limiting the auto ISO with something like manual exposure. But perhaps there is a reason for auto ISO in manual that I never thought of.
Do you use the auto ISO possibilities of your camera? I would love to know how you use auto ISO, with what exposure setting, and why in that particular way. Please share it in the comments below.


Join the Fstoppers community for free
-
Post comments and join in the discussions
-
Browse the site ad-free
-
Share your work and get featured in the community
-
Compete in the photo contests for fun and prizes
21 Comments
Auto ISO in manual mode is great for something like sports work, where you know the shutter speed you need to freeze the action, you're like always shooting at the widest aperture, and you don't have the time to react to players moving in and out of shadow areas.
I always use shutter priority for that.
For those of us with cameras that don’t have a minimum shutter speed limit setting in auto iso, manual mode with auto iso is very useful.
In those situations the camera would probably use a minimum shutterspeed that is related to the focal length?
Yes, it does - well, my humble EOS M5 does anyway. However, for subjects such as wildlife, at a day at the zoo with the EF-M 55-200mm, I've found it better to simply use Tv mode and let the camera select the widest aperture, and therefore the lowest ISO. The widest aperture at full zoom is only f6.3, so I needn't worry that the aperture is too narrow!
I use it. Definitely is handy and way faster than I am:
a. Aperture Priority in ambient/natural light.
--- For non events, I have the AEL button function normally this way it could lock the exposure when moving around and the lighting isn't changing.
--- For events, AEL is mapped to jump to aperture to f5.6 while holding the button. I typically use it for groups of people. When, I release goes back to the aperture I had before, normally f2-f2.8.
--- For shooting slow to fast moving subjects, AEL is mapped to shutter speed 1/1600 while holding the button. I normally keep the minimum shutter speed to 1/250s, but, when the subject moves quickly, or I anticipate they will, I'd hold down the button to jump to the faster shutter speed. When I release, goes back to normal speed.
b. Shutter Priority for panning shots.
A button programmed with a complete different behaviour. Does that mean you hold two buttons at that situation, one for AF and one for the settings you chose?
Yes. Thumb on AEL and index finger on shutter button.
I use back button focus, and I have only one thumb on each hand.
I doubt it would work for me, but interesting to know about this method. Thanks for sharing
"ISO determines (the digital version of) sensitivity". Really? Sigh.
Really?
If I would have said ISO IS sensitivity, you probably would have reacted "...that isn't true because it's signal applification".
Nando, I apologize if I came across as rude with my comment. It was not my intention.
You state "ISO setting on our digital camera has nothing to do with the sensitivity of a sensor".
So, why connect ISO with sensitivity in another sentence?
Thank you, Fred Westinghouse .
I learned to mention how ISO is similar to an increase in sensitivity, but not exactly the same. Just to prevent the comments about this. As said, it has the same effect in the real world.
Auto ISO is a great feature except when the Sony A1 chooses 640 it’s the worst noise I would love Auto ISO where I could program what ISO values are available.
Yesterday I shot birds flying ISO set to 125 Shutter set to 1/3000sec shot for one hour in the same light aperture tuned to taste all images were with in 1/3 to 3/4 of a stop.
Auto ISO for me would only be in changing light but it’s a must have feature for that situation.
The old days using a Leica on the street was probably the hardest ever to nail the exposure
If you wanted the shot and had to react to the light you would miss one or the other.
By choose the available settings, do you mean min/max or picking certain values within a range so as to avoid poor choices where you have split native iso on an iso-invariant camera?
If it's min/max, I expect the A1 has that already since Sony's been doing that for yonks. If it's avoiding the perils of split native iso, does it really make that much difference in practice? I worried about that initially when I brought an A7R III but stopped worrying very quickly. I couldn't see any difference in noise when transitioning between the two native ISOs (100/640 I think).
For us manual shooters, it may be believed that Auto ISO is not as flexible especially if you're trying to keep the same exposure. For events and outdoors where shooting rapidly means that exposure will be changing especially depending on if you're facing the sun or not, auto ISO right now does all that I need to do*. Note that I am talking about environments that do not have set lighting so the exposure changes can be extremely dramatic.
Auto ISO unfortunately does tend to crank it up pretty dramatically especially if you're shooting in shadow areas (regardless if a sunny day). Your eyes would tell you there's enough light but the sensor is definitely saying something different.
At the end of the day I prefer a full manual but the faster you shoot the harder it is to maintain and the more prone to mistakes.
In landscape situations and casual shots during daily walks I always use full manual. There’s plenty of time to adjust the exposure parameters to suit the situation. I do use auto iso in M mode during concert shoots (with spot metering) it will not get that bright that my shots will be over exposed.. The light changes so fast that it’s hard to keep up. You can anticipate certain situations , but than you can miss other shots. Using shutter or aperture priority will not add any flexibility in the concert setting I think. Do like your approach to auto iso.
Auto ISO is great but on cloudy days you need to decrease EV dial to get the zebras to decrease so as to get clouds unblowen. Also you can set low limits and high limits. A low limit like 640 will be better than 300 because it is at as step where noise in controlled better in camera and 12800 is another step of control in camera, that is if you have dual ISO. Also having an ISO Invariant camera the noise is he same across many levels and even a dark image shadows can be brought out without color noise.
"Even the use of auto ISO to get a proper exposure in manual doesn’t make a lot of sense."
This is an incorrect statement.
Street photographers, event photographers and sports and wildlife photographers all like manual mode + auto iso.
The reason is you want to control the depth of field and ensure everything is in focus and you want a fast enough shutter speed to freeze action.
Floating the ISO allows one to do this without messing around and no, shutter priority only gives you part of the equation.
Modern cameras like the Canon R3 handle ISO amazingly well - I shoot two of them, always in manual mode and always float the ISO. I'd rather get the shot in focus without motion blur and deal with any noise in post.
Completely agree manual + auto ISO can be great for sports. Nando, I think you are overlooking the benefit of controlling shutter speed to capture action plus depth of field at the same time. And assuming your camera shows the ISO selected, you can tweak the shutter and aperture to quickly get the tradeoff you want for shutter, aperture, and ISO. Sometimes it helps to bump exposure compensation up or down if the camera's metering isn't exactly what you want.
Whilst in theory auto iso in manual mode or ap pri or shutter pri is great, only so if the camera then allows to access and utilise exposure comp, even todays amazing cameras get it wrong a lot when camera points in the shadows or lots of bright areas to screw with the exposure. most allow this, my A9ll does and it’s quick to use the jog dial on rear to adjust this, although has a small lag between rotation on its effect within the EVF, sadly my Fuji xh2s only allows exp comp in manual mode after a button press to alter the function of a dial, not ideal for sure as forget to re press this button to get the other function back to a dial, in my instance shutter speed on rear dial. Not all manufacturers implement this function in the same way, sadly.