Let’s talk Beyoncé. Specifically, that now-iconic Cowboy Carter promo photo that’s been everywhere. In my latest video, I break down exactly how I would recreate that look on a budget—and how you can too, with one or multiple lights.
We’re not here to copy Beyoncé 100%. That's theft. We’re using what I call my 85% Rule: reverse-engineer someone’s lighting setup to about 85%, and then bring your own flair to the final 15%. That’s where your magic lives. That’s how art evolves.
The Beyoncé photo I chose isn’t just a pretty picture. It’s functional. Artists use images like this for press kits, Spotify, iTunes, Apple Music—you name it, and the publicist loves them. So learning how to recreate this style can actually land you paid work! Also, apologies for the Beyoncé puns. I think she's incredibly talented, but I don't know her music beyond a handful of songs.
The Lighting Setup
In the video, I show you how this setup can be done with one, two, or three lights. I even reference a shoot I did with Usher in a room barely bigger than a closet, using one light and a kit lens. Don’t let your gear hold you back. It's difficult to illustrate lighting in a blog post, but I do hope it inspires you enough to watch the explainer video.
To break down Beyoncé’s lighting, I analyzed the three major shadows: under the cowboy hat, under the chin, and on the wall behind her. Those shadows told me everything from light placement to height to output. I even used a 3D render of “Mock Beyoncé” to walk you through the setup step by step. Remember, the goal isn't to directly copy her lighting but to get inspired by it. I have a rule that I created called the 85% Rule, and it's the maximum limit to copying someone's lighting. I mentioned it earlier, and it's worth saying again! The other 15% is your own recipe—your secret sauce—and that truly lets us have unique voices. Please do not copy 100%. It's bad etiquette and disrespectful to your talent and that of the original photographer.
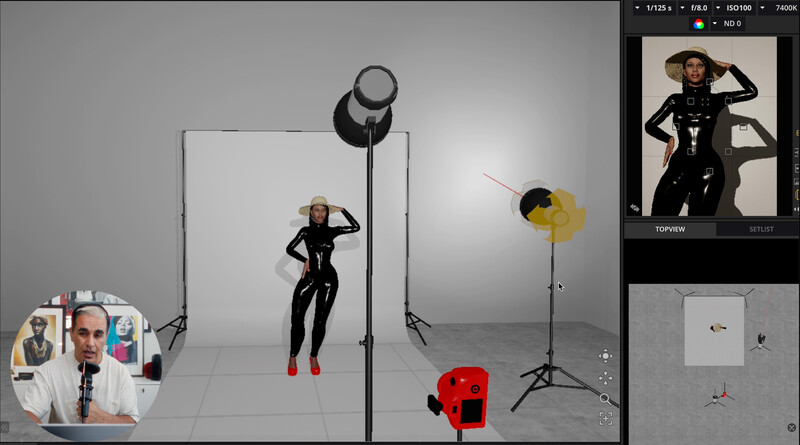
I used a hard key light for structure, a bounce to lift shadows, and a third light to softly illuminate the background. The key light was placed just off-center and raised slightly above eye level to match her shadow angles. It’s surprisingly simple once you break it down.
The material of her outfit (leather or vinyl) told me I needed to watch my light output. Blowouts are easy with reflective fabrics. I also adjusted ISO and aperture to get the skin tones right and added V-flats to control spill and bounce light.
We wrapped it up with a little composition tweak. In the Beyoncé image, she’s looking down slightly. That means your camera needs to come up just a bit so your subject looks powerful and elevated.
If this kind of breakdown is your vibe, you need to watch the full video. I show every light position, explain every decision, and walk through the build in real time. You’ll learn way more by seeing it in action.

No comments yet