
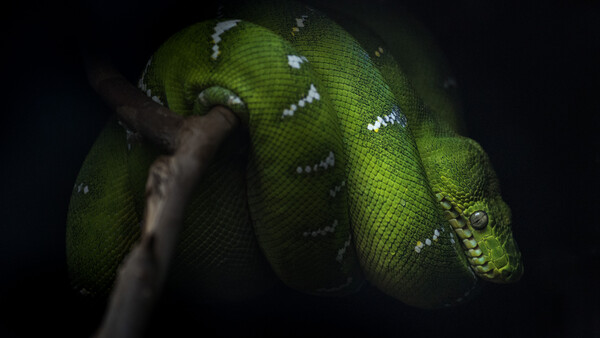
Whether you’re using your iPhone or regular camera, shooting through windows and transparent surfaces can be one of the trickiest situations you’ll encounter. With just a few simple tricks, you can greatly improve the results next time you try photographing through a window.
Before we get into the strategies for addressing those image quality issues, let’s discuss what they are and where they come from. When shooting through a medium like glass, plexiglass, airplane windows, aquarium glass, or similar transparent surfaces, your photos can end up with reflections or glare, undesirable changes to color, or a loss of contrast. Depending on your camera and autofocus setup, you may also be challenged by much worse autofocus performance. Notably, you can also see some of those issues when shooting through a medium like fencing or netting — that’s a scenario you’ll often see if you’re photographing at a zoo, for instance.
Each of these issues can have a different technical cause behind it, but put simply, the surface you’re shooting through can reflect or deflect light in ways that mess with your camera’s exposure. Recognizing which issue you’re facing can make it much easier to address the issue, but all of the following solutions are just good practices to employ whenever shooting through something.
Glare or reflections can be caused by light coming from behind you reflecting off the surface and into your lens, or in some cases, reflecting within the surface, like in a double-pane window. Color changes can be caused by the glass itself blocking certain wavelengths, or by window tints or other treatments on the glass. Contrast loss can arise from those reflections or light being scattered by dirt and smears on the windows themselves, which acts as a layer of diffusion.
Straight On
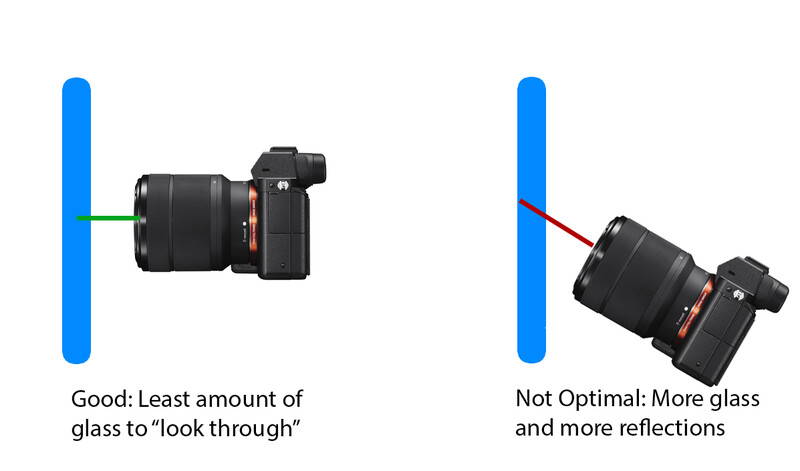
To help with all of those issues, one of the first priorities is to shoot straight at the surface. Ideally your camera is going to be oriented squarely to the surface. When your camera is at an angle relative to the surface, you’re looking through more material than is necessary, and you can also end up catching reflections off the surface. To see this in action, just take a look at your phone. Facing it straight on makes it easier to see the screen compared to looking at it while drastically tilted.
Duck and Cover
One step beyond making sure you’re squared off to the surface is to use some sort of material to block reflections. If you’re just trying to grab a quick shot, a dark material in a neutral color, like a jacket or hoodie can work well in a pinch. Just bunch it up around your lens, then press it onto the surface. For a more dedicated solution, rubber lens hoods are available for both cell phones and regular camera lenses. Compared to a regular lens hood, a rubber hood is flexible, allowing it to better conform to the surface you’re shooting through, and reduce the risk of scratching the surface. Just make sure that the material isn’t blocking the lens, causing vignetting by intruding into the field of view of the lens — you’ll typically see that in the image preview, but this may be tough to catch in low light scenarios.
Polarizing
Depending on the surface, you might benefit from using a polarizer. Light that’s reflected off a non-metallic surface ends up polarized, and by using a polarizing filter, you can have the filter absorb some of that light, resulting in a reduction of glare. Put simply, a polarizing filter can work just like polarized sunglasses, by reducing the glare and reflections off water or glass, and letting you better see through it.
Using a polarizer with a cellphone camera may be a little tricky, unless you already have a setup for attaching lenses and filters to your phone. Fortunately, it’s pretty easy with DSLR or mirrorless cameras. By getting a circular polarizer that’s the same size as your lens’s filter ring, you can just screw it in and go.
Unlike some filters, however, a polarizer does need to be adjusted to work its best. By rotating the polarizer filter around the lens, you can adjust the angle it’s blocking. To find the best result, just look at your image preview. While rotating the ring, you should notice the glare come and go, see the skies darken and lighten, and be able to directly observe the results of the filter - just stop when you’re happy!
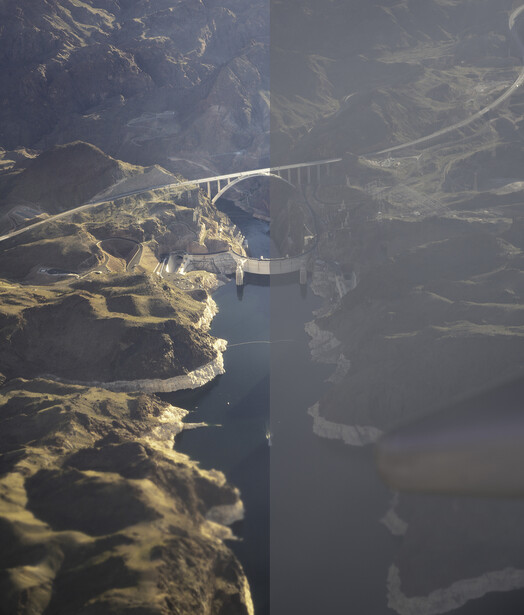
Correcting Casts and Contrast
Even with the best practices employed, things might still not be perfect. Some issues, like dirty glass, color casts, or loss of contrast from something like netting or fencing can’t be realistically addressed in the field. With a little work in your favorite image editor, however, these problems are easy to fix.
If you’ve got dirty glass, you can either end up with visible dirt or a more subtle loss of contrast. For visible smudges, it might be as simple as using cloning and healing tools to just patch over the problem. I’m very partial to Photoshop’s Content Aware Fill. I think it yields great results, often with less work than even the simple brush-based tools. My favorite way of using it is to make a selection of the problem area with the Lasso tool, then Edit>Fill, and select Content Aware Fill in the dropdown. If you find that you need to further refine the results, just hit Undo and open the dedicated Content Aware Fill workspace via the Edit menu.
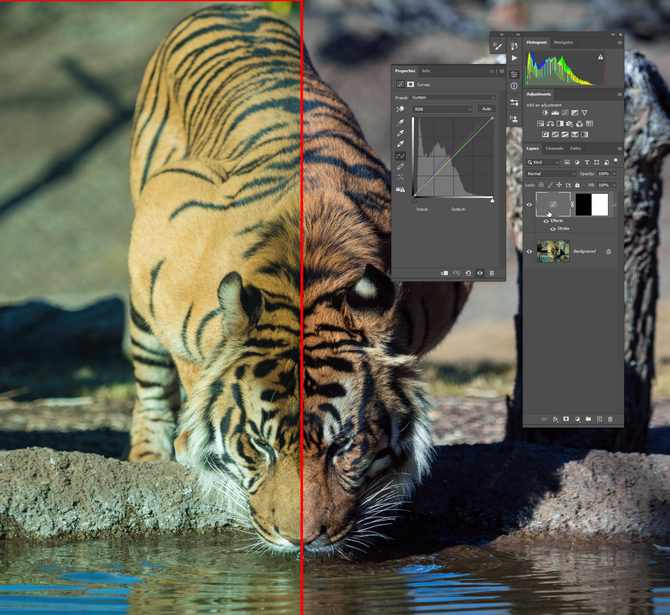
For color casts, I like to use a Curves adjustment. Curves let you tweak the red green and blue channels manually, but also offer an automatic adjustment that can make for a 1 click color fix. Whether you’ve added a Curves adjustment layer, or opened Curves via Image>Adjustments, just hold Alt/Option and click on Auto. This opens a somewhat hidden menu. In this menu, you can have the Auto adjustment use an alternate algorithm. I find that Enhance Per Channel Contrast often works well, and you can even select Snap Neutral Midtones to further adjust the colors.
Modern editing software gives you a dozen options for adjusting contrast. For contrast issues arising from shooting through glass or netting, I find that a slight bump to Dehaze in ACR works well, as can an increase in clarity.

Join the Fstoppers community for free
-
Post comments and join in the discussions
-
Browse the site ad-free
-
Share your work and get featured in the community
-
Compete in the photo contests for fun and prizes
4 Comments
You kind of glossed over one of the most effective methods. Creating your own dark space by using a dark cloth completely around the lens and preferably adhered to the glass to eliminate all of the reflections behind it. The products like you mention take up almost no space in your bag.
I covered that as the second tip after making sure you're aligned with the surface (which is fundamental to any of the following approaches). Were you looking for more details?
"One step beyond making sure you’re squared off to the surface is to use some sort of material to block reflections. If you’re just trying to grab a quick shot, a dark material in a neutral color, like a jacket or hoodie can work well in a pinch. Just bunch it up around your lens, then press it onto the surface."
You might be able to position polarized sunglass such that you can shoot through them with a phone. Also a lot of the plastic windows will not be good shooting through with a polarizer. You can get that “rainbow” effect.
Try to get as close to the “glass” as possible. Touching it if you can do so without damaging anything, or violating any rules.
Also if you have the option, the shallower the depth of field the better. Shooting at your widest aperture will help.
I shoot through glass all the time on the city bus. I have this big rubber lens hood I shoot through with a polarizer. I'm always dealing with reflections from the other window on the other side of the bus. It's worse at night as the overhead lights cause reflections. But with the hood and filter, I can clean up a shot pretty good pre and post.