
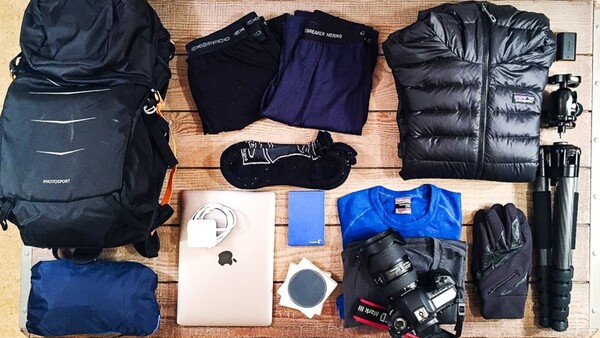
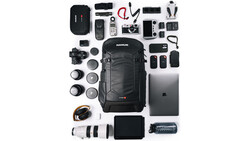
How many bags do you travel with for landscape photography? Two or three depending on the trip duration? How about one carry-on sized backpack for a year of travel?
Especially among digital nomads, traveling the world with one bag is becoming more common thanks to high performance clothing and lighter tech. But for landscape photographers, squeezing everything — gear and clothes — into one bag is a challenge in its own right. Even photographers who have outwitted gear acquisition syndrome may be hard pressed to get everything into two bags, let alone one carry-on.
As a location independent landscape photographer, I travel indefinitely with one carry-on backpack — regardless of destinations — but getting down to one bag is only a recent achievement after years of honing my pack.
This guide focuses on the top packing optimizations, so if a few things seem missing, I’ve compiled an exhaustive, evergreen packing list down to socks and headlamp.
Why Travel with One Bag?
If getting down to one bag is so challenging, is there any value beyond the wow factor?
It’s tempting to focus on cost savings as the primary benefit, but traveling with one bag has a much weightier payoff: freedom. All the minor stresses of keeping up with several bags of equipment add up to subconsciously prevent us from pursuing spontaneous opportunities.
- Flexibility: after driving an hour to a landscape destination, you may decide to stay for astrophotography. Didn’t dress warmly enough? No problem, you have everything with you.
- Spontaneity: plane, train, bus, or last minute ferry, you can tour a city on foot and head for the next destination without making a return trip for your luggage.
- Security: with some tuning, that one bag doesn’t need to scream “I’m a photographer with expensive gear!” And since that one bag will always be with you, it’s less likely to get snatched.
- Ease: no checked bags, no transfers, no dragging a bag through rocky courtyards, and no fuss packing between accommodations. If your ride gets totaled, it’s one less stress to have only one bag to pack up before jogging to the nearest bus stop.
So if you don’t mind dealing with checked bags, lengthy check in / check out at hotels, the feeling of forgetting something, overweight fees, dragging around heavy bags, or inconvenience taking public transit, this guide probably isn’t for you.
Although traveling ultralight will save you money in some areas, it will cost a ton in others. The purpose of this guide isn’t budget travel: it’s about reducing anxiety, embracing freedom, and making travel easier so you can focus on exceptional landscape photography instead of the logistics around it.
Eliminate Before You Optimize
To get anywhere near one bag, you can’t just optimize all your gear: the real trick is learning what you don’t need to bring. These won’t be the same for everyone, so the key is to experiment and iterate. Take day trips and stay overnight with or without some equipment to see what goes wrong. Like preparing for a marathon, you need to practice these optimizations in your day-to-day rather than discovering the kinks in the middle of your next landscape photography trip.
Here are a few things I don’t pack:
- Multiple lenses
- Multiple camera bodies
- Multiple pairs of shoes
- More than two articles of any particular clothing
Some of these omissions may seem like a recipe for missed opportunities, but more often than not I find a workaround that doesn’t compromise the quality of my work. For example, traveling with one lens forced me to become more intentional about my compositions. Traveling without a telephoto hasn’t caused me to miss opportunities, but instead to trade them for opportunities better suited to the lens I have with me.
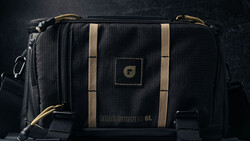
Ultralight Photography Gear
You might notice one thing missing from this list: a camera recommendation!
Look, your camera is expensive. You’re probably not going to switch to the lightest camera body on the spur. I still shoot on my 6-year old Canon 5D Mark III. If I could start over today with weight in mind, I would make a different choice, but like it or not I’m stuck with it for a little longer. So don’t worry too much about optimizing your camera body: focus on other gear that is easier (and cheaper) to swap out.
Tripod
Look for a 4 to 5-section carbon fiber tripod with twist locks, reversible legs, and removable center extension. Without ball head, the tripod should fold up shorter than 17 inches so it can easily fit in a carry-on.
Sirui has some phenomenal compact tripod options that won’t ruin your credit score. I love my Sirui T2205X Carbon Fiber tripod, but sadly it has been discontinued. The aluminum version is available with similar specs, but it might be worth browsing their other models as well.

To shave a few ounces, I removed the center extension and cut off the foam grips. Grams add up, but more importantly it’s easier remove the tripod from your bag without the grippy foam.
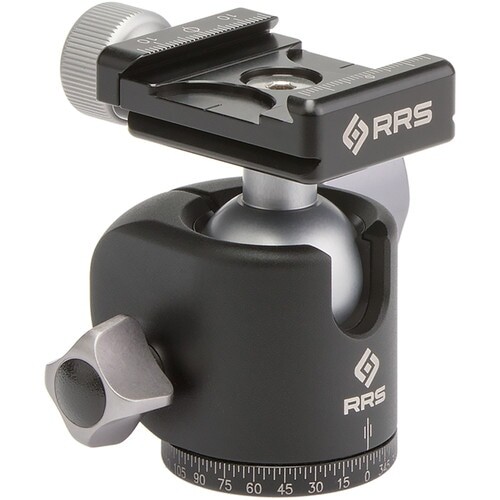
Ball Head
I use Really Right Stuff’s BH-30 ball head. It’s probably my favorite gear optimization of the last year: the knob version packs incredibly small, cuts down weight, and is a pleasure to operate in chilly weather with gloves on. You might prefer their clamp version, so give yourself time to experiment with the knob version before takeoff.
Camera Straps
Straps are a surprisingly powerful optimization. When it comes to weight and size, the standard neck strap is hard to beat; if it didn’t have the logo plastered everywhere, I’d probably still use it.
I tried some different shoulder straps, but wasn’t happy with how bulky they were. I recently took Peak Design’s Slide straps for a spin — phenomenally built, but the generous padding made them a bit hard to pack into the camera slot. Since I take my camera in and out of my bag constantly on hikes, it was a bit tedious.
Nowadays, I use Peak Design’s Leash strap. These are technically designed for tiny cameras, but I love using these straps with my Canon 5D Mark III and 16–35mm lens. They look slick, weigh next to nothing, take up no space, and work as a shoulder strap or neck strap. The strap is quite comfortable considering the size, and since my down jacket doubles as padding, the Leash doesn’t cut into my skin even during a lengthy hike.
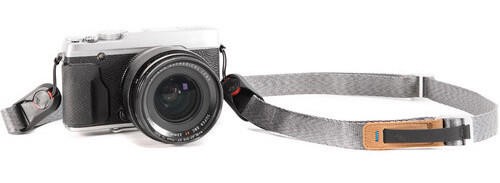
Because these are so lightweight, I don’t even take the strap off when shooting long exposures. When setting up the camera in a precarious spot, I often detach one end of the strap and “leash” it to something in case a blast of wind tries to knock my camera over a cliff.
Optimizing Your Wardrobe
Now on to the often overlooked optimizations: your clothes. How easily can you hop from the toasty car to an intensive hike, followed by an hour of shooting at the top of a windy mountain? Do you feel presentable in the same outfit at a nice dinner later that night?
I travel for an indefinite amount of time with 3 shirts and 1 pair of pants, for 10–90 degrees. I do a sink wash one or two times a month. But I actually smell better after a month than most people do after a short walk.
Merino Wool Base Layers
The (not so) secret: merino wool, nature’s miracle fabric. Unlike regular wool, it’s incredibly soft. It’s a natural insulator that regulates your body temperature in warm and cold climates, and the irregular surface is naturally antibacterial, so you can wear the same shirt — hikes and all — for a month without a smell. The only reason I have to wash merino wool at all is to slim down the fabric and remove antiperspirant build up.
You can find merino wool base layers everywhere, but you need to pay attention to the grade of merino wool used. Cheaper merino wool is itchy, while the better grades are super soft — I personally stick with Icebreaker.
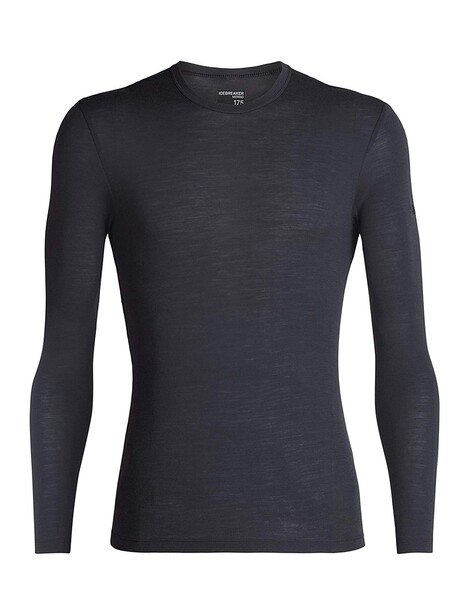
By layering these shirts, you can go from dressy beach weather to an arctic hike with the same wardrobe. I have one lightweight tee that doubles as an undershirt, one heavier tee, and one heavy long sleeve. They’re versatile, resilient, and compact for weather from 10 degrees to 90.
Merino Wool Gloves
Gloves are technically a base layer, so merino wool is the way to go. To date, I know of only one reputable glove designed for photographers: Vallerret. I got the Markhof gloves a couple years ago, and just recently upgraded to Vallerret’s Markhof 2.0 gloves. These are an absolute must for winter photography: they have a great weight-to-warmth ratio and flip tips so you can operate your camera or phone.
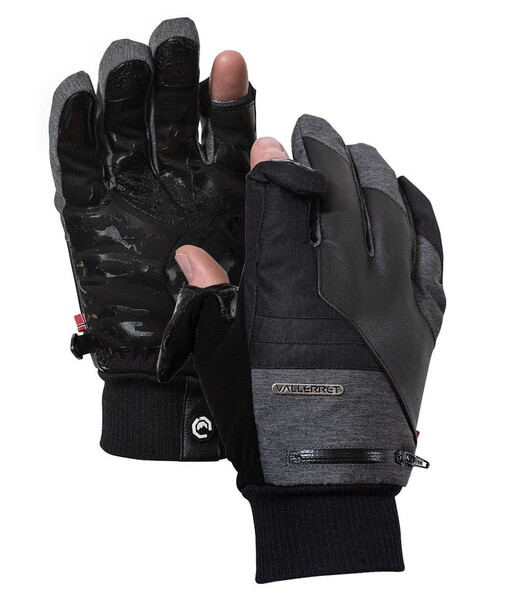
If you’re headed for sub-freezing climates, you can eke a bit more warmth out by throwing a pair of liners under the Markhofs, or take a look at the Ipsoot that is specifically designed for deep winter conditions. The one downside is they are a bit bulky, but provide more warmth than the Markhofs even with a liner.
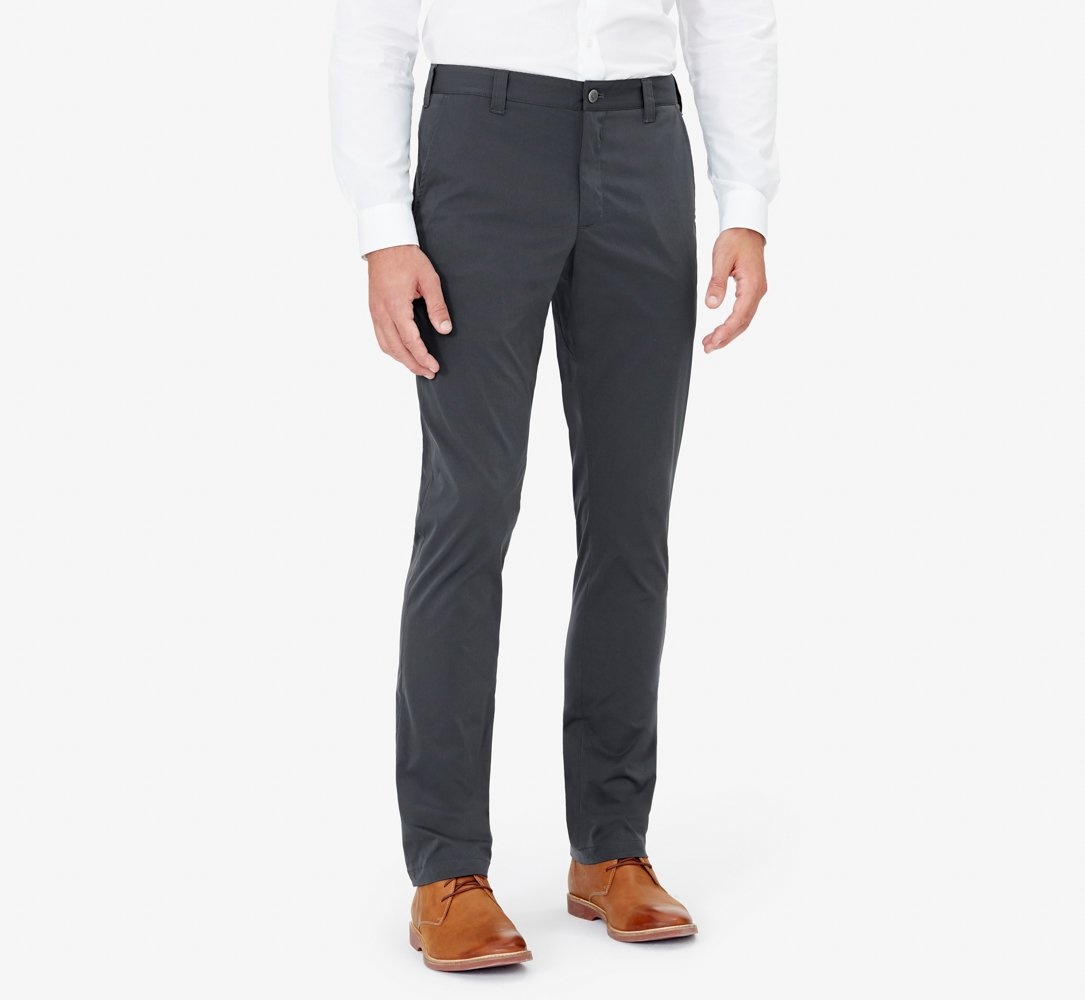
Ultralight Travel Pants
The key with pants is to travel with a single pair that is appropriate for anything, whether you’re hiking in the winter or on a business trip. They need to be lightweight, easy to sink wash, resist odors, and look good. I have two recommendations depending on your preferred climate.
If you’re headed for climates above 45 degrees, the Tailored Chinos by Bluffworks are fabulous. These pants are quite literally tailored to active travelers: they are the best fitting and lightest pants I’ve ever worn, and come with subtle security pockets that are great in sketchier cities.
The Chinos breath unbelievably well during intense hikes, but that means in a colder climate, the chill goes right through the pant. The legs are cut short too, so ankles tend to be a bit exposed when hiking. All great for fashion and warmer climates, but not a great asset in colder climates.
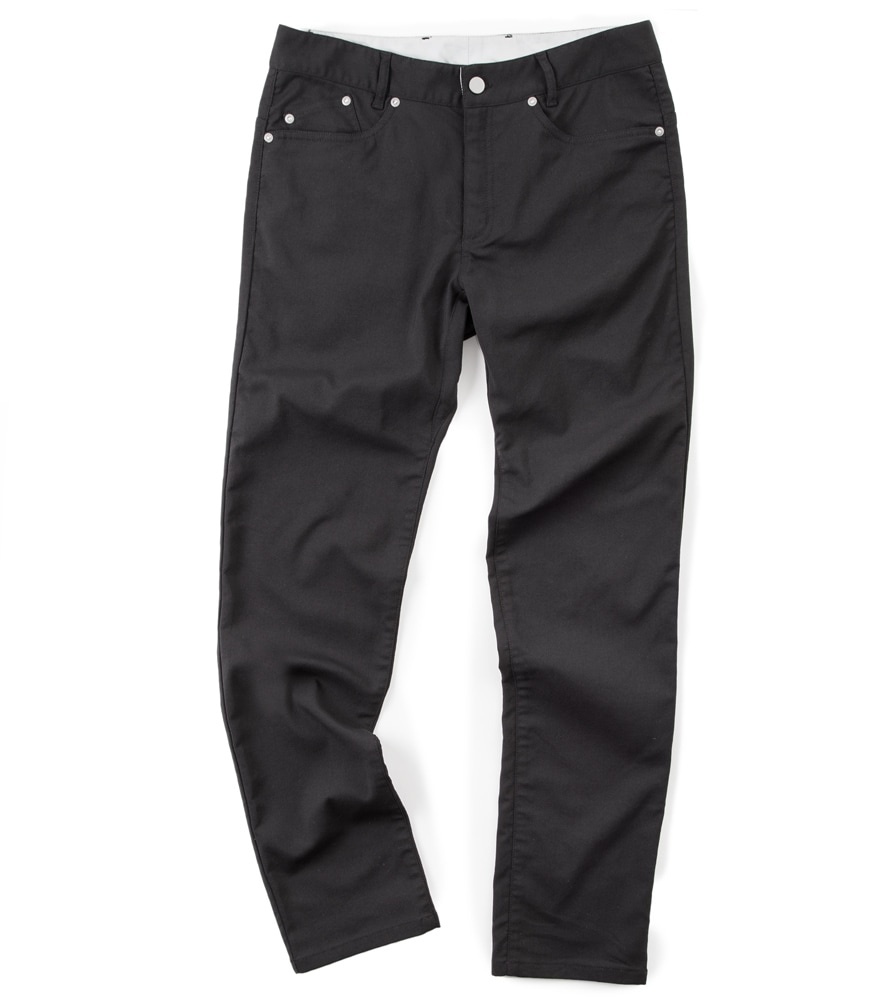
Since I tend to hit chillier destinations, I wear a pair of Outlier Slim Dungarees. I’d heard about these many, many times in digital nomad circles. The first thing you’ll probably notice is sticker shock: these pants are not cheap, but you will literally own one pair for years. The weave is top notch with a Cordura exterior for incredible durability. I’ve worn them for ten weeks non-stop in Virginia, Iceland, and the UK. By non-stop, I mean for the entire 24 hours of the day: the lightweight fabric feels great for sleeping in.
These look fantastic once you find the right size. It took me a couple times to get the size right, because once they loosen up you shouldn’t need a belt. If you do, it’s a size too big.
The Dungarees have some minor liquid repellant: I spilled coffee on them and it rolled right off without stains. But they definitely aren’t waterproof — 5 minutes walking in a light rain eventually soaked through. But because of the weave and fabric, they dried out in 10 minutes of air conditioning. Try getting denim to do that!
Ultralight Jackets
Your mid and outer layers are the easiest place to blow any imaginary budget, but crucial for landscape photographers. Your mid layer, typically a down jacket, provides heavy duty insulation. Your outer layer needs to provide wind resistance and waterproofing without trapping perspiration that gets wicked from your base and mid layers.
It’s hard to match down feathers for their phenomenal weight-to-warmth ratio. Down feathers trap heat by “lofting” and trapping little pockets of air, so a higher fill power doesn’t mean the jacket has more down: it means the feathers are better quality and do a better job of trapping air. Generally you should look for jackets with a higher fill power, but there’s a lot more to comparing jackets — for example, fill weight indicates how much down is actually stuffed in the jacket. Switchback has a great in-depth technical breakdown of some of the top down jackets.
I travel with Patagonia’s Down Sweater Hoodie. The Nano Puff is also really popular for ultralight packers, but doesn’t pack quite as much warmth as the Sweater Hoodie.

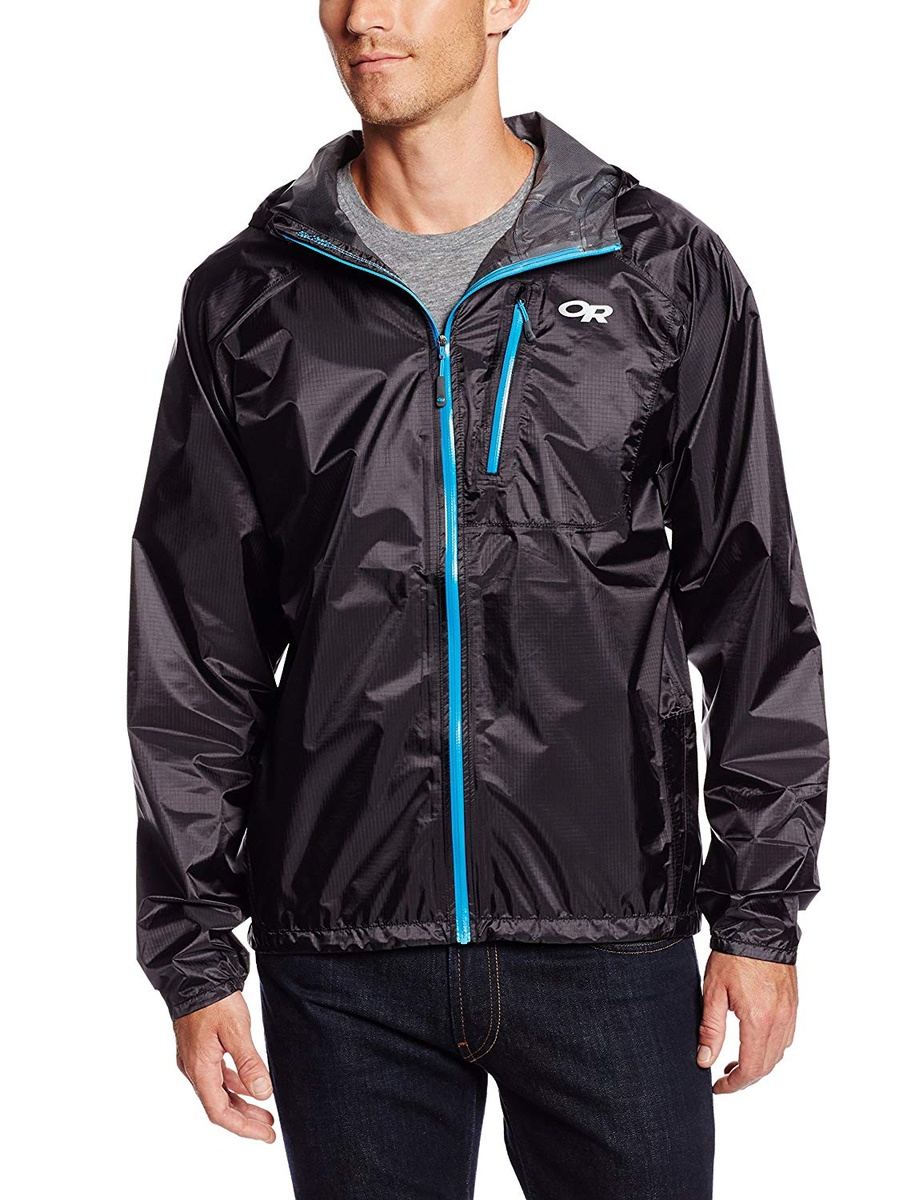
Of your wardrobe, your outer layer will probably see the least use. Unless you habitually shoot in the rain, I recommend looking for the lightest rain jacket that fits your budget, keeping in mind that it will mostly be packed in your bag for inevitable downpours in the middle of a hike.
Nothing beats the Outdoor Research Helium II rain jacket for weight. This is my rain jacket of choice, though I opted for the pricier Helium HD (not to be confused with the Hybrid) which adds pockets and adjustable cuffs in exchange for an extra ounce.
Waterproof Hiking Shoes
Exceptional waterproof hiking shoes aren’t lightweight, but that’s okay since you’ll be wearing them! The trick is finding one pair of shoes that works for everything: urban exploring, hiking, and potentially a business trip.
I have a pair of Merrell Gore-Tex hiking shoes that keep my feet dry, grippy, and warm. The catch: they aren’t exactly stylish. Going with a lower cut helps, but I’m still waiting for something that looks as good in the city as it does in the mountains.
Ultralight Experiments that Didn’t Go Well
Not all of my optimizations worked out. In particular, I had catastrophically bad luck with my experiments in cutting down on all those stupid chargers.
I tried replacing every wall charger with a USB version so I could charge my headlamp, laptop, camera, action camera, and iPhone with one wall brick. It was a fantastic idea, and meant I could charge anything in the car without a power inverter. Unfortunately, my USB camera battery charger simply didn’t work. Like an idiot, I only tried it a few times to make sure it worked before leaving for a year of travel. I had to drive 3 hours back Reykjavik to pick up a big, beefy non-USB charger that cost 3 times as much.
The big wall to USB charger I purchased to charge all my gear seemed fine, but is spotty about charging my MacBook. Lesson learned: test your new charging equipment daily for a solid month before travel. The risk and cost are too high if they don’t work.
I’m looking forward to next generation charging technology like the recently released Innergie 60C USB-C charger, but for now it’s probably best to stick with the OEM chargers for your laptop and camera.
Never Stop Iterating
There is no such thing as a perfect pack, and if there was it would quickly deviate from the intent of ultralight packing: to get out of your way so you can focus on creating the best landscape photography possible.
So unless you have a stack of gift cards lying around, take it one step at a time and analyze how every optimization does — or does not — improve your work. That $950 tripod might be better spent on a 5-day photography trip and taking notes as you go about pain points with your current gear.
What are your favorite gear optimizations in pursuit of one-bag travel? Share your tips in the comments!
Join the Fstoppers community for free
-
Post comments and join in the discussions
-
Browse the site ad-free
-
Share your work and get featured in the community
-
Compete in the photo contests for fun and prizes
30 Comments
You can get away with two bags as well. One for clothes and the other for day hiking with your gear.
Niiice! I do bag-within-a-bag: pack a nylon foldable daypack that rolls up to go in your main bag, and when you reach your destination, you can throw a bunch of stuff in it. Not as nice as having a real daypack, but it lightens the main bag without littering the back seats.
I'm carrying a bit more than you so I need that extra support. I've used those little day packs before and they can good for snacks, but not for carrying weight. My back would not like me lol.
Which exact Osprey models do you use and how do you store your camera gear and tripod inside it?
Good question! I use the Osprey Farpoint 40 for my clothes and tripod in transit (going through an airport). That bag is on the left. The bag on the right is a Stratos 24 which I actually plan to write an article about - it's the best hiking camera bag I've ever used. All my gear goes into a small camera insert (brevite camera insert which I salvaged from an old bag) and it fits perfectly. The tripod goes into the drink hold and straps up at the top as well. It works remarkably well and is far beyond a normal camera bag for weight support.
By convention, ultralight backpacking is taken to be a base weight of below 9.0 pounds (4.1 kg). There is a substantial online ultralight community. For any photographer who has a gear fixation, and who enjoys hiking, the ultralight community would be a good fit, as they are constantly obsessing about gear and weight. There are a lot of excellent cottage manufacturers of ultralight hiking gear; most of them in the US.
And yes, ultralight trail shoes (as opposed to hiking boots/shoes) are the done thing. The conventional wisdom is that reduction of shoe weight is extremely important to comfort. As an aside, leather boots take forever to dry once wet, whereas a lightweight trail shoe dries pretty quickly; it doesn't sound like a big deal, but it is.
With regard to sleeping gear, I tend to layer in the same way that people layer clothes. If you use your insulated jacket as sleep wear then you can use a three season sleeping bag in winter. Added bonus, it makes it a hell of a lot easier when you have to leave the tent in the middle of the night to urinate.
An ultralight hiker would be most likely to carry something like the Sony RX100; certainly, cameras and tripods such as those depicted have no place in any ultralight kit. As to the laptop... Being pedantic, I would suggest the depicted kit is lightweight, not ultralight.
My semantic objections notwithstanding, reduction of weight and size is only ever a good thing, and in terms of camera gear, I've paired my gear for hiking down to an A6000 and a couple of the Sigma f/2.8 primes. My entire camera set up weighs 1.7kg, including the camera bag, a 1kg tripod, and spare batteries - mostly I could leave the tripod at home. On my next iteration, I'm thinking I'll move down to MFT.
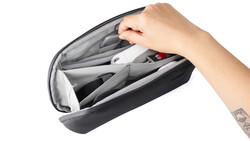
With regard to the camera bag, I've repurposed a Lowepro film bag (padded and divided, with a weather cover - I don't think they make them anymore), which fits my camera, second lens, and batteries, and it secures to the waist belt on my pack. Not only is it light and compact, but I can access the camera quickly, without having to remove my pack.
In any case, the first rule of lightweight or ultralight weight is 'if you don't absolutely need it then leave it at home'.
As somebody who has experience in both circles (long distance hiking & landscape/travel photography), there are a couple of caveats that I think one needs to consider before assuming the gear list is directly transferable.
The main issue is that there's often a big difference between the two: the amount of time spent moving vs. standing still. Most ultralight hikers are on the move... 20-30 miles a day through rough terrain, from sun up to sun down. This is actually what allows you to carry lighter weight clothing & trail shoes, because the fact that you're constantly moving goes a long way towards how you stay warm. And if you're stopped for any longer than 30 minutes, you're basically in your shelter & sleeping bag. But for photography, while you may be hiking a little in order to get to a destination, you're often spending more time either standing still or moving slowly in order to find compositions, waiting for the light to change, etc. That can have a huge impact on how warm you're able to stay.
For example, I 100% agree that waterproof boots shouldn't be worn for long distance, ultralight hiking. They don't breathe well, so you get moisture buildup and therefore a higher potential for blisters. They're heavier, and they take forever to dry if they actually do get wet. Heck, I don't even hike in shoes anymore; I've backpacked in Chacos for the last 18 years. My feet may get wet faster but more importantly they dry faster. That being said, if I'm spending hours shooting on a beach or by a lake in wet, muddy conditions, I'd rather have a good pair of insulated waterproof boots. I'm able to tolerate wet feet if I'm moving constantly because that's what keeps my feet warm. If I'm standing still, no such luck. I'll freeze.
Similar thoughts on clothing... if you need to stay warm while standing still or during long periods of low-output activity, you probably either need more clothes / layers or simply a few heavier ones.
I agree that my hiking experience has informed my packing decisions for photography a great deal, but I've definitely found that there are distinct differences when packing for one vs. the other. Mostly this has to do with the fact that it's easier to stay warm if you're constantly moving, and getting wet doesn't have as big of an impact on that, vs. if you're trying to stay warm with low exertion, you need more insulation and getting wet has a bigger impact.
Well, common sense does apply. If someone is wearing lightweight trail shoes in -20 degrees, they probably deserve the injuries they are going to sustain.
Thanks for bringing more hiking perspective, Edward and Dave! Didn't know there was a definition of "ultralight," now I have a new weight goal.
I'll echo Dave, this guide is probably a better fit for ultralight *travel photographers* and digital nomads rather than ultralight hikers — since a year of travel takes me anywhere and I continue to work + visit cities, items like a laptop and tripod are non-negotiable. The challenge is to squeeze my (working) life in one bag, rather than optimize my pack to its bare minimum for an intense outdoor trek. Different challenges and tradeoffs, but there's definitely some helpful overlap!
Is there a backup plan in case of equipment failure? Such as a second body or lens ready to go from someone at home in case it's needed?
That's definitely an option, but I think Amazon is easily the fastest backup option, as opposed to buying a backup camera that will collect dust at home and will need a lot of coordination to set up international shipping.
It can sound terrifying not to have backup equipment, but depending on what you plan to shoot, it might be a bit like car vs airplane crashes: we tend to overprepare for the plane crash because it's such a dramatic, 300-people-died-at-once way to go. So while equipment gone south does happen, the inconvenience and expenditures preparing for the worst can often outweigh taking the hit if it comes.
That said, if you're shooting events during your travels — where equipment failure means a lost gig — it might be worth renting backup equipment rather than purchasing, insuring, and lugging around your own personal backup equipment.
You left out "for those with deep pockets" at the end of the title of your article. However suitable affordable alternatives exist, both for clothing and support gear. I would consider synthetics over wool for thermal layers, possibly for everything actually. Not as thermally efficient, until you start sweating of course, then they'll be worth their (light) weight in gold...
I would argue that synthetic is not an affordable alternative for anything longer than a day of use between washes, because once you start stinking so much you’ll cave and buy wool anyway. I’ve tried for years to use synthetic stuff but if it’s anything longer than a weekend trip, it just doesn’t hold up. Especially if you’re talking about travel that includes equal parts town, where you’re not the only one offended if you stink.
The closest thing I’ve found as a “best of both worlds” is Rab’s meco base layers, which are a merino / polyester blend. Great stuff... faster drying, no stink. But as far as straight synthetic, even the more expensive odor control stuff doesn’t really work well in my opinion. And at that point you’re not saving much money anyway. I’d suggest cutting costs elsewhere, especially when talking about base layers.
Strange ablout the stink comments here. I've been using synthetics for years and never had this issue. I suppose it may vary by individual.
Ask your wife. :-D
The rest of us are envious 😂
Yeah, it's well known that synthetics retain odor. It stands to reason that if you are not exerting yourself much and washing everyday, that this process will take longer.
https://www.npr.org/sections/health-shots/2014/09/05/346055067/stinky-t…
Ultralight & Minimalism doesn't mean cheap to be honest. I've been taking my path to minimalism at home, reducing my whole wardrobe to 2 shirts, 2 pants, 4 t's, 4 polos, 2 sweaters, 2 shorts, 1 surf short, and underwear + shoes basically. It's all I own but what I have done and am doing (to work it properly) is go with quality fabrics and clothing which lasts for long, doesn't wrinkle too much, and merino is for the upper part a way to go (i go with unbound merino for my part).
That's awesome, Olivier! It's strangely freeing to have a tiny wardrobe where everything pulls its weight.
Agreed, minimalism is definitely more expensive short term. I'd like to think that over time it pays off (you tend to reconsider purchases, spend less on transportation, etc) but it's easy to focus on money cost and forget about lifestyle cost: what opportunities did you forgo because of this stuff? What countless anxieties stole joy from your day-to-day? Those are costs you won't see in your wallet so much as your relationships and life goals.
Jonathan Lee Martin You are absolutely right. Life imho is about experiences, people, doing things, going places, meeting people (yes also the PADI way :D). It's very freeing, and i'm slowly getting the whole family in that mood, takes a bit of time, but I feel that when I do it, and feel amazing about it, it will reflect to whom it might concern in the household.
The documentary on "the minimalists" was a fascinating movie, I had started my journey and it just brought everything together.
The toughest part is to deal with the paperwork for Administrative purposes, in 2019 the goal is to receive, pay, scan, store online, discard paper version, and have a shelf with my former files, which when the year of deletion comes, to go to the bonfire or confettis from my shredder during carnival :D (a great way to get rid of papers when nobody would imagine you're throwing out your personal data :D)
What a journey! Leading your family through minimalism sounds like an amazing (in a good way) challenge. Best of luck — time is your ally, and cultivating some habits now pays dividends.
Admin paper is a rough one — I moved a couple times in a couple years which helped me kill incoming mail so I could slowly eliminate the stacks I already had 😂 sheet music was the hardest; I studied violin performance so I had piles of music with notes and fingerings from instructors I really didn't want to lose. 2 days later, I now have my music with me wherever I go. Hurray scanners!
Sadly I haven't had good luck with synthetics — the stink is real 😂 but a lot of the merino wool base layers add a little synthetic for durability and stretch, like lycra/nylon/polyester. So almost the best of both worlds!
Merino wool base layers can be a steal if you watch Amazon and department stores around spring. I've picked up a lot of pieces in my wardrobe for <$30. Still pricey, but long lasting and replaces my entire wardrobe. Easily paid for by not having to check a bag on a budget flights 💸
Interesting, as I've mentioned elsewhere I've never had a stink issue with the synthetics I've used for years.
Someone can recomend a small, light travel tripod for use With D850. I have a large RRS tripod, but want one extra : smaller, lighter and not so expensive :)
I'm a pretty big fan of Sirui's tripods. Amazing build quality and features at some solid prices. Here are a couple options that fit the specs (I haven't personally owned them though):
1. https://www.bhphotovideo.com/c/product/822126-REG/Sirui_BSRT2005_T_2005…
2. https://www.bhphotovideo.com/c/product/1378861-REG/sirui_a1205y_a1205_c…
I had a Sirui T-025X, I was assured would hold my D810 and 70-200 f/2.8. Soured me on the brand.
Which lens(es) are you bringing?
I've had a very good experience thus far with the 3 Legged Thing Punks Brian for my D750. Not the lightest out there, but one of the stronger contenders in my research for its load capacity to weight ratio - about 3 pounds including the ball head. Folds down small too. I've taken it on 60+ mile backpacking trips through the mountains and not felt too encumbered. Not everyone is going to want to do that, but I try to get my backpacking gear as light as possible so I don't have to compromise as much on camera gear.
https://www.bhphotovideo.com/c/product/1394638-REG/3_legged_thing_brian…
Great article. With you on the merino. For warmer temps, my synthetic alternatives are Uniqlo Heattech longsleeves.
I'm super confused regarding the Outlier Dungarees. Firstly, dungarees, by definition, have a bib that comes up and over the shoulders. It's an odd choice of name for a pair of trousers. It's like North Face calling their next jacket the Thermoball T-Shirt. Secondly, what is going on with their photos?! Dark, out of focus, weird composites. It's very odd.
Warmer as in 60+ degrees, or 40–60? Funny enough, I like the merino wool in 80 degree weather too (150g/m2) so I can pretend I didn't sweat for the last hour 🤷♂️ it doesn't breathe as well as a typical polyester top, but prevents the Pumba effect 🐗
😂 no comment.