
Trying to capture a perfectly balanced shot during blue hour has its challenges. These three tips will have you capturing more successful images for your portfolio.
For most photographers blue hour is defined as the time between twilight and sunrise or sunset. While this is accurate in a literal sense, I'll be referring to blue hour as the time period when you can visibly see stars while also having enough ambient light present in your scene. Photographing during these times comes with specific challenges you might not realize until you're trying to capture your first scene.
Location Scouting
Scouting your location is paramount to all types of landscape photography but it is even more important when you're planning on photographing a spot with very little light available to you. This obviously applies more to photographing blue hour during sunrise rather than sunset as you can plan on being at your location and get setup far before blue hour starts. Sometimes we don't have that luxury though and capturing the perfect blue hour shot time is crucial.
If you've ever photographed at night for astrophotography then you know how much of a pain it can be to find a composition in the dark. I've already written a full article on maximizing your time when location scouting but the three main tips are:
- Have a shot in mind before you go based on photos you've seen from the same location
- Keep your shot simple, you might not have enough time to find a completely unique composition
- After your first visit, stick around and find more compositions for when you return
One thing you'll find when you first come to a location that you've seen online is that it might look entirely different than you would ever expect based on social media. I've arrived at so many locations that were new to me but had seen countless times only to find out it was nothing like I imagined.
Using the Mobius Arch as an example, you'd never guess to take the photograph you'd be standing on a big boulder right next to it trying not to slide off and take your camera with you. It's these limitations that are good to know before you arrive rather than trying to figure them out when time is of the essence.
Balanced Exposure
Timing is incredibly important when trying to pull off this type of shot. The time period to capture the image we want is an incredibly small window (this is for North America, these times might be a bit stretched at the poles). The goal is to capture enough light on the scene and stars in the sky as a single exposure. In my experience, this moment only lasts roughly 5 minutes.
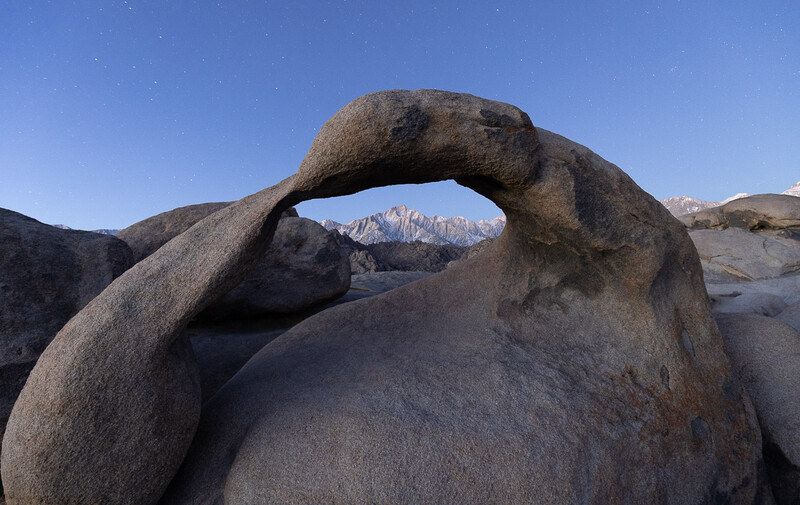
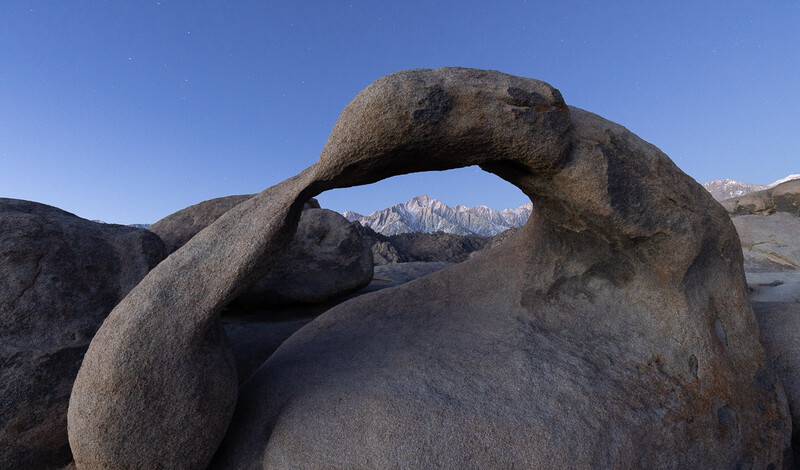
Take these two example images. The only difference between these images is the left one was taken at f/4 and the right one taken at f/8. I adjusted the right image by +.25EV so their exposure is identical. Notice the balance of light in the image and how many of the stars you can still see. These images were only taken 6 minutes apart from each other. The sweet spot allows you to capture enough light on your scene and still have enough to work within your edit to reveal the stars. Ideally, you also want to capture your scene with a healthy balance of low aperture and low ISO for the highest quality image you can walk away with.
You might be wondering why you can't lock in your composition and take a photo while the stars are more present and wait for more light to take a second photo then blend them together in Photoshop. This is an option, but many of you might not feel comfortable with those techniques, and keeping it all in a single exposure is easier no matter how great you are at editing. More importantly, doing this wouldn't have been possible with the composition I ended up with. To capture the entire arch I had to take 3 photos at a focal length of 16mm and combine them into a panorama. This would be nearly impossible to do cleanly if I tried to take the panorama at two different times and blend them together in Photoshop.
The Sun Matters
The last tip is likely the most important but requires the aforementioned tips to understand. The darkest part of the sky after the sun sets or before the sun rises is 180 degrees away from the sun. This means that many times your compositions might only work for sunrise or sunset, not both. Thus it is incredibly important to know where the sun will rise and set based on your composition.
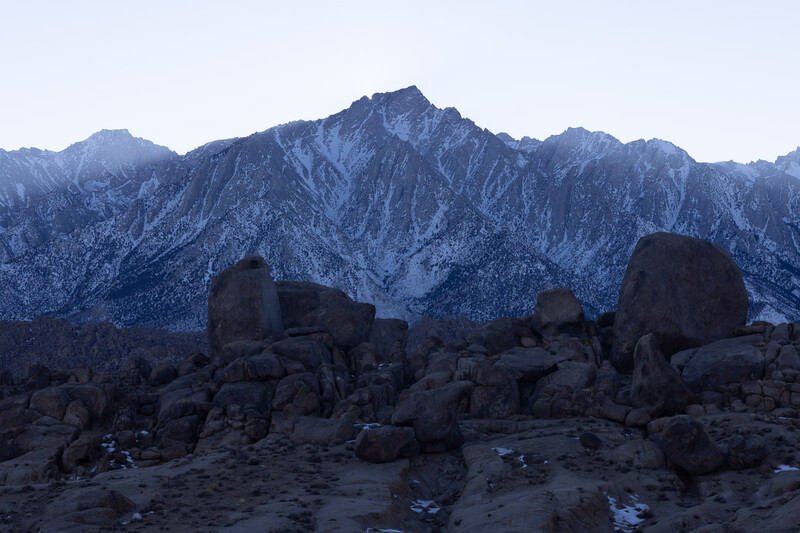
If you've ever tried to capture a beautiful sunset that happens behind a mountain range you may have experienced this. A scenario where you're exposing for the detail on the mountains but having the sky be completely void of detail because it's simply too bright to capture in a single image. What might not be obvious is what happens long after the sun fully sets. The night sky where the sun sets will remain too bright to ever capture any stars while there is still light on your scene. Next time you're out shooting and the sun goes down, pay attention to the area of the sky that gets darkest first and you'll see exactly what I'm referring to.
On top of all this, the most pleasing light on your scene during blue hour will also happen opposite of where the sun sets. Even though the sun hasn't reached the horizon you can still think of the area it is rising/setting from as your light source. Sometimes you'll get absolutely beautiful soft light and other times you might get more shadows in your scene. This is the magic of blue hour. The tonal ranges you get during this period are based entirely on the atmosphere the sun is reflecting off of.
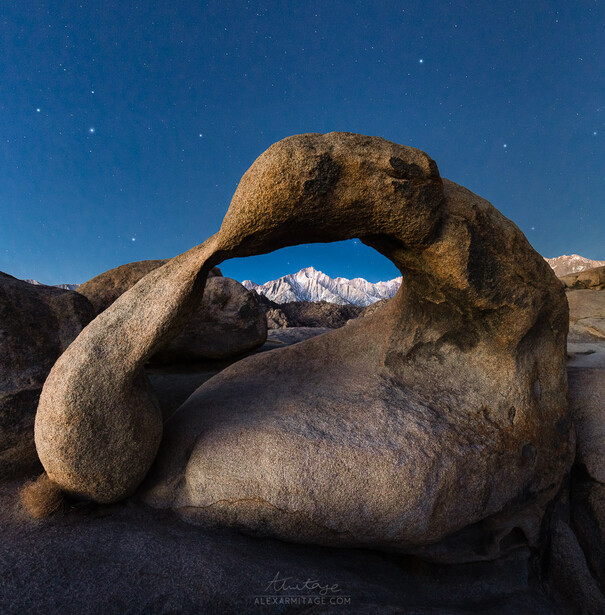
This image wouldn't be possible without the techniques in this article. Trying to time blend a super wide-angle panorama like this one would have been a massive headache if not possible at all. By planning my shot, timing exactly when I could capture the stars and detail in my scene, and knowing where the sun would be I was able to capture everything I needed in a single exposure. If you're interested in how I accomplished this edit be sure to check out the video at the top of the article. Hope this was helpful and you found something to work on the next time you're trying to capture your own starry night blue hour shot.


Join the Fstoppers community for free
-
Post comments and join in the discussions
-
Browse the site ad-free
-
Share your work and get featured in the community
-
Compete in the photo contests for fun and prizes
3 Comments
Great video and picture!!! Can't normally watch video. All the time watching ring in your nose.
I do like the final result, but can a 3 shot panorama stitched together in a processing program really be considered a single exposure?
I guess in literal terms it's not a single exposure but in in terms of light, the exposure doesn't change which is what is important.