
Shooting a panorama is quite simple in concept, but there are a few tips to follow that should give more consistent results. Whether you have never shot a panorama before or you're well versed, there may be something in here for you.
These tips are intended to increase consistency and give you a better chance at being able to stitch images together without much trouble. Devices even exist specifically used for taking panoramas to give you an idea of how deep you can get into capturing and perfecting images. Elia Locardi uses them often within the Photographing the World series here on Fstoppers. Personally, I travel with the bare minimum, thus it's not something I've ever used, but if you're interested, that's a fantastic resource to consider.
The point is you can take a successful panorama with nothing but a camera and a lens. Anyone that tells you otherwise is wrong, but there are definitely tips to follow to improve your results that I hope you find useful throughout this article, so let's jump in!
In the Field
There are quite a few variables when it comes to shooting panoramas, and I won't be able to cover all of them. With that said, these tips should apply no matter what type of lens you're using, subject matter, or even the conditions you are shooting in.
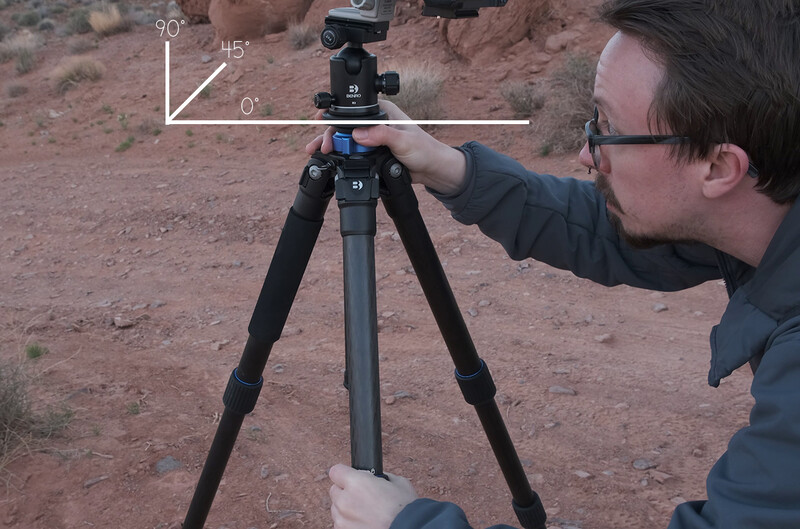
Use a Tripod
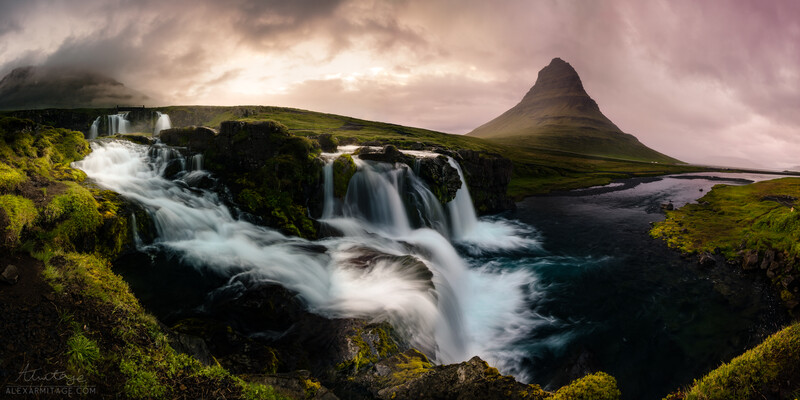
Level it to the best of your ability. I've taken numerous handheld panoramas, especially at wide angles, but I always get better results if I'm taking my time and using a tripod. A tripod is somewhat ubiquitous when it comes to landscape photography so it likely comes as no surprise here; however, making sure your tripod base is level isn't something to worry all that much about until you're shooting a panorama. Regardless of the type of tripod head you're using, you want to make sure the base of your tripod is level to the plane of your shot. For this example, the plane of my shot is the horizon, so I simply want my tripod base perfectly level. Do this by adjusting the leg length of your tripod after you've chosen the spot from where you are going to take your shot. Once you've done this, try to level your tripod head to the best of your ability and pan across your shot to see how much the plane you are following shifts. Repeat the balance of leveling your tripod if the shift is significant, remembering that the smaller the shift, the more usable image you'll have in the end.
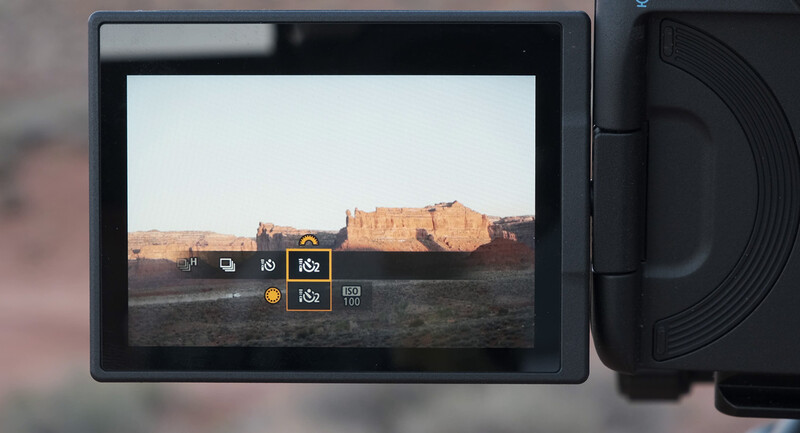
Reduce Camera Shake and Internal Lens Movement.
If you're shooting with a telephoto lens, this step is very important, though it's less of a concern with wide-angle panoramas. The higher your focal length, the more movement you'll see in your shots from camera shake or wind. Make sure you're using a two-second timer or a shutter release. You also want to set your camera to manual focus after you've focused on whatever the main subject of your panorama is. Lastly, you'll want to turn off any image stabilization your lens might have; this is not incredibly important but can be an issue with longer shutter speeds.
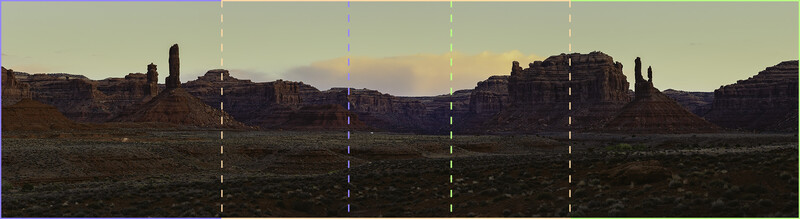
At Least 30% Overlap
Once you've done everything else, it's time to take your shots. A general rule of thumb is to make sure that you overlap the composition in each individual shot by 30%. You can always take more, which will result in more images, but taking less can risk having a harder time combining your images in editing. Make sure between each shot that you lock down your tripod and give time in between your exposures so that any camera shake or vibration settles. This is very important, as I've botched my fair share of panoramas because of my impatience.
Editing
Now that you've taken all your shots, it's time to bring them into your editing suite of choice and combine them together. I will be using Lightroom; thus, everything here also applies to Photoshop. However, if you're using something like Capture One, you should still be able to follow along. Your results for this part are going to vary greatly depending on the focal length of the photos you captured. If your shots were taken without much lens distortion, which is accomplished typically by shooting at 35mm or greater, but can also depend on if you're shooting with a prime or zoom lens, then your results will look similar to this guide. However, if you're attempting to merge wide angle shots together, the process will still apply; just note it may be more difficult to fix distortion in your final image.
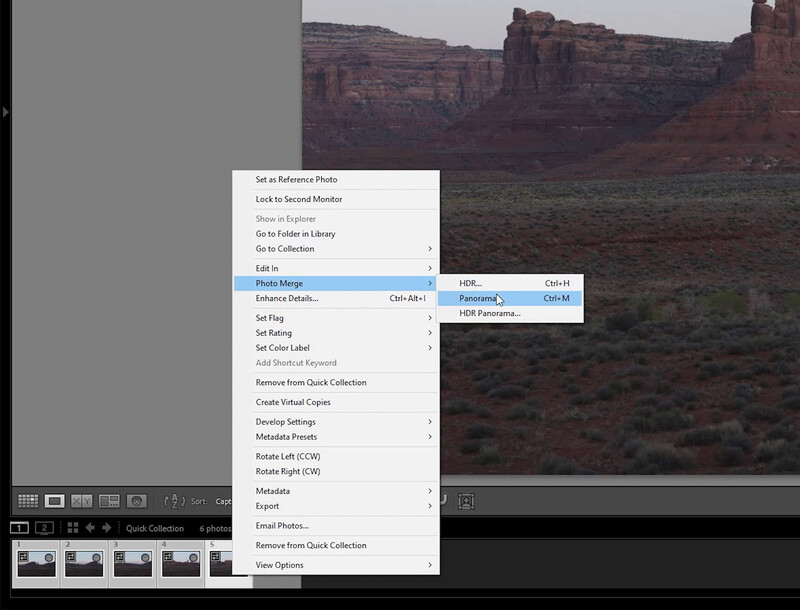
Once you have your images loaded into Lightroom, you'll want to select a series of shots taken together, right-click while you have them selected > Photo Merge > Panorama (Ctrl + M or Cmd + M also works).
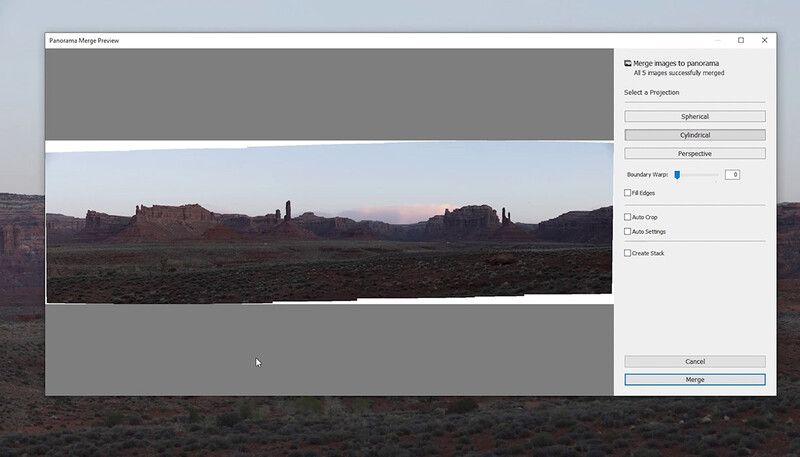
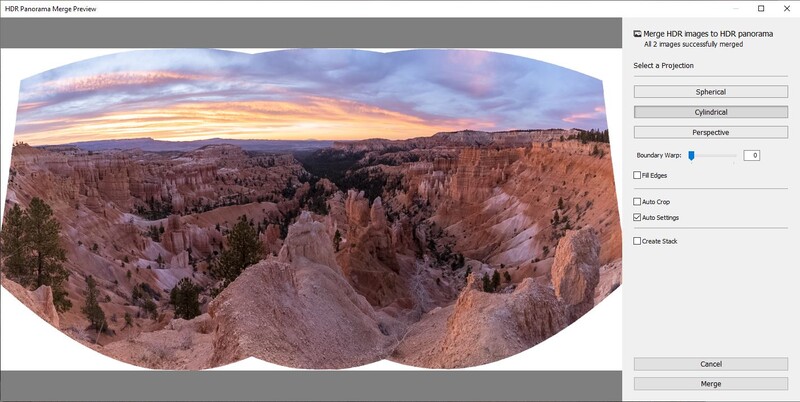
This will bring up the panorama merge preview window, where you have a few choices on how you want your image to be processed.
- Projection Selection will tell Lightroom how you want your image merged into a 3D object. Spherical will put your image inside of a sphere, which is most useful if you've shot multiple lines of images as if on a grid or if you have shot a 360-degree panorama. Cylindrical puts the images into a cylinder, thus similar to a sphere, except it's more concerned with images going from left to right or up and down rather than a grid. This is the setting I typically use when photographing a horizon, such as our example. Last is Perspective, which you'll use rarely for things like architecture. It will take the center of the image and distort the rest of the image around it, creating a bow-tie effect. Try each projection and pick which one looks best to you.
- Boundary Warp is used to stretch your image so that any white area you get from staggered shots or from distortion is removed. Notice in my shot that my images gradually incline, creating a bit of missing space from shot to shot. This is prevented by having a more level tripod base but is certainly nothing we can't work with within our final image. Just be careful with this step not to skew your horizon line so much that you can't fix it in the edit.
- Fill edges is another method to fill in those white areas where your image doesn't exist. I suggest avoiding this and if you need to fill any white areas to use Photoshop's Content-Aware feature instead.
- The auto-crop feature will simply crop the image down until there is no white area showing. You can always re-adjust this crop with the crop tool.
- Auto settings enables automatic edits for basic corrections once it finishes processing; don't use this unless it's something you use in your normal edits.
- Create stack is for organizational purposes and will take your newly created panorama and combine it into a stack with each individual frame in Lightroom.
Once you have your preview finished, simply select merge and wait. Don't edit your photos before combining them. Lightroom will use the unedited version of the images, and if it can detect lens profiles for the images, it will use those in its algorithm for combining them.
Conclusion
One issue you might run into is that Lightroom won't be able to combine your images together. If this happens, try merging them together in Photoshop as I've had a personal experience where they wouldn't merge together in Lightroom but they would in Photoshop. If that doesn't work, there is software made specifically for panoramas that has stronger capabilities than your standard editor. That being said, as long as you follow the tips in the field, you shouldn't have any issues combining images together. Recently, I did find a weird issue where I couldn't get a three-shot panorama to merge, but if I merged image two at a time, then put the full panorama together, it worked.
As always, thanks for reading, and feel free to ask any questions you have down below. I would love to see you share your results, and I'll provide any feedback I can on your process!


Join the Fstoppers community for free
-
Post comments and join in the discussions
-
Browse the site ad-free
-
Share your work and get featured in the community
-
Compete in the photo contests for fun and prizes
2 Comments
My ballhead sits on top of a leveling base. So, no matter how my tripod legs are aligned, the leveling base keeps the camera level. I also use a nodal slide to avoid parallax. These measures just makes the stitching process produce better results.
For those of us who are Linux users I use the program called Hugin which has wizards that makes photo stitching a breeze for some of us who are learning about how this all works.