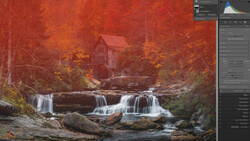
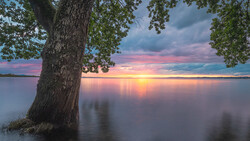
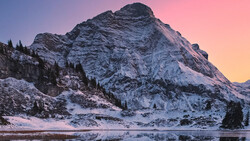
Enhancing a sunset sky in an image can make a significant difference, bringing out vibrant colors and warm tones that captivate the viewer. Here's how to do it.
Coming to you from Christian Möhrle - The Phlog Photography, this detailed video walks you through the process of enhancing a sunset sky using Lightroom. Möhrle starts by emphasizing the importance of working with an HDR file for high-contrast scenes. This approach allows you to merge multiple exposures, balancing bright highlights and deep shadows to create a more dynamic image. The initial step is to select and merge your HDR sequence, then move on to the basic adjustments in Lightroom.
In the video, Möhrle changes the profile to Adobe Standard, which helps reduce contrast and brighten dark areas. By carefully adjusting the exposure, shadows, and blacks, you can bring out details in the darkest parts of your image. He also demonstrates how lowering the highlights can recover colors in the sky, adding warmth and depth. This balance between warm and cold tones creates a visually appealing gradient in the sky, enhancing the overall composition.
Möhrle further refines the image by increasing texture and clarity, which sharpens the details without making the image too harsh. Reducing the dehaze effect adds a subtle glow, enhancing the light around the brightest parts of the image. These adjustments collectively improve the base image, setting the stage for more advanced masking techniques.
Using linear and radial gradients, Möhrle shows how to darken specific parts of the sky and add warmth to the horizon. These techniques draw attention to the central part of the image, creating a natural vignette effect that enhances contrast and depth. By carefully manipulating temperature and exposure, you can achieve a balanced and warm sky that complements the rest of your composition.
To add a touch of creativity, Möhrle introduces a glow effect around buildings using radial gradients and adjustments to clarity and dehaze. This method softens the light, making the scene more atmospheric. Additionally, he discusses using a luminance range mask to selectively brighten parts of the foreground, adding contrast and detail.
Finally, Möhrle covers color grading to enhance the overall warmth of the image. By adjusting the highlights, midtones, and shadows, he introduces subtle color contrasts that enrich the scene. The final step involves using the calibration tab to fine-tune the colors, making them pop without appearing unnatural. Check out the video above for the full rundown from Möhrle.
Join the Fstoppers community for free
-
Post comments and join in the discussions
-
Browse the site ad-free
-
Share your work and get featured in the community
-
Compete in the photo contests for fun and prizes
1 Comment
If you're going to go so far to alter the truthful reality of your photograph, then why not just do the whole thing in CGI and be done with it.