Creating magical light in your photos can turn a good image into something truly captivating. If you’ve ever struggled with making a bright, contrast-rich scene feel more dynamic and visually appealing, this tutorial might be exactly what you need.
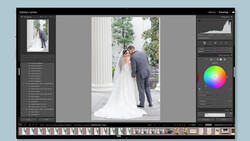
Coming to you from Christian Möhrle - The Phlog Photography, this informative video walks you through the steps to elevate a raw file using Lightroom’s powerful tools. Starting with a well-exposed but challenging image, Möhrle guides you on how to bring out the best in your shot. The first step is adjusting the basic settings—moving from Adobe Color to Adobe Standard to slightly reduce contrast. This subtle change sets the stage for further enhancing the image by carefully lifting the shadows and blacks, brightening the darkest areas without overdoing it. Each adjustment is layered carefully, creating a more balanced and pleasing look.
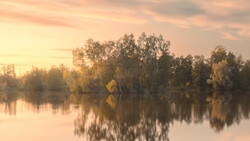
One of the key challenges addressed is dealing with the sky, which can often appear blown out in bright scenes. Möhrle demonstrates how to regain lost detail by bringing down the highlights, making the sky more detailed and textured. This is a common issue, and the technique shared is straightforward yet effective. He also tackles the problem of unwanted color casts, particularly the blue tint often found in distant mountains. By slightly warming the overall temperature, the scene takes on a more inviting and natural feel.
Next, Möhrle delves into local adjustments using Lightroom’s masking tools. He shows how to darken the upper part of the sky while introducing warmth to the lower part, creating a gradient effect that enhances the scene's depth. This approach makes the sky not just a backdrop but an integral part of the image, drawing the viewer's eye toward the subject. Additionally, he explains how to use linear gradients to adjust the foreground, adding contrast and texture to the water reflection, making it a more engaging element of the composition.
The tutorial continues with color grading, where Möhrle focuses on enhancing the hues to create a warmer, more vibrant atmosphere. He carefully adjusts the yellow and orange hues in the sky, making it glow with a sunset-like warmth. Split toning is also employed, adding warmth to the highlights and midtones, further enriching the image’s color palette. These color adjustments are essential for creating that magical light effect, making the scene feel almost otherworldly.
For the final touches, Möhrle sharpens the image, ensuring that details are crisp without being overly sharp. The result is a beautifully balanced image that showcases how a few well-considered adjustments can dramatically improve a photo. Check out the video above for the full rundown from Möhrle.
And if you really want to dive into landscape photography, check out our latest tutorial, "Photographing the World: Japan With Elia Locardi!"

Join the Fstoppers community for free
-
Post comments and join in the discussions
-
Browse the site ad-free
-
Share your work and get featured in the community
-
Compete in the photo contests for fun and prizes
1 Comment
Thank for video . Not so easy but also can follow it. What version of Lightroom then have this mask feature as my old LR dont have need to upgrade it?