Color grading can transform your images. It's a straightforward process using Lightroom.
Coming to you from Christian Möhrle with The Phlog Photography, this helpful video walks you through the steps of editing and color grading. Möhrle begins by adjusting the base exposure, changing the profile from Adobe Color to Adobe Standard. This adjustment helps lift the darker areas of the photo. Lowering the highlights and raising the shadows further refines the exposure, making details more visible without causing overexposure.
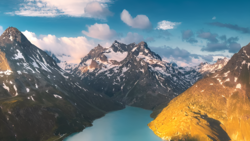
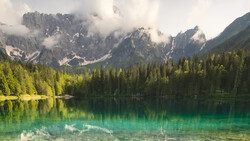
Once the exposure is balanced, Möhrle moves on to setting the white balance. For a warm, golden hour effect, he increases the temperature and tint to reduce any green color cast. Adding texture sharpens the smaller details, while reducing clarity and dehaze creates a soft, dreamy look around the edges, especially above the treeline.
Local adjustments play a crucial role in fine-tuning specific areas of the image. Möhrle uses various masking techniques to target the sky, foreground, and central trees. A color range mask darkens the blue parts of the sky, enhancing the contrast with the clouds. Linear gradients add punch to the water reflection by increasing contrast and clarity. For the trees, a color range mask combined with a radial gradient brightens the area and adds depth and contrast.
To create a glow effect, Möhrle uses a radial gradient on the left side of the image, adjusting the blacks, dehaze, and highlights to introduce warmth. Another radial gradient warms up the sky just above the horizon, adding a golden light effect. These adjustments bring a cohesive, glowing warmth to the image, enhancing the golden hour feel.
The final step involves color grading using the color mixer and split toning. Möhrle adjusts the hue of greens and yellows to balance the sky and trees. Increasing the saturation of oranges, yellows, and blues adds vibrancy. Split toning is used to apply a strong golden hour look, setting the highlights to a warm hue and adjusting the midtones slightly for a balanced, warm effect.
For further refinement, Möhrle uses the calibration tab to boost saturation and adjust the hue of the blue primary. This step enhances the sky's color and overall vibrancy. A bit of sharpening in the details tab, along with some cleanup using the remove tool, finalizes the image. Check out the video above for the full rundown from Möhrle.
And if you really want to dive into landscape photography, check out our latest tutorial, "Photographing the World: Japan With Elia Locardi!"

Join the Fstoppers community for free
-
Post comments and join in the discussions
-
Browse the site ad-free
-
Share your work and get featured in the community
-
Compete in the photo contests for fun and prizes
2 Comments
It's wild how far you can push an image these days. I remember thinking Lightroom was more authentic and Photoshop was the tool that made images look fake and pushed too far. Now with all these powerful masks, you can probably do more in Lightroom than Photoshop now. The image in this video is a prime example. It looks pretty bland starting off but then looks amazing by the end of the video.
Totally agree. I spend very little time in Photoshop these days with everything that can be done in Lightroom.