Many photographers struggle with creating a pure white background in camera, but it is an essential skill that all of us must master. The good news is that it’s relatively easy to do with the right setup. In this article and the accompanying video, I detail my method for creating a pleasing white background on camera.
Two Mistakes to Avoid
There are two common mistakes that you'll want to learn to recognize and avoid. The first mistake is underexposing the background, which results in a sort of dirty-white color or an uneven gradient of white to gray. In most cases, this is going to look bad, whether you are photographing objects or people, because the uneven or unpleasing background becomes a distraction from your subject and does not look professional. The second common mistake is overexposing the background, which is probably worse than underexposing because in this case, the light from the background ends up flaring and enveloping your subject in unwanted light. Therefore, the goal is to get the background lights bright enough that they create an almost pure white while having them set low enough that they don't affect your subject. This also makes the editing process much easier, and, if you are a headshot photographer like me, it gives your clients an accurate representation of what their final images will look like right on the monitor.
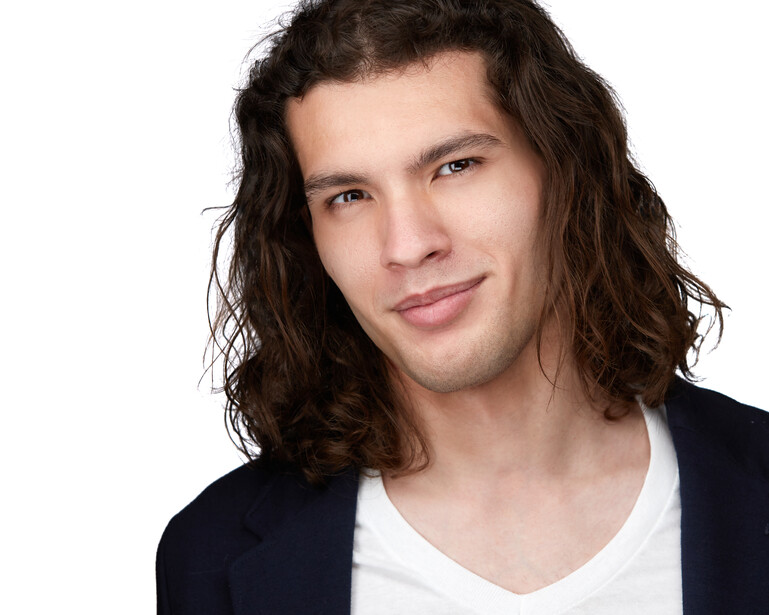
A headshot of actor and model Tyler.
A Note on Gear
There are a variety of ways to do this, and it can be accomplished with one strobe directly behind the subject. I prefer using two strobes, one on each side of the subject, because it allows me to take headshots and half- and full-length portraits with the same setup. If you have one light positioned directly behind your subject, you will not be able to take a full-length portrait without moving the light and changing your setup.
As you can see, we don’t need a ton of equipment to accomplish our task, and whatever brands you prefer to use are fine. The setup itself is relatively simple, but it’s crucial to make sure that everything is positioned properly and that the flashes are at the correct power.
The first step is to make sure you have enough distance between the subject and the backdrop. In my studio, I try to position the subject approximately eight feet from my seamless paper. I recommend placing the subject a minimum of five feet ahead of your backdrop, but if you are working in a very tight space, just make sure they are as far from the paper as possible.
Next, place one strobe on each side of the subject, feathered away from the center of the backdrop. Make sure the strobes are in line with your subject, and not behind them. You will not need the flashes powered very high, so start with them at about 1/16th power. Once we take some test shots, we will be able to dial it in, but remember that small increments in power make a big difference.
Now, take your v-flats with the black side pointed in, and position one on each side of your subject. The v-flats should be tucked in as close as possible to the flash stands. From above, it should create a sort of diamond shape, which is where our client will be placed. Make sure you leave enough room on the interior of the diamond for the subject to stand or sit comfortably and for any modifiers, you might want to place within the shooting area.
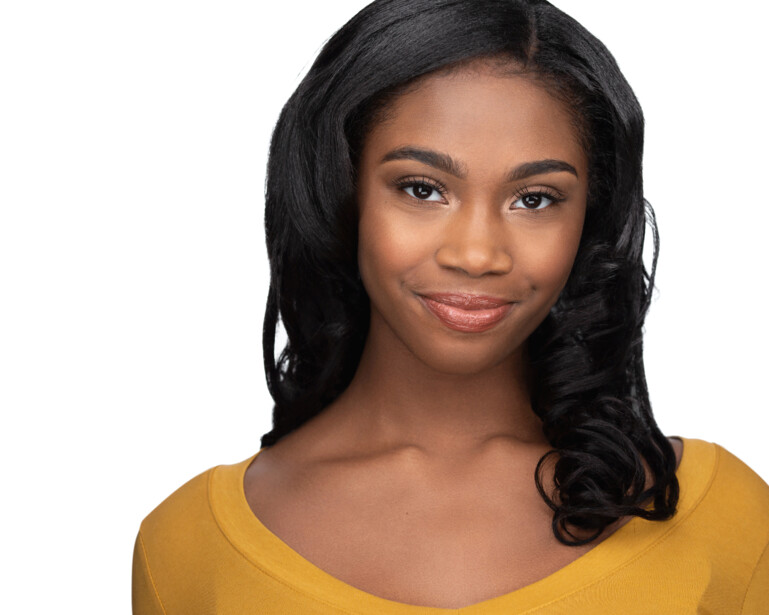
Kelly, a music educator and singer.
Time for Test Shots
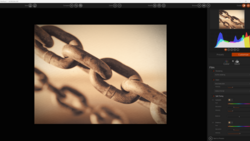
Now that we’ve set everything up, it’s time to take a few test shots and make sure our flash levels are dialed in correctly so that we are neither over- nor underexposing our seamless paper. If you are tethered to Capture One, after taking a test shot, scroll your mouse around the entire frame, paying close attention to the RGB levels, which are shown near the top of the screen just below the toolbox. If your RGB levels are above 255, your flashes are powered too high. This will result in a flare from the background enveloping your subject. Generally, I like to keep the values somewhere between 230 and 240, because this will give an almost pure white and eliminate the dirty off-white color. Since we are almost at pure white in-camera, in post, it’s a very simple task to bring it up to pure white while keeping your subject isolated from light spill.
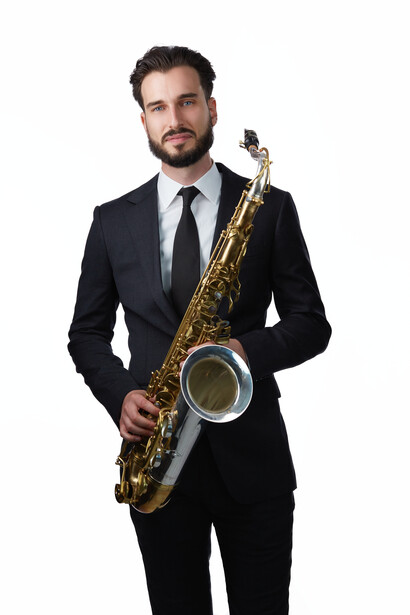
A headshot of jazz musician Chad.
Why Is This so Important?
As I mentioned before, this is a crucial skill for photographers who photograph anything in a studio for many reasons. If you are a headshot and portrait photographer like me, one of the greatest benefits of getting this right in camera (and not relying on Photoshop for heavy lifting), is that your clients can see in real-time what the final image will look like. Showing clients images of a muddy off-white background not only makes it much harder for them to see how great the final product will be but also diminishes the entire image, including the way they are represented in it. In other words, a clean, pure background makes the subject look better too.
A portrait of Chad using the same lighting setup. I like using two background lights so I do not need to change my setup when going from headshots to portraits.
Time to Shoot
Now that we have our white background dialed in, we can focus on capturing awesome images. During a typical session, I will turn my Pocket Wizards on and off between a series of captures. With the transmitter on, I get pure white, but with it off, I can also create a pleasing gray color, using the same white seamless paper and without changing anything in my settings or setup. I also have the advantage of taking headshots or portraits by just moving my camera back or changing my lens, which, as I mentioned, cannot be done with one flash directly behind the subject. In the images of jazz sax player Chad above, I was able to take a variety of headshots and portraits without moving anything around, which is a huge advantage.
By providing your clients with a pure white background in camera and with the added benefit of being able to easily shoot headshots and portraits without moving equipment, you will be able to give them a larger variety of awesome images to choose from, making your clients happy and increasing your bottom line.
For years I struggled with getting the background to be white without spillover on my subject. My studio was pretty large and even when I had as much as10' between my subject and the background, it would still flare. No matter how precisely I adjusted the strobe power or positioned the V Flats I would either have an off-white background, or a white background with light spillover on the subject. Eventually I replaced my Nikon 85mm f/1.4D lens with the Nikon 85mm f/1.4G and the problem was solved. So for anyone struggling with this, defintely try using different lenses. Also, my Leica 75mm Summarit 2.4 lens has worse flare than that older Nikon lens and it's pretty much impossible to get the white background without spillover when using it.
I agree.
I had a fairly large studio and often used my Canon 70-200 F2.8 L-IS v1. While pretty good, it was not until I switched to my 100 macro that the contrast fell into place. Dirty filters can also drop contrast with veiling flare.
By flagging as much of the background as possible you can also minimize the flare problem.
I used the Canon 100mm macro v1.
IMO the key is to reduce internal flare by choosing a modern prime.
I think the latest zooms would work well too but the prime retained detail in dark tones such as fabric (critical for fashion) whereas the flare of my v1 Canon 70-200 F2.8 muddied the detail in the deep tones. Bringing down the darks to eliminate the flare damaged the detail.
"Now, take your v-flats with the black side pointed in, and position one on each side of your subject. The v-flats should be tucked in as close as possible to the flash stands. From above, it should create a sort of diamond shape, which is where our client will be placed."
Is it just me, or is this description extremely hard to visualize? I have no idea what this is supposed to look like, and I'm a pro used to working with V-flats. In particular, I can't, for the life of me, figure how a pair of V-flats make a diamond shape unless you place them front opening to front opening. A quick sketch of the layout would be helpful here.
Black on the inside or outside? I'm guessing inside. Am I correct in assuming that the purpose of the V-flats is to reduce flare caused by light from the backdrop, as well, perhaps, as keeping light bouncing off walls/ceiling/floor from landing on the subject?
While it certainly possible to visualize, it is not necessary nor, in my opinion, preferable. A V-flat can both block a background light source and be a reflector at the same time in an 'L' configuration relative to camera and subject.
Furthermore, using negative fill (black) on the shadow side (opposite of main light) has a dramatically different effect than blocking/reflecting with white side. I think of black/white flats as giving options for density on the shadow side -- apart from blocking background lighting. I have sometimes used two flats one with black out from subject position back and white out from subject forward for nice contrast but a controlled shadow on face.
Over many shoots where I was faced with shooting white bridal gowns on white background and preserving detail in the white gown and still contrasting it to a pure white background, you start to value having options for contrast and density on the edges of the figure you are shooting. Having said that, I never used it in a diamond configuration.
I tend to light backgrounds with soft boxes and have matching pairs of both medium and large soft boxes to get consistent results from side to side. It is easily possible to get clean white using soft boxes without blocking flats. More frequently I will block only the shadow side because I am using the flat as a reflector anyway.
Over many years of shooting white background for fashion catalogs and lookbooks I learned that taking an incident meter reading behind the subject/model's head facing background (essentially measuring the background as a light source) and setting the light balance to make the background 1/2 stop higher than the main light exposure to be useful. I have found that to be just as accurate as measuring the light sources at the background. In my use, that balance yields about 240-245 as measured in Capture One.
Thanks! Makes perfect sense. FWIW, when doing headshots in small spaces, I use a scrim behind the subject as backdrop with a flash behind that. I wonder if V-flats would be as effective, with that setup, in reducing fringing. Then again, I often like the rim lighting it provides.
Can be done with umbrellas. As mentioned by some, studio size limitations can be an issue with spill, but I have done it with umbrellas in large places like meeting rooms and lunch rooms where spill gets down to nearly nothing.
Yep, also with strip boxes on the flashes. Sometimes I do this as well. The main goal for me is to keep light from spilling onto the subject while also giving an almost pure white in camera. Makes editing a lot easier and also gives the client a much better idea of the final product.
I'm not a pro so forgive me if my question looks naive. Why not just shoot with a high MP camera, and then add a white background layer in post processing?
Hey John this is a good question. The basic reason is that you want to get everything (exposure, color, hair, makeup, etc.) as perfect as possible in camera and to use photoshop to enhance what is already looking great. Using photoshop to switch backgrounds can be done, but it takes more time, and depending on the subject can be tough to get perfect, etc. Also, I shoot tethered and want my clients to be able to see what it will look like right in the camera as this makes it much easier to sell images. If I show them an image and say, "the final image will have a white background," then they have to envision it which makes it much tough er to sell.


20 Comments
For years I struggled with getting the background to be white without spillover on my subject. My studio was pretty large and even when I had as much as10' between my subject and the background, it would still flare. No matter how precisely I adjusted the strobe power or positioned the V Flats I would either have an off-white background, or a white background with light spillover on the subject. Eventually I replaced my Nikon 85mm f/1.4D lens with the Nikon 85mm f/1.4G and the problem was solved. So for anyone struggling with this, defintely try using different lenses. Also, my Leica 75mm Summarit 2.4 lens has worse flare than that older Nikon lens and it's pretty much impossible to get the white background without spillover when using it.
I agree.
I had a fairly large studio and often used my Canon 70-200 F2.8 L-IS v1. While pretty good, it was not until I switched to my 100 macro that the contrast fell into place. Dirty filters can also drop contrast with veiling flare.
By flagging as much of the background as possible you can also minimize the flare problem.
I'm in LOVE with the Canon 100mm totally agree
Hey Indy, great point! I don't use filters at all. Which macro are you using?
I used the Canon 100mm macro v1.
IMO the key is to reduce internal flare by choosing a modern prime.
I think the latest zooms would work well too but the prime retained detail in dark tones such as fabric (critical for fashion) whereas the flare of my v1 Canon 70-200 F2.8 muddied the detail in the deep tones. Bringing down the darks to eliminate the flare damaged the detail.
The 100 sparkled.
Oh yes, good lens hood too.
Thanks, Indy! This is a great tip. I'm going to give my 100 a try for my next headshot session.
"Now, take your v-flats with the black side pointed in, and position one on each side of your subject. The v-flats should be tucked in as close as possible to the flash stands. From above, it should create a sort of diamond shape, which is where our client will be placed."
Is it just me, or is this description extremely hard to visualize? I have no idea what this is supposed to look like, and I'm a pro used to working with V-flats. In particular, I can't, for the life of me, figure how a pair of V-flats make a diamond shape unless you place them front opening to front opening. A quick sketch of the layout would be helpful here.
I think he means like this. < o > where the subject is in the middle.
Yep! Exactly, thanks Benoit. Looking from the top down.
Black on the inside or outside? I'm guessing inside. Am I correct in assuming that the purpose of the V-flats is to reduce flare caused by light from the backdrop, as well, perhaps, as keeping light bouncing off walls/ceiling/floor from landing on the subject?
Black on the inside, yes you are correct. I do this both to reduce flare and also to control the light on my subject.
While it certainly possible to visualize, it is not necessary nor, in my opinion, preferable. A V-flat can both block a background light source and be a reflector at the same time in an 'L' configuration relative to camera and subject.
Furthermore, using negative fill (black) on the shadow side (opposite of main light) has a dramatically different effect than blocking/reflecting with white side. I think of black/white flats as giving options for density on the shadow side -- apart from blocking background lighting. I have sometimes used two flats one with black out from subject position back and white out from subject forward for nice contrast but a controlled shadow on face.
Over many shoots where I was faced with shooting white bridal gowns on white background and preserving detail in the white gown and still contrasting it to a pure white background, you start to value having options for contrast and density on the edges of the figure you are shooting. Having said that, I never used it in a diamond configuration.
I tend to light backgrounds with soft boxes and have matching pairs of both medium and large soft boxes to get consistent results from side to side. It is easily possible to get clean white using soft boxes without blocking flats. More frequently I will block only the shadow side because I am using the flat as a reflector anyway.
Over many years of shooting white background for fashion catalogs and lookbooks I learned that taking an incident meter reading behind the subject/model's head facing background (essentially measuring the background as a light source) and setting the light balance to make the background 1/2 stop higher than the main light exposure to be useful. I have found that to be just as accurate as measuring the light sources at the background. In my use, that balance yields about 240-245 as measured in Capture One.
Hi Jacques, you can see a diagram from above here: https://petecocophoto.com/headshot-lighting-diagram
Thanks! Makes perfect sense. FWIW, when doing headshots in small spaces, I use a scrim behind the subject as backdrop with a flash behind that. I wonder if V-flats would be as effective, with that setup, in reducing fringing. Then again, I often like the rim lighting it provides.
Can be done with umbrellas. As mentioned by some, studio size limitations can be an issue with spill, but I have done it with umbrellas in large places like meeting rooms and lunch rooms where spill gets down to nearly nothing.
Yep, also with strip boxes on the flashes. Sometimes I do this as well. The main goal for me is to keep light from spilling onto the subject while also giving an almost pure white in camera. Makes editing a lot easier and also gives the client a much better idea of the final product.
I'm not a pro so forgive me if my question looks naive. Why not just shoot with a high MP camera, and then add a white background layer in post processing?
Hey John this is a good question. The basic reason is that you want to get everything (exposure, color, hair, makeup, etc.) as perfect as possible in camera and to use photoshop to enhance what is already looking great. Using photoshop to switch backgrounds can be done, but it takes more time, and depending on the subject can be tough to get perfect, etc. Also, I shoot tethered and want my clients to be able to see what it will look like right in the camera as this makes it much easier to sell images. If I show them an image and say, "the final image will have a white background," then they have to envision it which makes it much tough er to sell.
It looks so goos and educative as well. Thank you so much for sharing this video here.