Getting your subject to pop is the difference between a frame that feels intentional and one that feels like a snapshot. This video focuses on making that happen with available light instead of leaning on blurry backgrounds.
Coming to you from Pit Haupert, this practical video lays out a simple idea: your eye goes to contrast first. Haupert treats contrast as a brightness gap between the lightest and darkest parts of the scene, then shows how that alone can steer attention. He breaks it into two clean patterns you can start spotting immediately: a darker subject against a brighter background, or a brighter subject against a darker background. The point is not to chase “pretty light,” but to place your subject where the scene naturally does the work. You end up thinking less about settings and more about where to stand, where to turn, and what to include.
The first hands-on section digs into using direct sun without falling into the usual shallow depth of field crutch. Haupert’s starting move is backlighting, with the sun positioned behind the subject, and he’s clear about the tradeoff: push it too far and you get a silhouette. The video gets interesting when he talks about controlling that look by changing the sun’s position in the frame, not by “fixing it in editing.” You hear him frame it as a choice between revealing and hiding, which is a better mindset than trying to make every shot show everything. If you like silhouettes, he gives you enough to start making them on purpose, not by accident.
He then shifts into side lighting and front lighting, and the comparison is blunt. Side lighting can give you shape fast, especially when the sun is low and shadows stretch, and it can let the background drop darker without you doing anything fancy. Front lighting, on the other hand, can look flat because the subject and background get lit the same way, and that’s where a small change becomes a big deal. Haupert suggests rotating the subject and camera just enough that the light hits from an angle, keeping the bright, clean look while letting the background fall off. That tiny adjustment is easy to test in five minutes, and you can see it change the feel of the frame without changing locations. The video also includes a quick visual example that makes the difference hard to unsee once you notice it.
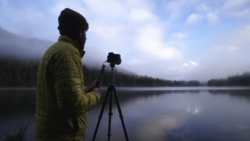
Then he tackles the scenario that ruins a lot of outings: gray, clouded-over light with everything stuck in the middle. He describes winter conditions where the sun barely shows up and contrast feels impossible, then offers three ways to create separation anyway. One uses place, one uses angle, and one uses what stands out in a dull scene, but he does not treat them like rules you must follow. The strongest part is how he treats the background as the real lever, not the subject, and that opens up options you probably skip when you assume the day is “bad.” Check out the video above for the full rundown from Haupert.


Join the Fstoppers community for free
-
Post comments and join in the discussions
-
Browse the site ad-free
-
Share your work and get featured in the community
-
Compete in the photo contests for fun and prizes
1 Comment
Sometimes, when you ask a question correctly it answers itself. Conversely, if your wording is vague or imprecise, an answer may elude you. For example, "How can I make my subject pop?" does not lend itself to clear and simple answers unless the subject is a balloon. On the other hand, "How can I draw the viewer's eye to my subject in a photo?" may elicit solutions, such as cropping out distractions, getting closer, making the subject bigger, dressing him/her in bright colors, panning with a slow shutter to blur the background and create a sense of motion, etc.