Expanding a photo in Lightroom without using Photoshop can be a real time-saver. Here's how to do it.
Coming to you from Signature Edits, this informative video demonstrates a clever workaround for expanding photos directly in Lightroom. This method works with both Lightroom CC and Lightroom Classic, as long as you have the latest version. It involves using the new generative AI feature, which is typically used for object removal and other modifications. The trick here is to take a screenshot of your image and then import that screenshot back into Lightroom, enabling the AI tool to work outside the original image boundaries.
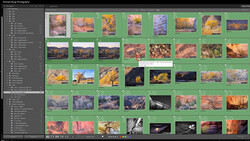
The process starts by taking a screenshot of the image area you want to expand. On a Mac, this is done with Shift + Command + 4, and on a PC, it's Function + Windows Key + Spacebar. After importing the screenshot back into Lightroom, you use the erase tool with generative AI enabled to paint over the gray areas outside the original image. This step is crucial as it allows Lightroom to fill in these areas with generated content, effectively expanding your photo.
What makes this technique valuable is its simplicity and speed compared to using Photoshop. While Photoshop offers more control and higher-resolution edits, Lightroom’s AI can produce impressive results quickly. By refreshing the generated variations, you can choose the best one or even layer multiple variations to perfect the photo. This can be particularly useful for social media images that need a bit of extra space or background enhancement.
One caveat to this method is the potential for lower resolution since you're working with a screenshot rather than the original high-res file. Ensuring your screenshot is as large as possible can help mitigate this issue. Additionally, since this process converts your image to a JPEG, it’s best to apply this technique after you've completed all your other edits. Check out the video above for the full rundown.


Join the Fstoppers community for free
-
Post comments and join in the discussions
-
Browse the site ad-free
-
Share your work and get featured in the community
-
Compete in the photo contests for fun and prizes
4 Comments
he mentions it in the video.. but this will work for Instagram and social media.. but you'll lose a ton of detail doing it this way.. round tripping to photoshop is more work.. but overall a better approach.. i hope at some point lightroom adds this feature or provides a way to expand an image.
Really ridiculous video. If all you want the image for is Facebook or Instagram then great but he never mentions that.
He did mention the downsides is it's not high res.
Magic is Magic! A great add maybe best for a Pro! I am a hobbyist and getting more if needed just a different lens. What I had to learn was cropping for I believed the site framing was important BUT when capturing birds in a nest or flying sometimes you do not have that long lens handy and todays software allows both cropping as well as enlarging back to your cameras sensor size, like using the A7RM5 and cropping down a size or two with unbelievable sharpness but bringing back to a size you can get a great print from.
Some can remember when PS/Lr got the ability to get rid of sensor dust and then other programs followed. Sensor dust was and is a reason for fast glass f/2.8, f/1.4 for many have never cleaned a sensor or do not ever want to and never go above f/8.
This image was done at f/22 back in 2015 not knowing about Aperture thinking you get a sharper image but got the image of the pirate in the sand for it but I learned early to clean a sensor years before. But there is one thing PS/Lr can not clean and that is the full frame blotch that looks like dust but is dust on the backside of lens glass that few clean.
The big thing is there are many talented programmers advancing software for US and to be thankful for to be back in the 2010 days having to use Canons/Nikons software and stuck with JPEG's mostly.