Learning how to use masking in Lightroom Classic unlocks precise editing possibilities, allowing you to enhance specific parts of your images independently. It’s a practical skill that transforms your workflow and improves photo quality.
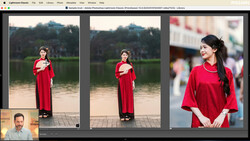
Coming to you from Aaron Nace with Phlearn, this practical video explains clearly how masking works in Lightroom Classic, demonstrating how easy it is to make selective edits. Nace walks you through each type of mask—subject, background, linear and radial gradients, object selections, color and luminance ranges—showing exactly how each one functions and when you might want to use them. His example starts with basic exposure adjustments, pointing out clearly how standard global edits affect your entire image uniformly. Masks solve this issue, letting you target areas like faces or backgrounds for isolated adjustments, so you can boost exposure on your subject's face without affecting everything else.
Nace shows how automated masking tools simplify your work significantly. For instance, Lightroom automatically selects subjects or backgrounds, quickly isolating the area you want to edit. This is particularly useful when you’re editing portraits or trying to enhance specific details without tedious manual selection. He then demonstrates practical uses of masks, like darkening distracting backgrounds slightly to make your subject pop. By clearly showing the effect of toggling each mask off and on, Nace emphasizes the value of subtle adjustments rather than dramatic edits. Learning to adjust shadows, highlights, and exposure individually through masks helps you achieve professional, nuanced results that simply aren’t possible with global edits alone.
One particularly useful technique Nace covers is the luminance range mask, allowing precise control over highlights and shadows by targeting specific brightness levels. He also explores color range masks, which let you enhance particular colors in your scene selectively. These tools open up creative options, helping you adjust certain colors or brightness without affecting the overall image balance. If you've ever struggled with overly bright highlights or want more vibrant greens without altering skin tones, these techniques are essential.
Nace also covers radial and linear gradients clearly, providing simple examples of brightening faces or subtly darkening corners of your photos for a refined, professional appearance. These masks offer quick and intuitive adjustments that enhance images with minimal effort. By combining multiple masks, he shows you how versatile your editing can become, giving each part of your image the attention it deserves. Check out the video above for the full rundown from Nace.


Join the Fstoppers community for free
-
Post comments and join in the discussions
-
Browse the site ad-free
-
Share your work and get featured in the community
-
Compete in the photo contests for fun and prizes
No comments yet