Learning the workflow from experienced photographers can help you understand and apply various techniques effectively. Here's a seasoned photographer's landscape editing process.
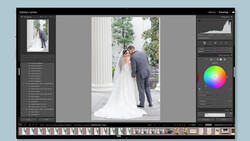
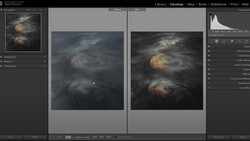
Coming to you from Anthony Morganti, this detailed video is part of his series demonstrating his current editing workflow in Lightroom Classic. Morganti focuses on a specific image that needs more post-production work than his previous examples. This choice allows him to show you more advanced editing techniques and adjustments.
The process begins with noise reduction. Morganti typically uses the denoise function in Lightroom's detail panel for most images, unless the noise level is exceptionally high. For this particular image, shot at a low ISO, noise reduction is not immediately necessary. However, underexposed images often exhibit more noise when brightened, so Morganti keeps this step in mind for later.
Next, he addresses the image's alignment. The image is slightly crooked, so he uses the crop tool to straighten it. This step is essential to ensure that the final photo looks professional and well composed. After straightening, Morganti moves on to basic adjustments in the tone section. He opens up the shadows to reveal more detail and adjusts the highlights to balance the exposure. This helps to bring the image closer to a properly exposed state.
Morganti then focuses on refining the image's tones using the white and black sliders. By holding the Option key (or Alt on a PC) while adjusting these sliders, he can see where the image is clipping and make precise adjustments to ensure a balanced contrast. After these adjustments, Morganti notices some noise in the image. He decides to use AI noise reduction, opting for the built-in Lightroom feature. This step creates a new DNG file with reduced noise and applies the previous edits to this new file, maintaining the workflow continuity.
With noise reduction complete, Morganti enhances the colors using the color mixer. He prefers the mixer section for its effectiveness. By adjusting the luminance and saturation of yellows and greens, he introduces tonal variance to the uniform green areas, adding depth and interest to the image. This step is particularly useful for landscape and travel photos with large green areas. That's just the start, so check out the video above for the full rundown from Morganti.
And if you really want to dive into landscape photography, check out our latest tutorial, "Photographing the World: Japan With Elia Locardi!"


Join the Fstoppers community for free
-
Post comments and join in the discussions
-
Browse the site ad-free
-
Share your work and get featured in the community
-
Compete in the photo contests for fun and prizes
2 Comments
Photographer should have recognized the near-spectral glare and adjusted for it.
This is a typical image done in daytime. When captured most will adjust the +/- EV dial to rid zebras (if on) in the clouds, on my A7R5 you may go down to a -5, with that yes the foreground will be darker so yes shadows have to be brightened and maybe blacks also. The rest is great.
Not mentioned is most photographers will do a bracketed 5 at +/- 2EV for day capture. When getting a final you can highlight the center images but also a control key to lowly highlight of the four others and the other four will be synched to the center image when edited. Then when you do the denoise it does it to all and still have all five images to then do the HDR merge.
Also the EV dial will go negative for say white birds or even for fall foliage when clouds are above to get details. This action will always give a darker image but when increase of shadows you will mostly get a nice bright image or normal.
Just for info most will have auto ISO on and limit set to low to 640 where it is the next step where noise in camera starts a fresh noise limiting and even more noise in the lower setting even the basic 100 and lower. The new mirrorless cameras are also ISO Invariant meaning no matter a setting just increasing exposure you will get a image you will like.
Whether bright or low images detail is best without blown high light's and the ability to bring out shadows with less noise.