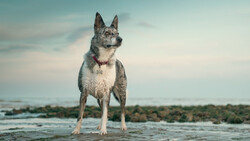
Editing workflow can be a nuanced topic, especially as technology evolves and personal styles develop. This helpful video tutorial will show you the workflow a Lightroom pro uses.
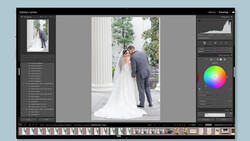
Coming to you from Anthony Morganti, this informative video walks through a complete editing workflow in Lightroom. Morganti starts by explaining that before any actual editing, he reviews and flags the images he plans to work on. Using the "P" key, he marks potential edits with a pick flag, filtering these selections to streamline his workflow. This initial step ensures he only spends time on the most promising shots.
Next, Morganti addresses noise reduction. He emphasizes the importance of tackling noise early, especially for high-ISO images. For minimal noise, Lightroom’s built-in AI noise reduction suffices. However, for more substantial noise, he prefers using plugins like Topaz Labs Photo AI or PureRaw 4. These tools not only reduce noise but also sharpen the subject, making them invaluable for noisy images.
Morganti then moves on to cropping. He prefers to crop early in the process, allowing him to visualize the final composition throughout the rest of the edit. For him, seeing the cropped image helps guide subsequent adjustments more effectively. In the case of a lighthouse image, he adjusts the crop to align the horizon with the rule of thirds, enhancing the overall composition.
Choosing the right profile and adjusting white balance come next. Morganti typically sticks with the Adobe Color profile for his Nikon raw files but suggests changing it if it doesn’t suit your image. Adjusting white balance early helps set the tone for the rest of the edit. For an image with natural lighting variations, he might leave it as is if it reflects the scene accurately.
Toning is a critical step in Morganti's workflow. He adjusts highlights and shadows, pulling down highlights to reveal detail and lifting shadows to balance the exposure. This meticulous adjustment brings out the subtleties in the image. Setting white and black points follows, ensuring a full tonal range without blowing out highlights or crushing shadows excessively.
Morganti then focuses on presence adjustments—texture, clarity, and dehaze—using Lightroom's advanced masking features. He applies these selectively, often targeting the sky and subject separately to avoid global adjustments that can diminish image quality. Sharpening is also done selectively, ensuring that only the subject benefits from enhanced detail.
That's just the start, though, so check out the video above for the full rundown from Morganti.

Join the Fstoppers community for free
-
Post comments and join in the discussions
-
Browse the site ad-free
-
Share your work and get featured in the community
-
Compete in the photo contests for fun and prizes
1 Comment
Superb and informative! The showing of the camera color profiles when the 4 blocks are picked is a hidden that many never find, these are the color profiles that would be in a jpeg or a profile you can choose in camera. But you can change in camera day, cloudy or set your own color temp etc to affect image also that will show in the image before processing, just info. Like for me doing Astro Milky Ways I will use portrait color profile for I capture on beaches and it brings out the sand and most always the yin yang colors of Pegasus (the hardest to bring out) that just show up most often. Also I just found in MW's in basic section just increasing Vibrance and Saturation the yin and yang colors come out as well as the real color of the night sky, just an add.
To help some with a noisy image you can use Lr NR on one or many images (all highlighted) and get the one or all noise reduced say if doing a bracketed set with first fully edited and continued editing after.
and now you can do panoramas mainly sending to PS then a return to Lr when saved better and faster than PTGui.
This is great show and tell for even some of us older users always learning from others.
Thanks for the show
1. done from edited in Lr to all images synced to PS perfect back to Lr just fast!
2. and old '15 capture redone in newest Lr
3. captured bracketed with Canon lens on A7S '15 at f/22 had no idea back then about f/#'s but captured a pirate in the sand also at sunrise also edited in the new LR