

Lightroom was one of the first serious photo-editing tools I used when I was getting started with photography, and it’s still a mainstay of my editing workflow. Whether you’re new to Lightroom or a veteran user, there are several unique considerations of the software: some are quirks of the program, while others are more recent changes that can impact your established workflow.
Catalog Paradigm
One of the most fundamental differences between Lightroom (Classic) and many other photo-editing tools is how your photos are stored and accessed. Consider the most basic example, editing a simple picture with another tool: you can open a JPEG, make adjustments, and save the results. The same paradigm holds for tools like Photoshop and most other image editors.
Lightroom is fundamentally different. Lightroom’s essentially opening a big book that records where your images are, what adjustments you want to make to them, and ancillary information like the star rating you’ve assigned the image. This “big book” is the catalog file, and from misunderstanding this model, a lot of issues can arise.

The model isn’t without its benefits, however. As the catalog records the changes but doesn’t save them to the individual file, you can always go back and undo changes, even years on. New process versions, basically Adobe’s set of features and tools built into LR, can be applied to catalogs, letting you combine old edits with the newest tools, all while retaining that ability to go back and tweak things. The catalog is also more portable than the entire library of images, which can weigh hundreds of gigabytes or more. Combined with Smart Previews, this means you can edit on the go easily while just transporting a few dozen GB of catalog and previews.
As a user, you have to keep this catalog in mind when considering things like moving files, backing up images, and even where you store the catalog itself on your computer. Let’s talk moving files first: moving the actual images outside of Lightroom will cause an issue that you can fix. As the catalog just points to the file location, moving the file breaks that connection. You can “find” the file again by pointing Lightroom to the new location of the file or folder, and this will sync things back up. It will become tedious if you have to do this with dozens of folders or hundreds of individual files, however. If you need to move files often, consider storing them in a single overarching folder and moving that.
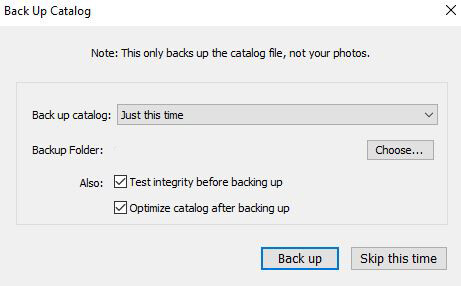
Backups are another thing that can catch you off guard. Backing up the catalog file itself is important (remember, this is the record of all your edits, ratings, etc.), but this doesn’t back up the actual photos. Remember, you have to have both to produce a finished image. Remember that both need to be backed up when designing your backup strategy, and remember that Lightroom’s built-in backup setting only protects against the corruption of the catalog file itself by making a copy of the catalog file in the same folder.
Speaking of where the catalog is stored, unless you have an informed reason otherwise, store your catalog on your fastest disk. The catalog and preview files are frequently accessed and are small relative to your actual image library. This makes them perfect to store on an SSD, in contrast to slower spinning disk hard drives, which are good for storing the more voluminous raw files.
Masking Can Work Now
The changes to masking are a lot more recent, and I’m still working through them in terms of integrating into my workflow. Lightroom’s support for masking has recently become a lot better. The first tools were just basic brushes and graduated masks, and a little while ago, they added support for color and luminance masking. Only now, however, has masking become powerful enough to enable complex masks built entirely in Lightroom. As this feature is recent, consider checking out a more detailed dive into how to use the tool — a lot has changed, and full coverage of the feature is beyond the scope of this article.
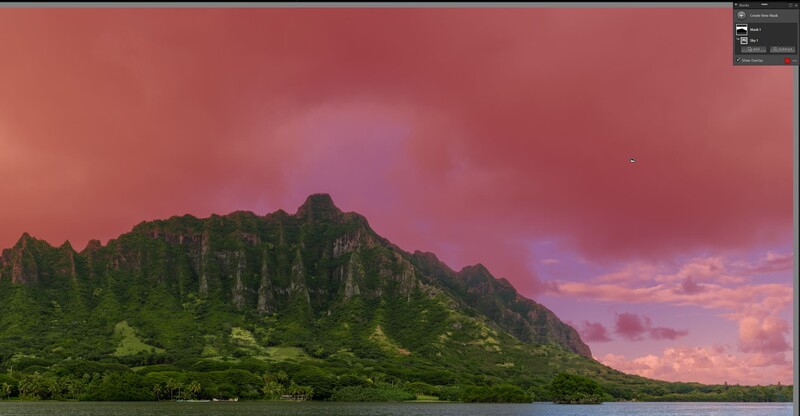
If you’re an experienced user, you might look at a situation requiring masking and automatically start reaching for Control+E, knowing you’ll have to take the file into Photoshop. I’d suggest giving Lightroom’s built-in masking a try. While it’s still not perfect and isn’t going to give the same control as full luminosity masking in Photoshop, it’s workable.
New users to Lightroom would be well served by getting comfortable with Lightroom’s masking tools. Keeping a file entirely within Lightroom is always preferable, even if it’s not always possible. Being able to adjust old edits, having a single interface to learn, and having a single “reference” copy of the file are all perks to staying within the software.
Conservative Optimization Can Equal Poor Performance
If you’ve got a modern computer, Lightroom’s default performance-impacting options are pretty conservative. One of the best examples is Lightroom’s cache: by default, it’s set to something like 20 GB. If you’ve got a big library or a modern, high-resolution sensor spitting out 30-megapixel-plus photos, this 20GB will get filled up pretty quickly. Fortunately, storage is cheap.
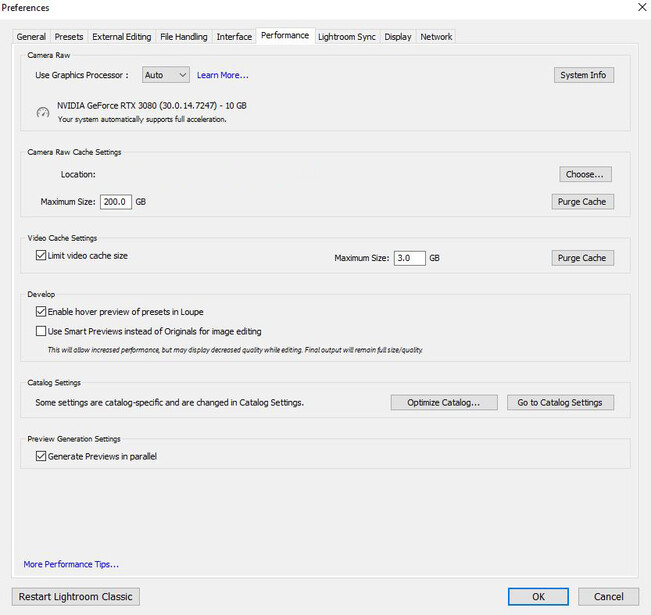
To change this, just go to Edit> Preferences, and under the Performance tab, set the Camera Raw Cache to a larger amount, like 100 GB. If you work with video in Lightroom, you can also bump up the Video Cache settings. One final default I like to change is how previews are rendered on import. The standard previews are fine, but many operations will force Lightroom to render a 1:1 preview on the fly. This can be an unpleasant slowdown even on a fast computer.
If you don’t have to turn images around immediately (think halftime at a football game), set Lightroom to render 1:1 previews at import. While this will add a few minutes to import times and can increase the size of the previews folder in your catalog, it makes for a more pleasant experience in use. Lightroom can just read the already generated preview far more quickly than rendering one from scratch.
Conclusion
Lightroom’s recent updates, as well as some of the design decisions from the earliest days, all leave room for improving how Lightroom works for you. Have you found yourself changing how you work with Lightroom over the years?


Join the Fstoppers community for free
-
Post comments and join in the discussions
-
Browse the site ad-free
-
Share your work and get featured in the community
-
Compete in the photo contests for fun and prizes
5 Comments
Regarding the moving of files breaking the catalogue, there is another way: Move the files within LightRoom.
My own process involves importing files to an "import" folder, culling/tagging/editing/rating/etc then using LR, moving the keepers to a "year" folder. Moving is as simple as select, left-click & drag.
I do this also.
If your target folder is already within Lightroom, this is a good way to do it. I find that it's a bit more awkward than using Explorer/Finder when doing things like creating new folders, moving between drives, etc.
Even if your target folder isn't in Lightroom it's a doddle to import it. If the folder doesn't exist, it's even easier to create one from within Lightroom and then drag the images into it. It's no more involved than Explorer - especially moving between drives.
I've always had Lr save edits to both the catalog and a sidecar file. This does slow Lr down a bit but it provides redundancy and better compatibility when moving Lr edited images to other software. And, like Jon, I always move files and create folders within Lr and thus never have to deal with "lost" files.