

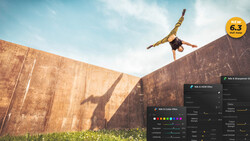
Adding a colored background to your studio shots can vastly change the impact of a studio photo. The most obvious method to do this is by collecting an army of colored backdrops that take up space and are a headache to swap in and out from shoot to shoot. Instead, it is quite easy to build this coloring effect using Photoshop so that you can shoot each image using a standard white or grey background.
Shooting
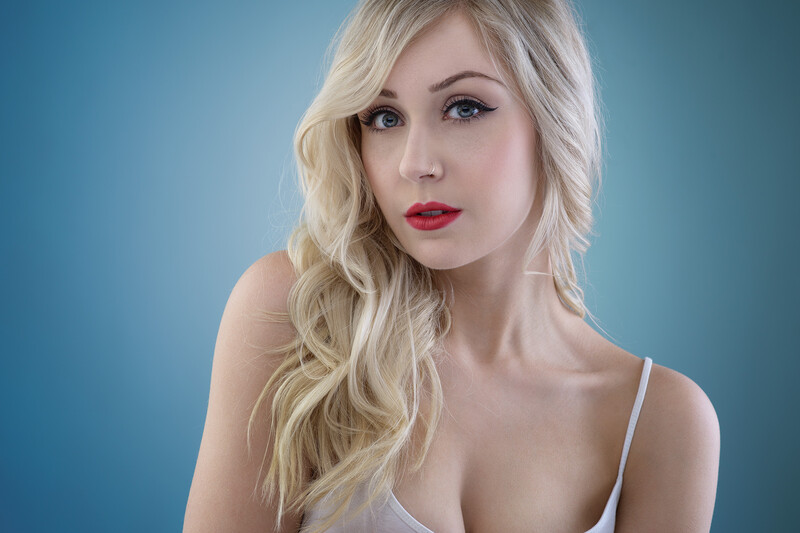
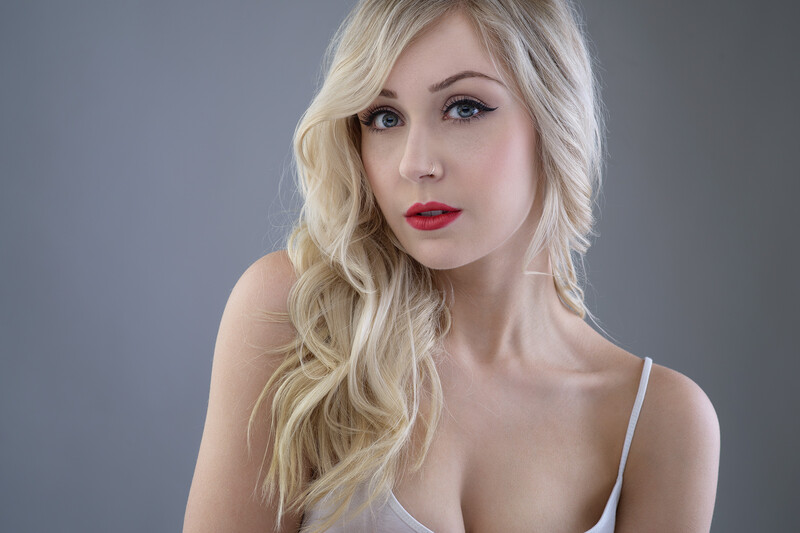
To create these sorts of images, photograph your model in front of a white surface of some sort. Seamless paper is my choice but really any matte white surface will work. Set your model up about six to eight feet in front of your backdrop and light them with your desired beauty light. Personally, I tend to use relatively soft light for these sorts of images.
Make sure you are shooting at a deep enough depth of field so that your model is completely in focus. While it is possible to make this technique work with a narrow depth of field, the Photoshop job becomes a much bigger headache and the results aren’t all that great. Most of the images in this post were shot using an 85mm lens at f/8.
Don’t light the background unless it is extremely dark. Your goal should be for the background to be relatively even and about 50 percent grey (though a little variance in one direction or another won’t really hurt).
Frame your subject so that their feet are not in the frame. It is possible to make this work with full body images but I find the effect works much better if you can’t see the model’s feet impacting with the floor.
Adding The Background Color
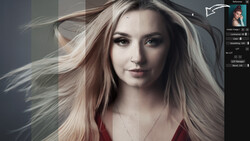
Step 1: Open the image using Photoshop and begin by creating a selection of the model. Personally, I use the quick selection tool with the help of refine edge to do the job but I’d say use whichever selection technique works best for you. After you have create your selection create a new, empty layer group and apply that selection as a mask to the folder. Then invert the mask (cmd+I) so that everywhere except the model is selected.
Step 2: Create a solid fill adjustment layer in your layer group that is filled with a tone similar to the color you are aiming to create. Set that layer’s blend mode to Soft Light.
Step 3: Create a curves adjustment layer above the solid fill layer. Drag the center of the curve up to brighten the whole background slightly. Then use the gradient tool to create a radial gradient within the mask of the curves tool transitioning from white (where you want the background to be brightest) to black.
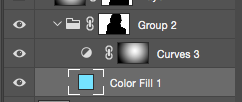
Step 4: Experiment by adjusting the two adjustment layers until the color is exactly what you want.
Step 5: Retouch the rest of the photo as you normally would.
Tips
- Don’t be afraid to pull back the saturation or opacity of your color layer so that the effect becomes more subtle and less obnoxious.
- Make sure to clean up any scuffs on your background. If there are too many weird shadows on your backdrop that prevent it from being a consistent tone you can place a 50 percent grey layer behind your solid color layer to quickly fix the problem.
- If you are experiencing banding in the gradient add a tiny bit of noise to the radial gradient mask.
- If the effect isn't potent enough simply duplicate the group containing your adjustment layer to double up on the intensity.
- You can easily add some sort of texture to the background to add variation.
- Be mindful of how the skin tone of the model compliments the background color. Personally, more often than not I prefer blue for pale skinned models and find that yellow is not flattering.
- Try to make sure there is decent edge contrast between the model and background or the cutout job will be much more work.
- Never forget that the background is still secondary to the model.
This is a pretty easy technique that can add a vibrant “pop” to your photos. Don’t hesitate to experiment and try different variations on this technique as just changing the blend mode of your solid color layer can completely change the effect. Most of all, have fun and create some images that will make people smile.

6 Comments
thanks! I needed this.
Funny, I just did this a couple days ago, also using a light blue background. On a side note, I always see people suggesting to make a selection to create a mask, but I use Topaz Remask, and it is phenomenal (and very quick) at creating a mask. It picks up stray hairs, and can even do a bit of transparency eg. a wedding veil. Might be worth looking into if you do a lot of this type of stuff!
https://fstoppers.com/photo/120427
I used to use Topaz Remask before the refine edge tool was released in Photoshop, after that I stopped using it as I found refine edge + quick select to be faster and more accurate than Remask was at the time. Maybe il give it another try to see if they have leapfrogged ahead again. ;)
Ooooh I need this. Now I need to learn how to do all these steps first because I know almost nothing about PS haha
"Easily Create Vibrant, Colored Backgrounds In Studio"
Masking a white background and replacing it in Photoshop is not creating a background in studio. Misleading and disappointing.
Great post, and well written. If you want to avoid the work in post though, just add a gel to your background light. As you said, things can start to look unnatural if it's a full length portrait because the gelled light mixes with the key lighthing on the floor. I obviously didn't have that problem as my subject was suspended from the ceiling!