

If you've often been shooting in what seems like dramatic light only to get back to your computer and realize that the images are kind of so so, then you're not alone. However, in certain situations, what seems like a dull and unimpressive image might just need a little tweaking to take it to another level.
This has happened me more time than I care to remember but that's part and parcel of landscape photography. An over the top but apt analogy might be to compare landscape photography to gambling. We get up at odd hours, while all the sane people are still asleep, in order to be at a location so we can take a photo, hoping that the weather will play ball. And we do it again and again, oftentimes coming away with nothing to show for it but a lack of sleep. But when we do hit the jackpot — when the sun, clouds, and landscape all align how we predicted, there is a definite feeling of euphoria. All the those losses make this one win all the sweeter as we remember why we were avoiding a healthy sleeping schedule by waking long before the crack of dawn. It's the addictive nature of a passion that drives us. However, unlike gambling, with repetition comes a kind of experience that's not analogous to addictive behavior. We do eventually learn how to win more frequently as our senses are honed and our predictions become more accurate. Our skill at the computer develops, also; and it is this secondary development that I want to focus on here.
Lightroom's Dusty Closet
Looking back through old images can illicit feelings of both nostalgia and embarrassment, as in: "Ah, that was beautifully crisp morning, but oh, lord those images suck." If this isn't you, then you can go now, Mads Peter Iversen. But if this is you, then maybe there's something salvageable among that pile of broken dreams and disappointment.
I often need to go back through my images to look for photos of friends, and family, and sometimes I come across a few landscape images that I had forgotten about. After the initial feelings of self-loathing subside, I might see potential there. First off, in order for this to work, there must be some interesting light in the shot, as completely dull/flat images just won't cut the mustard. In the examples I show in this article, my subjects, the mountains, are getting kisses of light through the clouds. Not only are the skies interesting but the breaks in the clouds provide some interesting highlights on the mountains. I don't think they would be worth salvaging otherwise.
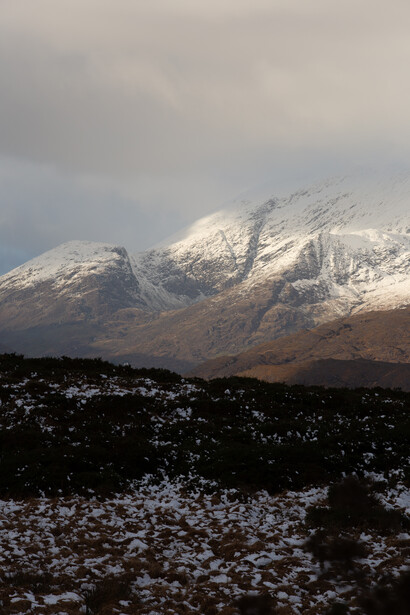
170mm, ISO 100, f/10, 1/125 sec.
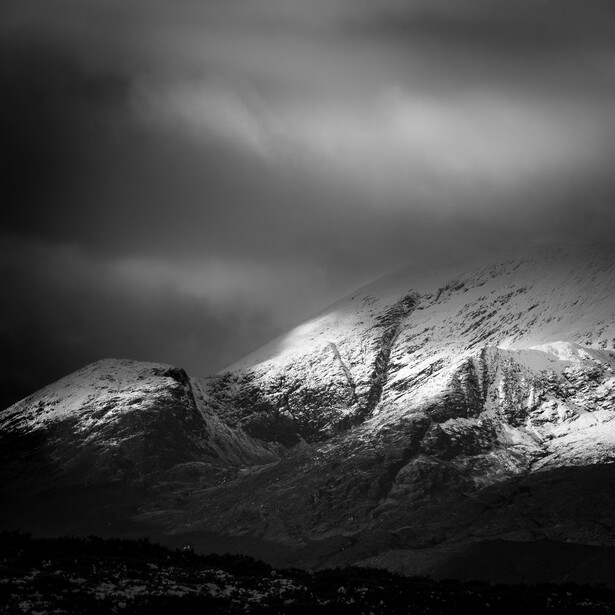
Notice how much I cropped? That foreground was doing nothing so I axed it. I probably noticed that the light was doing something right but didn't have time to get to a suitable vantage point.
The Method
- Crop it: If the foreground isn't doing anything for you, then just get rid of it. Some "experts" tell you to never crop and image. Don't listen to them because the are few absolutes in photography and one of them isn't about whether to crop or not. Some of the greatest photographers of all time cropped their images — sometimes so much so, that the before and after are almost unrecognizable. I'm not saying that it's a good idea to always shoot with a mind to cropping later; on the contrary, I will always try to nail my composition in camera because I want to sell large prints. But, in the interest of creativity cropping is not a sin.
- Monochrome: In times like this the color is often working against me, so I do the next best thing — remove it. Just hit that "Black and White" button in Lightroom, and fiddle with those tonal sliders — Black & White Mix — to achieve your desired result.
- Drop the exposure: The important part here is that you must have preserved the highlights by exposing to the right. You still want detail in the shadows, though — see the next step. Dropping the exposure instantly changes the mood of the image, from a flat, but well exposed shot, to something dark and foreboding.
- Raise the Shadows: If, like my examples, your image has a relatively wide dynamic range, then dropping the exposure will end up "clipping the blacks" — this just means that the darkest darks are so dark that there's no detail there. While raising the shadow slider might bring back all the detail you need, you may need to apply it selectively in order to preserve the mood. To do this I will often use an adjustment tool like the graduated filter. After I've applied the filter to my desired area I will use what is perhaps my favorite Lightroom update in recent years — the Range Mask. Using the Luminosity Mask, I can tell Lightroom to leave the brighter areas alone, again preserving the mood.
- Dodge and Burn: While you have much more control in Photoshop, you can still do this effectively in Lightroom. Darkening ares such as clear sky behind the clouds or dark areas of cloud, even, will increase the mood. What will make the image really pop, though, is brightening those highlights. Just be careful not to blow out any detail in the landscape or ruin the texture of the clouds. A light touch is the secret here.
- Work the Sky: I often see people adding a ton of Clarity or Dehaze to their sky in Lightroom. While it certainly does make it pop, it also adds a crunchy texture which I really don't like. What I find far more appropriate is adding negative Clarity using a graduated filter, while also adding contrast and maybe dropping the exposure again. This gives the clouds a dreamy appearance but the exposure and contrast adjustments help to preserve the mood. Again, a light touch is called for here.
- Finishing Touches: I usually add a very slight Vignette to guide the eye into the frame and add some sharpening before I export. If I feel that the image has a bit more potential, I will bring it into Photoshop to add all these adjustments more selectively. Photoshop also allows for much more control when it come to color adjustments, but I will lay the ground work on the the raw file in Lightroom.
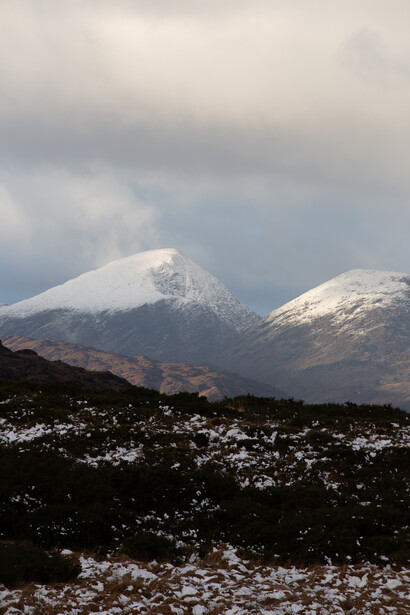
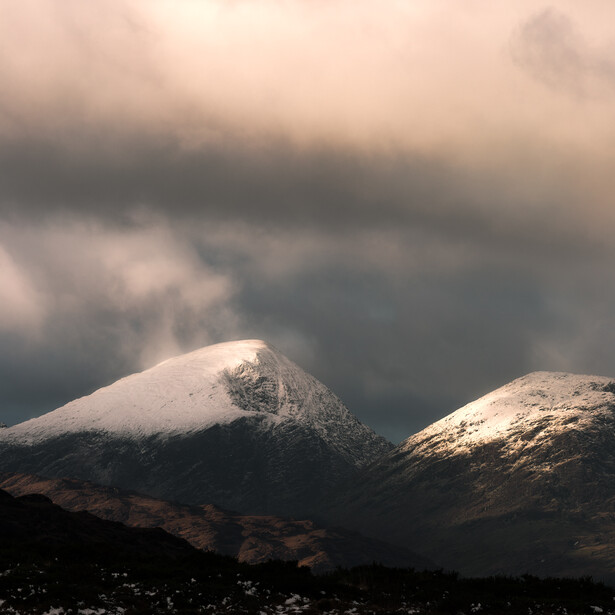
200mm, ISO 100, f/8, 1/160 sec.
The before and after of on image where I used a similar process, as outlined above, except I used both Lightroom and Photoshop to edit this.
Show us Yours.
Have you used a similar method to save otherwise dull or boring images? Can you add another step in my process which you think would make the final image even better? We would love to see your efforts and suggestions in the comments section.


Join the Fstoppers community for free
-
Post comments and join in the discussions
-
Browse the site ad-free
-
Share your work and get featured in the community
-
Compete in the photo contests for fun and prizes
11 Comments
If you take a boring photo, no amount of lightroom or photoshop will change that. It's the same as if you poorly cook a bad cut of meat. No amount of sauces on top will make it a good meal. That being said, these are good suggestions to improve an already good photo.
amen to that. if you use lightroom to heavily process a crappy photo, you end up with a heavily processed crappy photo
It's a good point, Justin, but if you read through the article, I do mention that there does need to be some interesting light to work with. I am not suggesting that one should go and polish all the turds in ones dusty Lightroom closet — just the ones that have a little sparkle to them.
very interesting method! Thank you!
Thanks, Maksims!
I'm all in favor of going back and seeing what you can do with old stuff. But this photo? not even kinda sorta bad. The author needs a more challenging test.
This is where I find presets useful. I've got a bunch of semi-wild ones, including those with some profiles included that do things like switch colors, and trying them on bad images often results in something usable. Indeed, sometimes an out of focus image, or one lacking contrast, or one with simple basic elements can be made into something interesting, like if it just has some interesting lines. Usually though one ends up with more of an abstract. Topaz Studio is a good tool to use for playing with this as well.
Be an interesting contest to have something truly awful here and seeing what folks could do with just Lr.
I'll take that as a compliment, Rob! I have to mention though, that I don't want you to try to over-process a bad photo to make it look good — that won't work. The photo needs to have some potential i.e. it's fine, a little boring, maybe, but with the right approach we could salvage something interesting from it.
I like your idea of experimenting with presets and other processing programs, though. At the end of the day, it's about enjoying the process of discovery and creativity.
I had a go at something similar the other day, the colour version was very bland and even the areas with the sunlight on looked bad. I edited this is LR and Nik Collections Silver Efex
Wonderful work, Martin! Thanks for sharing.
Your method is basically copying Ansel Adams' style without even mentioning him lol
Ha. I'm not copying anybody. If the end result is similar it might be because I've taken inspiration from him and others with asimilar style. I didn't intentionally look at my photo and try to do and Ansel on it, but now that you say it I think that would have been a better angle for the article! Maybe you should write for Fstoppers :)