
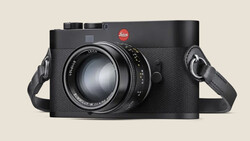
Luminar is Macphun’s latest editing platform, and it’s the company’s first try at an all-in-one solution that can go head-to-head with Adobe Lightroom and Apple’s discontinued Aperture programs. Still in beta, Luminar recently received an update that helped improve speed and fixed over 300 small bugs, making it nearly ready for its public release on November 17. So, how does it hold up to platforms such as Lightroom?
There are three major differences between Luminar and something like Lightroom. First, Luminar does not offer an image-cataloging service such as Lightroom’s Library module. Instead, the entire program can be more closely likened to a replacement for Lightroom’s Develop module alone. Additionally, Luminar is a single-image editor, requiring a one-image-at-a-time workflow more similar to Photoshop. In this way, Luminar might be best compared to using something such as Photoshop’s Camera Raw Filter (or the Camera Raw opening dialog for actual raw images), which heavily reflects Lightroom’s adjustment slider setup. But the third difference is that in many ways, Luminar gives you an impressive flexibility in the number and types of edits you can make to your images. And if you really want to, you can use Luminar as a plug-in for Lightroom, Aperture, and even Photoshop.
Why You’d Want Luminar
I’m starting here, because the truth is Adobe already serves an enormous part of the image-editing market, whether photographers like it or not. But as options such as Creative Cloud siphon funds from users’ accounts on a monthly basis, it quickly becomes clear that other options might offer a better solution for one’s finances. Forgetting other syncing and general control issues some might be upset by, Adobe Lightroom costs about $10 per month along with Photoshop under a Creative Cloud Photography Plan. Luminar, on the other hand, requires a one-time purchase of $59 (at the pre-order price, available for about two more days). In six months of your CC membership, you could stop paying if Luminar covers your needs. This is why third-party options such as Affinity Photo and Macphun’s suite start looking more appealing as they work out their kinks and provide better and better results. Additional features within Luminar even allow one to do things that Lightroom alone could not do. Add to all of this the fact that it’s remarkably easy to learn compared to other editing applications, and the appeal continues to increase.
First Impressions
Luminar is a beautiful application. As with anything new, it takes some getting used to. But for lovers of Mac applications, Luminar’s save, export, and other “system” functions will be immediately familiar. Those familiar with Adobe products or even with Capture One will appreciate the adjustment sliders that have become the industry-standard image adjustment dialog format. It doesn’t take long to see that Luminar isn’t all that different from its competitors. So, the question is "is it better?"
Basic Editing
Editing an image is a piece of cake with Luminar, just as with its competition. Want saturation boosted? Slide up a bit on the saturation slider. Adjust highlights, shadows, whites, blacks, overall exposure — all the usual things — quickly with individual sliders for everything. Side-by-side comparisons are difficult to make, but some things jump out right away.
A lot of the adjustments seem to do things in a smarter way. When I say “smarter,” I am referring to the obvious use of algorithms that consider more than just the one adjustment you are currently making. For example, pulling the shadows up in an image doesn’t just increase the exposure of the shadow areas of the image. Doing so also “smartly” increases other aspects of the shadow area, such as saturation and sharpness, in order to automatically compensate for other pitfalls of shadow areas in an image. While other programs might let you adjust contrast, detail, noise reduction, and color in these areas yourself with secondary adjustments, Luminar works for you so you don’t have to.
The control freak in me hates this. In many ways, these automatic adjustments make it very easy to overdo things like shadow adjustments. And I don’t always want an added punch to an area that’s darker; I’ll adjust that later on my own. However, the older I get and the more I edit, the more I begin letting go. Does it really matter if I have precise control over how much extra vibrance is added to my increased shadow adjustment, especially if I’m going to add it back in a little bit myself anyway? Some automatic adjustments that take away control from the user are annoying, but might it not be okay to let it go, continue editing, and simply let Luminar do half the editing for me?
If I can’t let go of some of the editing work, this program doesn’t really work for me. But as soon as I did let go and carried on with my editing, the final result was actually okay. I liked it. I’m not sure if it was a better image than a Lightroom-edited equivalent, but it wasn’t worse. And no one would have known one way or another which editing software I used.
In a big way, these adjustment sliders behave more in the way that Capture One’s semi-recently updated contrast slider works. For those unfamiliar with this, Capture One updated their contrast slider to behave in a smart way so it wouldn’t mess with skin tones. You know how increasing contrast in Lightroom gives that terribly ugly yellow-orange muddy look to skin? Capture One doesn’t do that, and neither does Luminar (I checked). Brilliant. This is where a smarter adjustment slider can really benefit you. If you don’t want luminance or saturation of various hues to change when you adjust a shadow slider, that’s a problem. But on the other hand, it’s meant to help, and it really does. In the case of contrast adjustments, I welcome the effort to solve the problem of muddy skin tones and counteracting it simultaneously with a slide of the contrast slider.
Side note: adjusting sliders in the editor is extremely snappy, which is something that I really appreciate coming from Lightroom, which has been quite slow for me for years. This snappiness combined with an inexplicable feeling that adjustments are well controlled (I can’t explain it, but with few exceptions, each adjustment just seems more pleasing than I expect it to be) create a great editing experience right from the start.
Filters
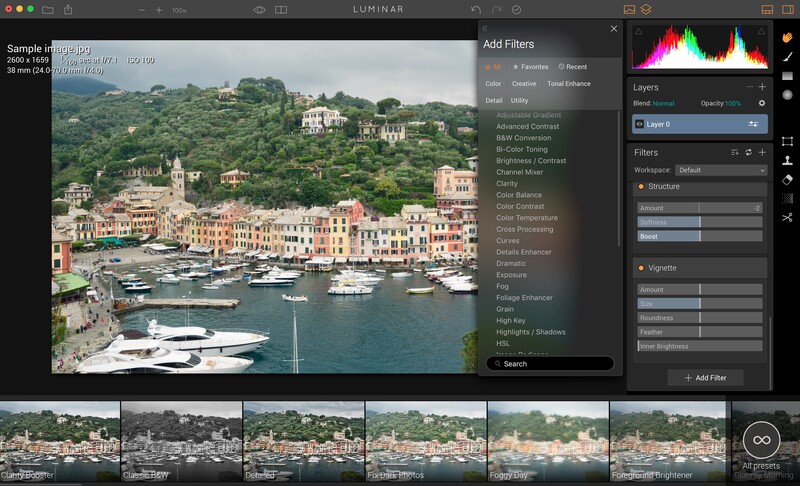
In an effort to not bombard everyone with all the mini paradigm shifts of a new editing platform, I didn't want to mention this at first. But allow me to clarify something now. All of the aforementioned basic editing is actually done in a pane that Luminar calls “Filters.” Each filter is an individual type of adjustment (everything from color temperature, tone, and clarity to foliage enhancer, polarizing filter, and fog), and each individual filter can be individually enabled or disabled temporarily and/or added to or subtracted from the workspace. If there are filters you often use for different kinds of images, you can save a user-defined workspace that will load those filters for you upon selection. Think of a filter as an editing panel if you're coming from Lightroom.
Local Adjustments and Layer Masks
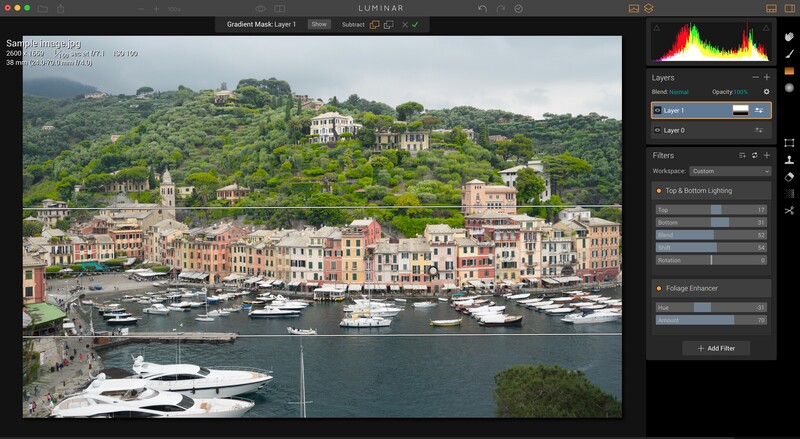
Gradients and radial adjustments are quick and easy to apply and also do not differ much from their equivalents in other editing applications in their effect. The only strange thing is getting used to the UI and understanding that the individual filter sliders become the sliders for changing local adjustment settings when you have a particular local adjustment tool selected. There’s no drop-down panel of possible adjustments that pertain solely to the current tool being used, such as in Lightroom.
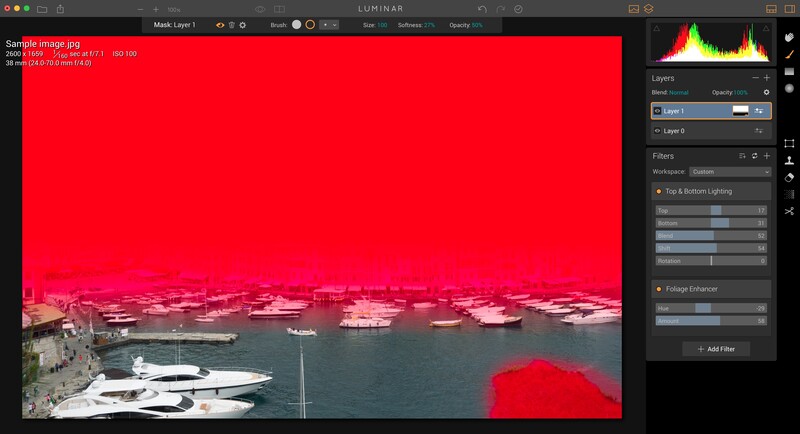
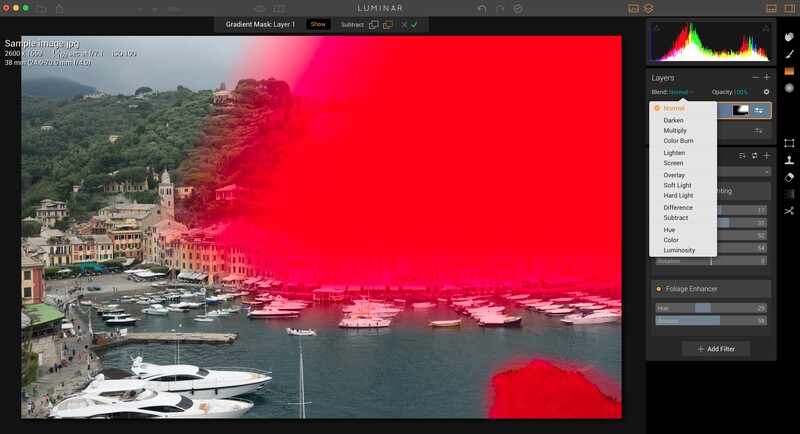
This is just a sample to show how I used the gradient tool for the top portion of the image and added in more to the mask with the brush. Finally, I created a second gradient in a subtractive mode to simulate removing the filter effect from a large portion of the original gradient, and then began exploring blend modes for the layer. Of course, my enabling of the red layer mask highlight is purely demonstrative, here. The possibilities are endless.
This actually makes more sense once you understand that local adjustments aren’t local adjustments at all. In fact, they are layer masks that you define easily with a particular tool such as a gradient or radial masking tool. The masks can be re-edited endlessly with the radial, gradient, or brush tools independently or together on the same mask. And each layer’s blend mode and opacity can also be changed at any time. As I learned this, I actually became quite intrigued by the flexibility this affords. Add to the fact that every filter in the program is available to you for your adjustments on any layer or within any masked area, and now, the power of Luminar starts to shine through. This is definitely something to get used to, but also is pretty easy once you understand.
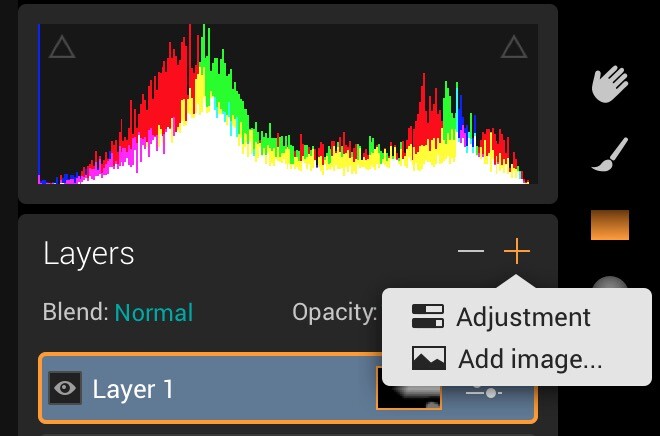
Multiple Images in Layers
One thing Lightroom doesn’t have is Photoshop’s layers. We all make do without (unless we want to take an individual image into Photoshop separately), and the experience with this is okay with Adobe’s choice to include individual local adjustments on pseudo-layers that live within each “adjustment dot.” However, it’s actually really nice to have the option to create adjustments bit by bit and to build them in layers, as already discussed. Beyond this, however, Luminar allows for the building of multiple images on top of each other through image layers. Of course, all blend modes and adjustment settings are available for any layer, so your options for how to merge and blend more than one image together are virtually endless.
Clone Stamp Tool
Since we’re comparing so heavily to Lightroom editing, let’s continue with Luminar’s clone stamp tool. Whether or not you agree with me, one of my biggest internal complaints about Lightroom is the lack of their actual content-aware brush. The spot removal tool works, and the change to allow one to drag it around to create other healing shapes aside from a circle was a welcome one. But nothing matches what Photoshop’s content-aware healing brush does. Unfortunately, Luminar’s Clone Stamp tool is literally just that, a clone stamp tool. While it lacks other features of a more capable healing brush, including the ability to see what you’re about to clone within the brush window as a preview, it at least works quite well in its current form.
One-Click Editing
Luminar does include various presets. In fact, they give you an entire bar for them down where Lightroom users would expect to see the film strip. While I don’t personally like to use most one-click adjustments, you can at least add your own for future use and have handy access to them in a central location. What can be accomplished in a couple clicks is actually quite impressive once you get down to it.
Performance
Editing filters on one layer is very snappy. I have no complaints there. However, as soon as you dive into the brushes or other masking tools on another layer, Luminar takes a moment to catch up. Sliders become slow, and you find yourself waiting a few seconds for an image to load at 100 percent, even if it’s small. I tried loading a larger 48-megapixel film scan I had, and Luminar handled it well up to a point. But again, local adjustments were slow to take shape with each adjustment. My preview copy of Luminar was in beta, however, so I would hope many of these issues can be solved soon.

The default hue for the Foliage Enhancer filter gives a rather nuclear look to greens in my opinion. But a quick bump to add a bit more yellow into the mix solves that problem and even gives more room to add more of the effect via the Amount slider while still looking boosted and not completely unrealistic.
While this doesn’t concern speed, the performance (or behavior, rather) of the smart aspect of the sliders is great to a point. While it’s easy to kill an image with too much of a particular adjustment in any editor, this is perhaps a slightly bigger factor within Luminar. On the other hand, certain smart adjustments such as those within contrast allow you to take it a bit further than you normally would. Settings such as the Foliage Enhancer filter were a bit over-the-top for me, resulting in a nuclear green. But I was able to quickly make great use of the filter by adjusting the hue to a more natural and more yellow tone than the default. At this point, the amount of effect that I added could vary quite a bit from image to image. You’ll be fine as long as you remember it’s powerful; don’t over do it. And feel free to tweak it when necessary to your preferences.
Conclusion
Even I will say that Luminar will require time for me to get used to. But from what I have been able to discern, it’s an incredibly capable editor that could be a replacement for Lightroom if you don’t need or care for the file organization aspect that the Library module offers. In many ways, Luminar is the perfect couple-click image editor for fast adjustments or even for finishing touches on an image. In fact, I almost wish they came out with a mobile application that could do this. But for now, the desktop application is a great alternative for those that are looking for something quite a bit more affordable and just as powerful (more powerful even, depending on your view of the “smart filters” — my term, not theirs).
Macphun Creative Kit users who own the entire kit or single applications such as Noiseless or Tonality will want to know how those compare with Luminar’s similar features. According to Macphun, the noise reduction and other adjustment features within Luminar are built on the same powerful tech behind their standalone application counterparts, but you won’t get the same flexibility and precise control that you would in those applications for the specific uses they fulfill. Macphun has made it easy to export images directly to their other programs as well, however, so you can more easily benefit from the entire Creative Kit.
Luminar can be pre-ordered before its November 17 release date for $59 with added bonuses in the form of various educational materials, but Macphun Creative Kit customers can receive a loyalty discount by entering their serial number. Luminar will go up to $69 once it is released.


Join the Fstoppers community for free
-
Post comments and join in the discussions
-
Browse the site ad-free
-
Share your work and get featured in the community
-
Compete in the photo contests for fun and prizes
18 Comments
Thanks for the preview impressions. Many are still looking for an Aperture replacement, which both LR & C1 not quite are. So it would be worth mentioning that Macphun confirmed that they are working on the cataloging part as well, to be released in a future version of Luminar. Something to look forward to.
Thanks for the mention of that. I didn't know this, but yes, it should definitely be interesting to see.
I second the motion. The library / cataloguing function is an important function for me too. Similar to be able to 'flow through' a bunch of photos (as in Apple's basic Photos app) and edit as you like rather then having to search for photos one-by-one, edit them then save a copy of those editted photos out to an alternate location. If MacPhun includes a Library / cataloguing function similar to LR, that could be a serious contender. I am not sold on Adobe's subscription, rental fee model.
Definitely can confirm that, though a DAM will be in 2017. A couple of years ago we wrote a "duplicate matching" app called SnapSelect, so there has been some groundwork laid. ;) Kevin (from Macphun)
It would be awesome if they released this on iOS/Android for tablets.
Agreed :-)
I hate to say this, but whoever edited the first landscape and its glowing green vegetation should be sent to a monochrome gulag for life. My eyes are bleeding.
(Yeah, that was kind of my point about the intensity of the Foliage Enhancer filter. But with a quick tweak, you can save it -- the issue is that the default is actually too blue on the hue scale)
The editing on these examples were just plain horrible. Overly blurry skin, awful skies that don't match the water nor colours in the cityscape, and intensely saturated plants in the first image....it did anything but sell itself to me with this example.
This strikes me as a consumer raw editor for casual users. The fact that it doesn't even have an image organizer pretty much kills this app for anything practical. Stacked automated processes is definitely another hint at it being a consumer product. This is somewhat of a variation on DxO, although there you have independent processing, albeit without local adjustment capability. There's always something missing with these apps.
I'm surprised that, to date, there aren't any really practical alternatives to Lightroom and Capture One.
I agree with you. I recently downloaded Luminar for a free trial and found it to be really tedious to quickly edit photos for the clubs I support. I don't have nor do I need the expertise that many of you have but I want to have better images and post processing is important to me. The lack of any organizational mode or cataloging as you refer to it is a big negative to me. Unfortunately, LR, C1 and similar programs are just too advanced for me and I don't need that level of technology.
I switched from LR to C1 because of color, details and the contrast and saturation sliders; it just works and way better than LR. Nice to see another player taking the same route. I am wondering where Luminaries stands vs. C1 in terms of image quality though. I've not seen any feedback so far. Just a few hours to wait for the trial version I guess
Anybody have a good sense of Luminar vs C1 yet? I know there's a bit of a price difference. I'm an amatuer that never does paid work but I still want my results to be 'pro like'. I came from aperture and recently bought Luminar and not interested in subscription LR. I shoot mainly raw and have heard great things about C1 raw handling. For the most part I've been happy with Luminar but get a sense that they need to do some updating before it's ready. No auto correct, no healing brush, etc. Wondering if I should stick with it or spend the extra $200 for C1. Just get a feeling that I'm missing out of C1 but not sure if it's worth the extra cash. Any input is appreciated. Thanks.
At the end of the day, the two programs are quite different. It's hard for me to say so early in the game, as I have simply had relatively limited experience with Luminar. C1 will definitely take you more time to figure out. And Luminar is definitely much easier to use for a beginner while still being quite powerful. But the two have different features and approaches in a number of a ways.
Your interest in photography sounds great enough to warrant trying Luminar (or simply buying it for the nominal cost) and seeing how it works for you... You can always switch to C1 later if you decide it's just not working. Naturally, I think trials might be a good thing to take advantage of in your case...
If you do try both, let us know what you think!
Have they made any adjustments to some of the setbacks since its release? I am debating purchasing this as a plug-in for Lightroom and it is really disappointing that their content awareness isn't comparable to Photoshop.
All in all - your review is one of the main reasons I am even considering this addition in the first place. Thanks!
Thanks for the response, Melissa. Photoshop is still a whole different beast, of course. And Adobe has an amazing amount of experience with advanced technologies such as content-aware.
Depending on how advanced your work is, you may find that Photoshop is simply a necessary tool. On the other hand, if you can get around not having quite advanced and robust automatic content-adjustment options, Luminar could be your ticket. Regardless, don't forget you could do both. This is the second time today I've suggested this, and it's not to try to sell you on both or anything (believe me, I don't get a kickback from pushing either). But it's simply because when all is said and done, it's not like it's expensive to own. So my thinking is, if it provides any use to you at all, just do it. To me, it's not worth haggling around and wasting hours of my own time wondering what I should do when I know it'll at least help every now and then.
I hope that helps...
I have wondered about the lens profiles that are a very important part of my LR workflow. That is one of the first settings I go to when beginning to edit an assignment. It's taken Adobe years to test and profile thousands of lenses professionals and general users employ. Has Macphun addressed this important part of image editing? Can't believe they have the resources to match what Adobe has done.
At this point, early Dec. 2017, Luminar/Win sucks. It can do wonderful things with my photos, which makes it doubly frustrating. The user interface, with tiny gray-on-black minimalist icons sans tool-tips is horrible. Mac developer arrogance at work - you WILL do as I say. The horizontal scroll bar under the presets is paper-thin making it impossible to grab because the cursor can't distinguish it from the window frame resize func
tion. It loads one image at a time painfully slowly, and exports at glacial pace. The devs don't listen to our complaints. Perfectly Clear went through exactly this phase when Athentech decided to release a Win version. Fortunately, they clued-up and hired some truly wonderful Windows developers and now PClear is just about perfect. Too bad it can't do Luminar-like magic with my photos, though PC's magic does accomplish some magic of its own.
I've asked for a refund on Luminar and will be delighted when they get over this juvenile phase and hire some Win devs and start doing it right - will gladly purchase it again if/when it gets to that point.