
The repeated process of exporting images from Lightroom is something you most likely have done many times over. With that being said, if you have not already, save yourself some steps, and set up quick and easy presets.
As creatives, we search for ways to streamline, and better existing workflows. Looking to save on time, and conserve energy for things that truly matter. As the tried-and-true adage goes, “time is money,” so it’s best to accomplish things as efficiently as possible. This adage, of course, rings true in photography, and luckily software companies like Adobe understand this and develop handy shortcuts tailored for our specific workflow.
A savings of a minute here and there will save you a much larger sum of time over the long haul. Take a client shoot, for instance, let's say a family portrait session. How many times per client do you typically export the same image from that one shoot? For example, on average you may need to export images from Lightroom to a client photo gallery like Pixieset or Shootproof. Providing the customer first with a low resolution, watermarked proofing gallery, and ultimately in time a collection of final edited images. Also using this same example you would likely export to your website blog, and as well to social media powerhouses like Facebook and Instagram. Keeping in mind if any of the images from these sessions really stand out above the rest they head to the portfolio, again this requires at a different export setting.
Point of these examples being common export settings like image sizing, metadata and watermarking will vary greatly depending on which one of these destinations the images are headed for. So as opposed to clicking checkboxes, and drop downs each and every time you export, instead try creating some export presets, and watch the JPEGS fly.

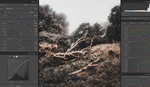
Example of a Lightroom export file menu and created user presets panel.
And setting these presets up could not be any easier to do in just a few moments time. Next time you are in Lightroom Classic, select the Library Module. Once you highlight the image or set of images from within in the Library, select the familiar "Export" dialogue button. Once the export menu appears, select the appropriate settings for the destination you are exporting the image to, and this time once your settings are dialed in, click Add, and create a preset name. Now the very next time you go to export an image to that destination the preset will be there to save you a few seconds. And who couldn't use some spare seconds these days? Any additional Lightroom time-saving tips out there? If so I'd love to read about them in the comments below.


Just FYI, the thumbnail photo for this article on the main page is corrupt.
What would be great to take LR exporting to the next level would be if you could group export presets, choose a folder and it would create a folder structure below with all the different versions.
You can use Capture One! For LR It would be helpful to have variables that can be used like in Photo Mechanic!