

Three years ago, I suddenly became obsessed with the colorization of old photographs. It soon led to me creating a time-lapse of the largest colorization job I'd had, which took over 14 hours to complete.
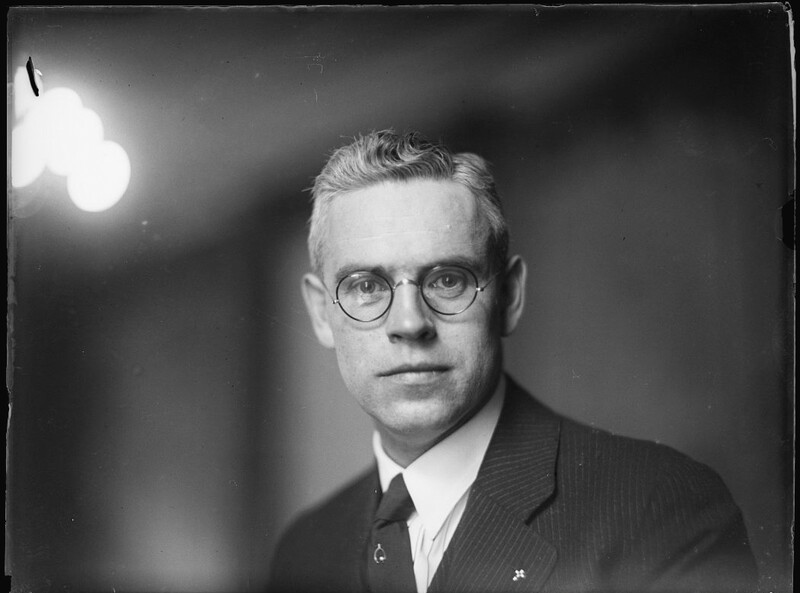
I'm obsessed with old photographs — the older, the better. I have no doubts I'm in good company with that. However, when my grandad showed me a treasured picture of his 1951 championship winning football team, I couldn't shake the feeling I wanted to do something with it. It was cracked and faded, problems I knew I could fix in Photoshop. And so, I set to work, carefully cloning, dodging, and burning the image back to perfection. Once I was finished, without a moment of consideration, I began turning the scene to color. It was a dreadful first attempt with me getting a lot wrong. For one, the colors looked fake and oversaturated, the faces looked lifeless, and the concrete still looked monochrome.
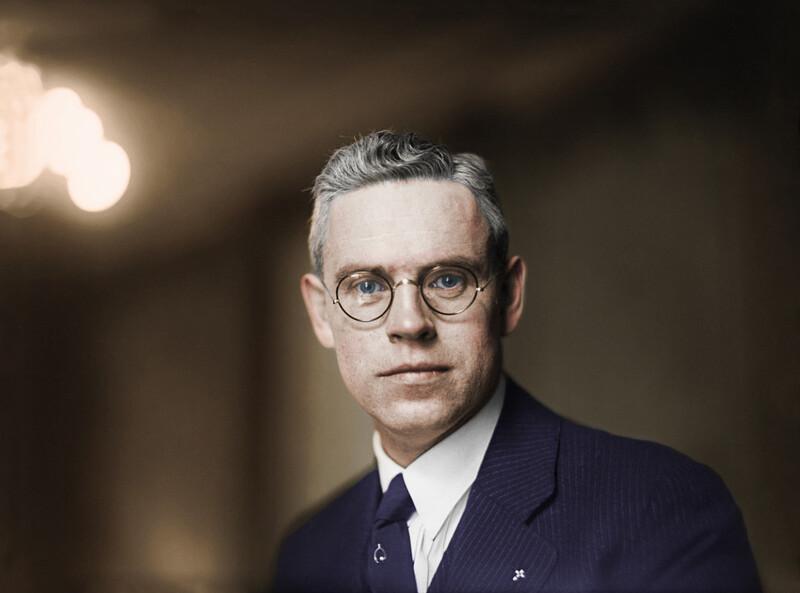
So, I set out to teach myself how to get it closer to what the reality would have been. I managed to find my grandad's original football jersey from that time (he throws nothing away, thankfully) and used it to map the exact colors. Then, I started pulling scenes at similar times of the day and weather conditions and sampling their colors to map onto the image. After hours and hours of trial and error, I was happy, and it made for a great Christmas present. It was, however, still pretty poor. But a little like had happened when I bought my first camera all those years ago, there was a constant itch to keep going. I found some Creative Commons images that were from between 1890 and 1950, and I got to work, churning them out.
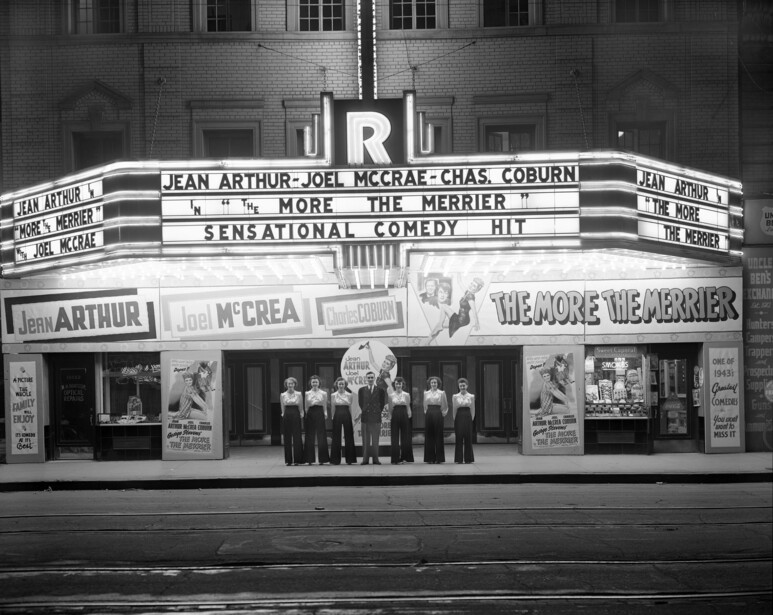
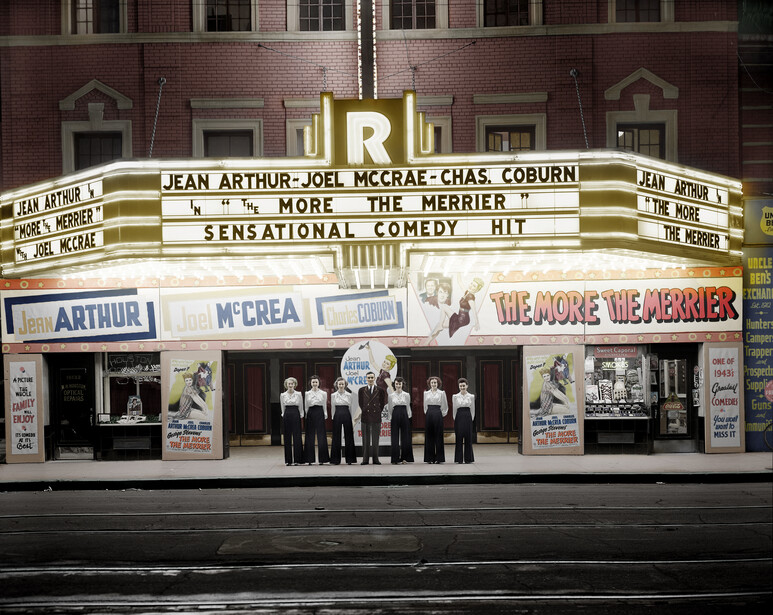
Before long, I was getting inundated with requests to complete swathes of historical family photos for people, and my new obsession became an accidental business. However, the most interesting task was an image (seen at the top of this article) of the Rialto theater in Edmonton, Alberta, Canada. Sadly, this beautiful theater was knocked down in 1987, and images of it were few and far between. I knew three things the instant I looked at it: first, this was no small job; look at the detail in the shop windows alone! Second, a lot of research was necessary to find out the correct colors. Third, I was going to do it no matter what. I decided to record the process — something I hadn't done before — and got to work. I was shocked to find when I'd finished that 10,000 percent speed of all the footage was still longer than I wanted the video to be.
Looking back, there are some adjustments I'd still make, but unlike my photography, I don't wince at the mistakes. I just got the return of that itch — the desire to see what I could do now and to see if I could find any nuanced techniques I didn't have before.
There's a lot that can be learned from a project this size, and I'm happy to share some of those tips for those of you who would like to try your hand at it:
- Less is more: too strong colors lead to an odd pastel feel to the image.
- White balance can play a large role.
- Try to get reference images for everything. In the theater image, I found references for everything from the original poster for the movie, to the Coca-Cola sign, and the brand of pipe in the shop window.
- Sometimes, perfect accuracy hurts the end result: There are times where entire areas have very faint colors, and the result looks as if there are patches still desaturated. I usually opt for a bit of creativity if that's the case.
- Dodging and burning can have a big impact on washed-out images by adding in local contrast.
- Layers, layers, layers: if the skin of your subject, a road, a wall, or anything else is looking flat and dull, add layers of color. For skin, I will do the base layer for the skin tone, then I will add blush to the nose, cheeks, and around the eyes, before finally tweaking colors for localized differences. The same even goes for things like roads: they are not perfectly gray, so start with a base layer and then add warmer tones where they might be present.
With the holidays not far away, completely revitalizing old family images can make for a superb gift.

9 Comments
Great work! I appreciate seeing the process and the attention to detail.
Glad you enjoyed it. Thanks, Eric.
I had the same hobbies for a while : http://www.samten.fr/albums/colorisations/
Great to watch this in action. Clients can watch this now and when you quote them a price say, "But it only took you eight minutes!" Thanks for sharing the video and the tips.
I wish we could see a time lapse without being so zoomed in. Although then you might not appreciate the lengths needed to achieve this.
This is amazing! I agree - love the attention to detail.
Great job Robert. Look forward to seeing more.
Would love to see a tutorial article on the subject at some point...
Good work, Robert!
Just curious about finding actual" colors", it is very subjective. For example, the suit that Bogart wears in "Maltese Falcon" appears to be dark grey however, in reality, it is orange. Would you ever do that to a still from that movie? The same goes for Civil War uniforms, it is very difficult to find, just from looking at the image, the correct colors. This extends into WW2 as well, determining a correct color or shade is often close to impossible. So really all that you are doing is coloring an image. Others may see a lot in that, for me the original is the actual art work.