Who doesn’t wish they could eliminate that annoying bystander threatening the vibe of your shoot with a simple click of a button? Well, you may not be able to do it in real-time, but it is possible to eliminate that pesky drunk with a single click in Lightroom.
It’s likely happened to you. An otherwise peaceful and fun shoot is interrupted by the comments or interaction of an inebriated bystander. If you’re anything like me, you’ve learned to contain the violence associated with your typical initial reaction and manage to stutter some sort of polite comment in order to keep your subject(s) comfortable.
The shoot is a success. You get back to your desk to upload images and find a nice shot possibly spoiled by that same guy that bothered you on location. Somehow he’s managed to follow you home and now you have to deal with him. The question is, how?
I have a confession to make. I dread taking images into Photoshop. It’s just a pain in the rear and takes away from the entire creative process for me. That being said, if I can make a correction while processing raw files in Lightroom, I do so. In the case of the drunk boater photo-bombing a recent senior portrait session of mine, the available tools in Lightroom prove to be enough to take care of such problems.
Lightroom's Spot Edit Tool
In the event I need to clone out or heal a specific area of a photo in Lightroom, I prefer to do so before make any other types of adjustments. This may not have any credible reasoning, I just prefer to get rid of annoyances such as the one mentioned before spending anymore time looking at the image.
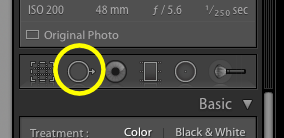
Lightroom offers a few basic tools that often prevent the need to export an image into Photoshop, and the Spot Edit tool is one of them. Found just beneath the histogram display on your Lightroom sidebar (right-hand side) are the six basic tools I’m referring to. For the elimination of said bystander, I'll only be referring to one in this article.

The second icon from the left (the one that looks like a confused gender symbol) is the Spot Edit tool. Clicking the tool will reveal a panel of adjustments that can be made to the spot, such as the size of the spot, the amount that the edge of the spot is feathered, and the opacity of the spot you're healing or cloning. For this image, it was necessary to reduce the size of the feathered edge so I could more precisely select the area that needed to be fixed.

From there, it was simply a matter of sizing the spot edit tool to the correct size and then clicking on the area that I wanted to remove. Lightroom will automatically select an area that would best replace the spot you've selected, but this is something that you can also decide for yourself.
As spring and summer approach, the temps will continue to rise and with that, the BAC of those you share some of your favorite places with. Knowing that, you can keep a level head now with the knowledge that you'll later be able to make them disappear with ease.


That tool tends to work too much like the healing brush for my tastes, always leaving density and color smears. I simply wait until I bring it into Photoshop to properly composite the image. BTW, I would remove that entire boat and it's wake out of the water in your sample shot. Total distraction.
I wouldn't have taken the shot at all. It looks too much like a billboard for "Attack Of The 50 Foot Woman".
When I first read the article, I was going to suggest PS is much better for this kind of thing but a lot of people don't have it or prefer to avoid it when possible.
"I wouldn't have taken the shot at all." From the looks of your portfolio, I believe you.
That wasn't intended as a comment about your abilities as a photographer but rather a follow up to Spy Blacks comment regarding distraction. My point was merely that, while well suited as an example for your article (it made for a difficult situation to demonstrate LR's abilities), as a whole, it wasn't composed very well.
I don't have a portfolio because I wouldn't believe any praise my photos would get and wouldn't want to believe any criticism. :-)
I'd love to see your work. Honestly
We captured plenty of shots during the set without the boat. The image was used to illustrate a simple technique.
Gotcha. The tool can work in a pinch in certain situations, but it disappoints me more often than not.
One important note that the poster forgot to mention is that you can click and drag the spot healing brush to create ANY size area that you want. This photo would best be done by zooming in 100%, then dragging to create a spot that more closely mimics the size/shape of the person (instead of just using a circle). You can create a lot better match that way. Also, the Lightroom spot healing only works if you can find a blank area that closely matches the color tones in the spot you're trying to remove. The Photoshop patch tool, healing brush, and content aware fill are 100 times better and doing this.