
Crushing blacks is a popular trend in Photoshop for achieving a more film-like matte effect that pairs well with vintage styling. It won't work with every image, but if it's a look you are after, photographer Mathieu Stern has put together a video suggesting three ways you can go about achieving and customizing the effect. In this article I will add on one more quick method in addition to the video which will give you plenty of options to play around with this effect and see which method works best with your workflow.
Mathieu Stern covers the following methods for achieving this effect in the video:
- Using curves layers
- Using a solid color layer
- Using a selective color layer
I would like to personally add on one more method that you can use which is quick and dirty for achieving the same look. It is by using the Levels Adjustment tool in Photoshop. Here is how:
Open up your image in Photoshop and fire up the levels adjustment window from your adjustment layers tab.
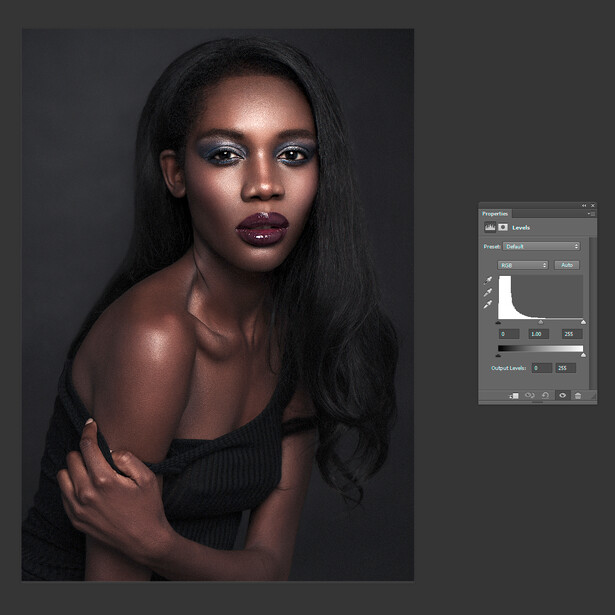
Next you will want to pull the bottom slider inwards from the left to the right thereby reducing the range of tones in that area. Also known as "crushing the blacks." Adjust to taste by pulling the slider various amounts.

What is your preferred method for achieving this look?
[via SLRLounge]
If you'd like to take your photo editing to a new level, make sure to check out the variety of Photoshop tutorials and plugins that will speed up your workflow and help you create stunning, professional work. Save 15% by using "ARTICLE" at checkout.


Join the Fstoppers community for free
-
Post comments and join in the discussions
-
Browse the site ad-free
-
Share your work and get featured in the community
-
Compete in the photo contests for fun and prizes
6 Comments
Some confusion in terms maybe?
Usually "crushing blacks" refers to the deepening and therefore often losing detail in blacks by (in the case of the writer's method) sliding the black point in from the left on the TOP slider of the Levels dialogue. Many video cameras with low dynamic range "crush" the blacks and blow out highlights giving the footage the so called "video look". Film usually has a better dynamic range leading to retention of detail in both shadows and highlights.
What this article is showing how to do is "lifting the blacks" as you are quite literally lifting the black point...the blacks become dark greys...it is often used in conjunction with dropping the highlights to give the "faded" or "matte vintage" look. It also can be done by lifting the black point and dropping the white point in a Curves adjustment layer.
John is right, the technique you are using is the opposite of crushing the blacks, you are indeed lifting them:
http://forums.solidsignal.com/content.php/525-What-are-crushed-blacks-%…
Uh oh.....Someone's getting the pink slip for messing this up tomorrow morning. lol :P
Reading this site sometimes is like watching the blind lead the blind.
There's a another technique that I recently picked up. Use an exposure adjustment layer. Push the gamma slider to about .95 and the offset to roughly .0013. Those are generally the settings I go with but obviously you can adjust to your own taste.
Thanks for this great approach on film emulation within Photoshop. Time ago I found PsdFilm, have you ever heard?