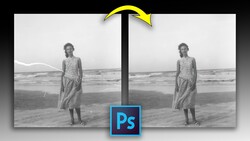
Under-eye bags are some of the most common things clients will want you to retouch, and as such, it is important to know how to take care of them efficiently and convincingly. This helpful video tutorial will show you how to do exactly this.
Coming to you from Aaron Nace of Phlearn, this great video tutorial will show you how to retouch under-eye circles using Photoshop. Nace begins by addressing a growing misconception in photo editing: the overreliance on generative AI tools. Many photographers, both amateur and professional, fall into the trap of expecting AI to be a magic wand that can effortlessly perfect any image. However, as he demonstrates, using AI for tasks like removing under-eye bags can lead to unintended consequences. The AI's algorithm, while powerful, often alters the person's natural features, resulting in an image where the subject looks distinctly different. This is especially true for delicate facial areas like the eyes, where even minor changes can significantly impact the overall appearance.
The tutorial offers a more controlled and nuanced approach. The key here is the subtle application. By feathering the edges of the selection with a Gaussian blur and quick mask, the changes blend seamlessly with the natural skin tone, avoiding the harsh, artificial look that AI edits can produce.
Nace also shares valuable tips on using the brush tool effectively. Setting the hardness to zero and the flow to a low percentage, he demonstrates how to gently layer the edits, ensuring a gradual build-up that respects the subject's original features. The use of the lighten blend mode is another critical piece of advice, ensuring that only the dark areas are targeted without altering the overall facial structure.
It's nice to see a reminder that refined manual technique is still important. While AI offers convenience, it lacks the nuanced understanding of human features that a skilled editor brings to the table. Check out the video above for the full rundown from Nace.


Join the Fstoppers community for free
-
Post comments and join in the discussions
-
Browse the site ad-free
-
Share your work and get featured in the community
-
Compete in the photo contests for fun and prizes
3 Comments
I only do a limited number of headshot photos but in my experience it's the eyes that require the most post-processing work. I use a conventional lighting setup with main flash and fill flash (and umbrella) high and at about 45 degrees either side. The problem is that one or both eyes aren't getting the same light as the cheek or nose, so invariably I've got some dark eye sockets that need to be brightened in post.
Of course there are always multiple ways in Photoshop of solving the same problem, but instead of using layers and blur, here's my approach:
First thing that I do is what you avoid... I make a selection close to the edge of the dark bags under the eyes. I feather the edge (about 40 pixels as I recall). It's really only a number that I must determine once as about every picture from the same distance is about the same. In other words, there's very little guessing in getting the feathered edge calculated properly. For lightening the dark bags, we can't just use an overall level adjustment because that would just make them a mucky shade of gray. To turn them into more of the color of their skin, I apply simple levels adjustment to each channel separately. The red channel slider decreases blue; green channel increases red; and blue channel increases yellow. The majority of the fix comes from removing blue in the red channel since blue is generally the darkening agent in this case. The other two colors I use more to balance the color with their cheek.
As far as softening the wrinkles is concerned, I use the cloning tool. I use the same technique for wrinkles on the face, or shadows around the nose and mouth... anywhere that I want to lighten or soften the impact from the harsh details. No selection required.
Set the clone tool to a size and area that covers your intended fix, larger for eye bags and nose shadows, smaller for deep thin wrinkles commonly found on the forehead. I use a soft edge brush set to about 10-15% opacity. Click on a source point near the edge of your targeted fix. I'll often use a source point in the cheek or forehead which has the best color. Then it's just a simple process of replacing the contrasty areas of the wrinkles or shadows with the clone tool. Essentially you're blurring that area of the image due to the low opacity of the clone tool. There are no precise number of times to click over the same spot. With a low opacity it takes a few clicks. That's where art and judgement come into play. Too many clicks and it doesn't look like the same person anymore. But it's a strategy I've used for the results I want to achieve.
Oh... the eyes usually need brightening too. I make a selection of the whites of their eyes, feather about four pixels, desaturate all colors or just red if that's the most noticable, and finally use the levels adjustment to lighten the eyes. Unfortunately I typically have to work with each eye separately since they rarely have the same brightness in the original photo. If I really want to get picky I'll select the color of the eye and brighten and saturate that. Helps to make a note while conducting the photo shoot of the color of the person's eyes. So many times I've gotten back to the computer and wondered if there was something in their eyes that the raw file was not showing accurately.
Hope that's of interest to you and other readers.
My wife is my favorite subject, and where I've learned the most about portrait photography. She graciously lets me try all kinds of experiments in lighting and editing. Without her, I never would have attempted photographing my first client for money. At our age, softening a few wrinkles and dark spots comes with the territory... although in her words: "Just make me look like I possibly could on a good day."
I'm not a fan of using any kind of blur in this scenario. It usually looses texture and it's obvious. I'd use dodging then color blend mode if need be. And, also, if need be, remove/spot healing/patch tools since they can maintain texture.