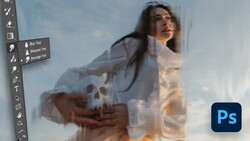
Being able to change the color of elements in your image gives you great freedom in the overall look of your scene. Here's a quick guide on how you can do that, by Adobe themselves.
Creating a set for photo shoots can be difficult, time consuming, and costly, and that's if you even get the opportunity to do that in the first place. Many shoots do not allow such control and while it may not break the image by any means, adjustments to color can certainly make it.
I edit the colors of objects in my images reasonably often when I'm shooting editorial images. While it's rare that any object will be such an odd color that it will ruin the scene or distract too heavily, I like all elements in my images to synergize with the scene and, if possible, be complementary colors. So, in most instances, I will select an object that stands out, mask it, then alter the color to be analogous or complementary of my subject. It may not seem like much, but it can add a layer of professionalism to your final image that could well push your work to the next level.
In this video, Adobe show you in just five minutes how to quickly and accurately alter the color of objects in your image. This technique can easily be used on clothes or just about anything you can make a selection of, too. How do you alter the color of elements of your images?

Join the Fstoppers community for free
-
Post comments and join in the discussions
-
Browse the site ad-free
-
Share your work and get featured in the community
-
Compete in the photo contests for fun and prizes
1 Comment
Since I make selections for color corrections on furniture all the time, I like to review the progress made with AI selection tools. I went and did a test on a recent file at 300dpi shot in a busy store with all types of items in the background. By the time I was half way with cleaning up and adjusting the selection, I feel I would have been safer if I had not spend much extra cleaning time if I had created a clipping path in the first time. With a path, I know I would have the proper selection all around and would not omit any detail. I feel the progress made with AI is pretty big, but the secret in the video is that "you can always fine tune later". Even at low res, I can see a bunch of places in the video that were left out. I would have liked to see a close up to evaluate the time needed for the fine tuning.
I see use for the technology, like hair and small details where ending with a clipping path is not the priority and time to achieve the selection not an issue. For anything else like volume of images and deadlines, I think the path tool is still the best way to go for consistency, speed and no need for fine tuning afterward.