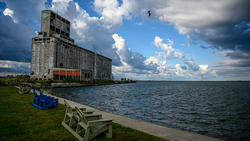
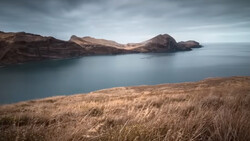
Sometimes, a small edit can bring a photo to life. Adjusting light, enhancing atmosphere, and directing attention can make a huge difference, especially when working with images that feel flat or lack impact.
Coming to you from Mickey Pullen with Eastern Shore Photo Instruction, this useful video walks through a simple way to add realistic beams of light in Photoshop. The technique is straightforward, requiring only the selection tool, a gradient, and a few adjustment layers. Instead of relying on Lightroom’s masking tools, which may not always give the desired effect, this method allows for precise placement and control. The key is using soft light blending modes, feathering the edges, and applying a subtle blur to keep the light beam natural. The process is quick, but the result is a believable enhancement that integrates smoothly into the image.
The video also covers fine-tuning the effect. Using a photo filter adjustment layer adds color to match the natural warmth of sunlight, while a curves adjustment helps introduce haze for a more atmospheric look. These small refinements make a big difference in achieving a convincing result. The flexibility of Photoshop’s layer masks means you can manually adjust the effect with a brush—painting with black to remove light in certain areas or white to extend it. This level of control ensures the light looks like a natural part of the scene rather than an artificial overlay.
This approach works well for images where natural light plays a role but needs a boost. Scenes with windows, doorways, or other light sources can benefit from added beams that draw attention to key areas. The effect can also be adjusted to create different moods—soft and subtle for a gentle glow or more dramatic for high-contrast lighting. Since the method relies on non-destructive editing, changes can be refined at any stage without permanently altering the original image. Check out the video above for the full rundown from Pullen.


Join the Fstoppers community for free
-
Post comments and join in the discussions
-
Browse the site ad-free
-
Share your work and get featured in the community
-
Compete in the photo contests for fun and prizes
2 Comments
I don't like to be too negative, but the lines and physics of the end result here are really jarring to the eye for me.
100% agree. As a photographer with a degree in architecture, I not only understand how light travels but also studied shade and shadow in architectural rendering. This edit makes no sense whatsoever. And besides, it doesn't take an education to understand that light beams don't bend in the middle of open spaces.