Removing distractions from a photo has never been easier, but relying on one tool alone won’t always give you the best results. If you’ve used generative fill and noticed low-resolution patches in your edits, you’re not imagining things. The tool is great for quick fixes, but when you need high-quality results, there’s a better way.
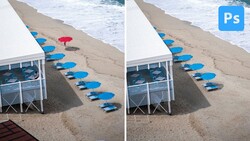
Coming to you from Matt Kloskowski, this practical video walks through a common issue with generative fill: texture inconsistencies. While the tool works well for removing elements in a pinch, it tends to introduce areas that don’t match the original detail of the image. This becomes a problem if you’re printing or enlarging a photo. Kloskowski demonstrates how zooming in reveals a sharp divide between the original texture and the AI-generated replacement. The result? A smooth, artificial patch that stands out against the natural grain of the photo.
To get around this, Kloskowski turns to an older tool that many have forgotten: Content-Aware Fill. Found in Photoshop’s Edit menu, this tool allows for more controlled, high-resolution edits. Instead of generating new areas from scratch, it intelligently pulls from surrounding details, making for a more seamless blend. He explains that rather than selecting a large section at once, working in smaller pieces gives better results. The tool also allows you to refine the selection, preventing Photoshop from using the wrong parts of the image as reference.
Once Content-Aware Fill has done most of the work, smaller imperfections can be cleaned up with other tools like the Healing Brush and Clone Stamp. Kloskowski points out that even the Remove Tool can help, especially when generative AI is turned off. The key is knowing when to combine tools rather than relying on a single fix. Check out the video above for the full rundown from Kloskowski.


Join the Fstoppers community for free
-
Post comments and join in the discussions
-
Browse the site ad-free
-
Share your work and get featured in the community
-
Compete in the photo contests for fun and prizes
3 Comments
Alex,
In the last paragraph, you mention Healing Brush, Remove Tool, and Content Aware Fill. Which of these are available on Photoshop Elements, and what do you do to find them on that program?
since a couple of updates ago I've found that the Spot Healing Brush now often only gives a blurred mess compared to the Remove tool
I don't use Adobe, but I do use Topaz-remove. I find sometimes I need to 'Transplant', to teach the 'Generative-AI', that is training it to finish the job more completely and seamlessly, to get it to do a better job. 'Transplant' is where I take a 'square' crop from another part of the same picture, or possibly a different picture, and put it inside the part I want filled. In the end, you shouldn't notice that part of the image may have been duplicated. Other tricks I use is: If it's a larger fill. I don't try to tackle the whole thing at once. In Gimp, I take a smaller crop of the section that needs filling... and make it a separate image. Then topaz-fill that. ... Then paste that back into the original whole.... Then proceed to the next part. Until it's complete. The filling engine is better at smaller pieces, rather than trying to do a large section at one time. One example I had where I had this panorama image, and I had missed this section in the sky. Well I couldn't crop that off, I would have lost my Light-House. I had to fill it, but it was a pretty big part. So that was where this technique came into play.