
If you have ever thought of light painting Portraits but were too afraid to attempt it, then check out these five tips that will get you on the right path to success.
This may seem overly simple but the first step is to use a sturdy tripod because your cameras exposure will be between five to ten seconds. For the images in this article, we used between a six and eight second exposure.
You could also experiment using a remote trigger for less camera shake but for these shots, I just pressed the shutter button gently and it seemed to work out just fine. Once you have your camera stabilized you can move on to step two.
Step two is to take a test exposure at six seconds for example and make sure the room is dark enough so that you don’t see any ambient light leaking into your image. If the image is dark then you can proceed to step three.
Step three is to light your subject with off camera flash using your lighting setup of choice, it can be either a speed light or studio strobe the type of flash you use doesn’t matter. You can also use any light modifier you would like or as many lights as you prefer to light the scene.
Your goal is to light your subject like you would normally light your portrait subjects because the flash will expose for your subject and your light painting will start after your initial flash exposure.
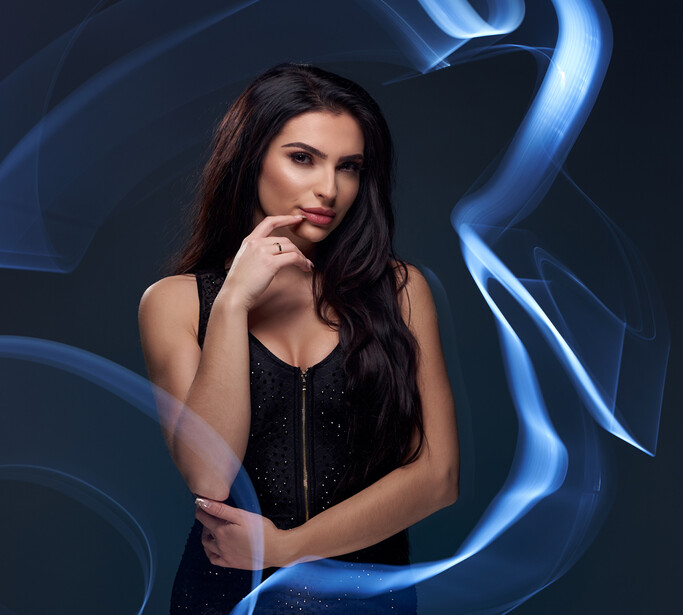
Step four is to use a light painting tool such as a small flashlight to create your light painting patterns. Adding a colored gel to your light source and modifying it with a light wand will help you to create some interesting effects.
In the video clip, I used some speed light gels with a light wand from light painting brushes but you could alternatively create a do it yourself experiment with just about anything that transmits light. The camera and lens used for these images was a Sony A7 III with the Sony 85mm F/1.8 lens.
Step five is optional but if you shoot tethered to a computer, you will find it helpful if you can review your images and make adjustments to your light painting. It’s even better if you can employ an assistant to help you with the light painting so you can focus on posing your subject.
Hopefully you found these tips helpful and your confident enough to go try light painting portraits yourself. If you have any helpful tips of your own in regards to long exposure light painting portraits. Please share your tips with the rest of the community in the comment section below.


Join the Fstoppers community for free
-
Post comments and join in the discussions
-
Browse the site ad-free
-
Share your work and get featured in the community
-
Compete in the photo contests for fun and prizes
6 Comments
At the very least you should credit Jake Hicks for teaching you how to do this.
Did this a couple of years ago using this exact technique. Except,it's an LED hoop and Safire is a top hoop performer so I could ask her to keep the hoop low from her face. This is SOOC except for a tiny bit of face exposure adjustment. So fun to do! Thanks for this tut, it reminds me to go play with light and have fun!
Wow, that is really funky, love the spherical shape. My experience with these is it takes a lot of tries to get one that works.
Here's mine from a couple of weeks ago. Didn't have a flash handy, so I've used one torch to light myself and another to draw the shapes. Using a flash I'd be sharper of course, but I kinda like the ghosty effect. Also harder to get the exposure right.
Nice!! And so fun eh! I like the ghost effect too. It adds interest.
That's great Andre. Now I'm only disappointed that your fstopper profile doesn't have a link to where I can see more of your work!
Thank you! I dropped all photo locations and am working on my own website while I'm recovering from shoulder surgery. Social media wore me out, with poor return for the type of work I do. Soon!