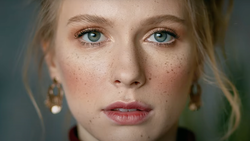
It's a common problem to have a variation of colors across the skin in any image. This may occur for many reasons, such as blood flow, skin quality and texture, or lighting changes. It's always been a hassle to fix this since it requires some guess work and tweaking. It's often not as precise as it could be either. Michael Woloszynowicz has come up with a brilliant way of color correcting skin in a way that I've never seen before!
The beautiful part about this technique is that it is easy to execute and very precise. You let Photoshop do most of the work once you determine the skin tone that needs to be fixed and the color you prefer instead. It's also quickly adjustable as well. Without saying much more, check out the video! It will be a technique that will surely come in handy in the near future.
To download the action, you can do so by going here and clicking on the link provided in the first paragraph in his writeup.
Thank you to Michael for sharing this great tutorial with us directly! If you'd like to see more, check out his YouTube channel!
You can also stay connected to Michael directly on his Facebook page, where he has plenty of other great tutorials as well.
__
Also as a quick heads up for anyone interested, I will be teaching a few retouching classes at the Fstoppers Workshop in the Bahamas this May. I'll be going over my workflow and techniques that I use on a regular basis. I kept the cost of my class low so that everyone can make it out. Check out the details here: https://fstoppersworkshops.com/pratik-naik/. Come out and spend some time with us, you need that break! Check out the promo video on what you can expect at this year's workshop!


Join the Fstoppers community for free
-
Post comments and join in the discussions
-
Browse the site ad-free
-
Share your work and get featured in the community
-
Compete in the photo contests for fun and prizes
4 Comments
Awesome, works wonders and shaved off a good 10 minutes off my workflow...thanks!
for high end commercial retouch it makes sense, but for a quick fix on everyday portrait I choose soft brush (same sample suggestion as on video above), low opacity ~20%, Blend Mode: Color - then take a sample (Alt+ click) on color you want to have, and then paint over the area you want to fix.
Make another pass till it looks right. Done.
also works on occasional skin redness here and there. Choose sample color to white if you want to remove yellowness from teeth. Keep opacity low, and make few passes if needed.
awesome, thank you!