
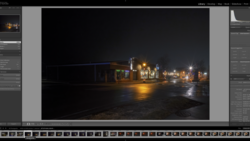
Over the last couple of years I have received more than a few inquiries about how I use Lightroom to edit my photos. The embedded video is a screen recording of my entire workflow, from import to export. It's sped up for the sake of time, so if there is any part that isn't clear, feel free to ask questions in the comments. So without further ado, here is my Lightroom workflow.
As I note in the video, I do about 99% of all my editing in Lightroom only. The only time I ever open photoshop is to do heavy editing, like if I need to open a subject's blinking eyes or edit complex shapes in an image. My workflow has been whittled down to what is now due to time constraints at my JackThreads job, where narrowing 500 images down to under 100 finished images in less than one hour was something I did daily. It would take me about ten times as long to edit with Bridge and Photoshop.
I want to note that this is the workflow that makes the most sense to me. It is not perfect. It will continue to evolve as I learn more and as the software continues to update. If you have certain elements to your workflow that I didn't touch on, please feel free to share them in the comment section. The thing that I find the most helpful when I am editing is to, in the words of Bunk, use "soft eyes". If I am looking too closely at one image, my eyes can get used to a poor white balance or dim highlights. So I always do one final run-through with my finished edits to ensure consistency, before exporting.
For those who are interested in the lighting info for the photos in the video, here ya go-


Lessons similar to these as well as 25 lighting diagrams are available in my new e-book, RGLR, The Run & Gun Lighting Resource for $10.


Join the Fstoppers community for free
-
Post comments and join in the discussions
-
Browse the site ad-free
-
Share your work and get featured in the community
-
Compete in the photo contests for fun and prizes
34 Comments
not a very good workflow if you ask me.
what makes you think your entiteld to make a tutorial?
Haha, really? I mean to each their own but if you want to start arguing that his images are lacking or his work is beginning to slump with this workflow good luck because the dudes killing it with a simple setup in Lightroom.
I appreciate tutorials, walkthroughs and BTS's from anybody willing to take the time to create them. What a horrible world we would live in if entitlement were a qualifying factor to giving.
Mom, is this you?
hahahaha this got me Nick!
Awesome.
Laughed so hard. A hardy congratulations.
You have some kind of credentials that entitle you to sit in judgement there?
Thats awesome man! Such a simple little workflow. Not too far off from what I have taught myself on my own but with some small details that really help the images pop a more. It may be more with simple color changes or tone changes but the small things add up and really show in the end shot. Keep up the great work!!
Thanks homie!
I am currently trying to re-design my workflow to use LR more in order to speed myself up. So far, cutting down on my Photoshop habit has been hard (I know how to do most things there), but tutorials like this make it much easier.
Thanks for posting this tutorial. I never thought of spot removing lens dust then copy and pasting to similar images.
copy and pasting is the same as syncing the spot removal.
Thanks for sharing your workflow, to my surprise we have very similar workflows and I also rarely open Photoshop except for cloning / 32bit hdr merging. Cool to see the some neat little things you do though, really inspiring!
Happy to!
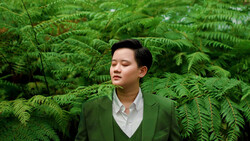
I'd love to hear more detail about how you handle skin in Lightroom? The model's skin in this photo looks pretty good. No blemishes, consistent, good texture etc. I have always found the spot healing tool in Lightroom to extremely clunky and unwieldy. (Not to mention extremely slow).
The same goes for cleaning up stray hairs.
A good MAU usually goes a long way towards making that easier.
I don't shoot much beauty, so I don't do much heavy retouching. General portrait work doesn't usually call for it. For little blemishes and even some stray hairs, I find the spot removal tool to be perfectly sufficient. If I need to do anything really extensive like open someone's eyes, I do that in Photoshop.
Ah, maybe i need a new computer, I find when I used the spot healing in photoshop it is fast and instant even on multilayer very high resolution images. In Lightroom i get a 15-20 second delay each time a place a spot.
(actually my biggest challenge in LR is always performance, i still use it a ton but I find the weirdest things bog down my computer in that app while complex stuff in photoshop runs smoothly)
I switched over from PS to LR in version 2 already. Once I realised how much quicker I could edit in LR compared to PS I did not look back.
My workfow is slightly different: View images in Library Loupe view, use "6" to label images red as selected (use left hand to press "6", right hand on arrow keys...), flicking through images rapidly to wittle shot selection down to favourites and reject technically poor images. Then go into develop mode and use "P" to flag images to be edited. Then go back to Library, select "filter by flag", back into Develop and then edit images to taste and export if necessary. This works really well and I can easily get through 1000 event photos in 2 hours following this workflow.
Nice tutorial Nick.. thanks for sharing! It's always good to see how others work and watching this has reminded me of a thing or two that I ought to be using myself... Really good images by the way!
Thanks!
I haven't used Photoshop except for heavy object removal in over a year now. Photo Mechanic+Lightroom 4 gets the job done. Photo Mechanic is invaluable for ingesting, tagging, and rating, as it previews images MUCH faster than LR. Then just drag my selects into LR and get to work.
I've always thought that having an undo reliance on PS to be a successful photographer is like having a reliance on steroids to be a successful athlete.
I think that such Tutorials should be somehow rated - for example this one is good for amateur lightroom users. I use Lightroom on a daily basis for a few years now, and I haven't learned a single thing here. I'm not hating, nor am I implying anything negative - great job, good tips for people who are not very familiar with LR, but nothing relevant for more advanced users here. So maybe a little hint, who certain tuts are adressed to would be awesome ;)
Good point. I knew I wasn't breaking ground with my post. But I thought it would help at least a few people out.
Agreed, solid idea by Robert to implement something like 'skill level' in the tuts bar or something. I am not new to the creative world or the adobe suites but when it comes to LR I am a novice at best so anything I can watch or learn from is helpful.
I am certain you did! ;)
Ya I agree, and while this isn't an issue with this tutorial one of my biggest pet peeves is when advanced tutorials assuming the user doesn't even know photoshop. (For example the teacher should be able to just say: "duplicate the layer" instead of "click on layer, then select duplicate layer". I find so many advanced tuts are made unnecessarily long by having to re-explaining basic photoshop principles that really should be addressed in more entry level stuff.
For weddings / most sessions where I am doing numerous images I'm the same way as he said at 5:43min into it. I primarily use Photoshop now just for running Portraiture skin softening and Liquify when needed.
That said, Lightroom and ACR import into Photoshop CS6 is all the same tools just a different interface. Some photographers I know don't use LR because they've got their own process that is even faster with just photoshop. That said, for most photographers Lightroom is an incredible tool :)
Travis - Minneapolis Wedding Photographer and Filmmaker
http://www.fridayweddingphotography.com
great work Nick! As usual you bring all the things most of us should be doing to light I learnt a lot from this thank you!
Really great post. I definitely like the multi image editing, saves so much time its ridiculous.
Really enjoyed watching this, some good tips in here! thanks
I was impressed by the speed at which you work on Lightroom.
great thanks Nick
LOL!! is there a reason that the video is not showing up? I mean true some critics here are D'heads but hey there are a whole lot of cool people that would like to see the video... plus any tip in workflow that I can get would be highly appreciated.