
Some months ago, I was excited enough to place a preorder upon hearing of the announcement of Sky-Watcher’s Star Adventurer GTi, the latest in their Star Adventurer series of star trackers. In September, I finally received it and have been checking it out. Let’s see if it has indeed met my expectations.
A Little Philosophy First
While I have great hope for this product, having worked in an engineering career myself, I should first say that I probably have relatively relaxed expectations compared to some users. This tracker is designed for low cost and portability. Although I’ve already seen some grumbling about the performance of this product, I don’t think we should have expectations for performance equalling a Swiss watch. After all, we’re not paying the price commensurate with a Swiss watch!
The other characteristic I see in some other users/reviewers is the tendency to overload the mount with a heavy setup and/or long focal length lens or telescope. I think we have to keep in mind that this is supposed to be a camera tracker. This is a bit muddied by the fact that Sky-Watcher has actually stuffed so many features (dual axis motors and go-to capability) into this product that it can actually be considered a small telescope equatorial mount.
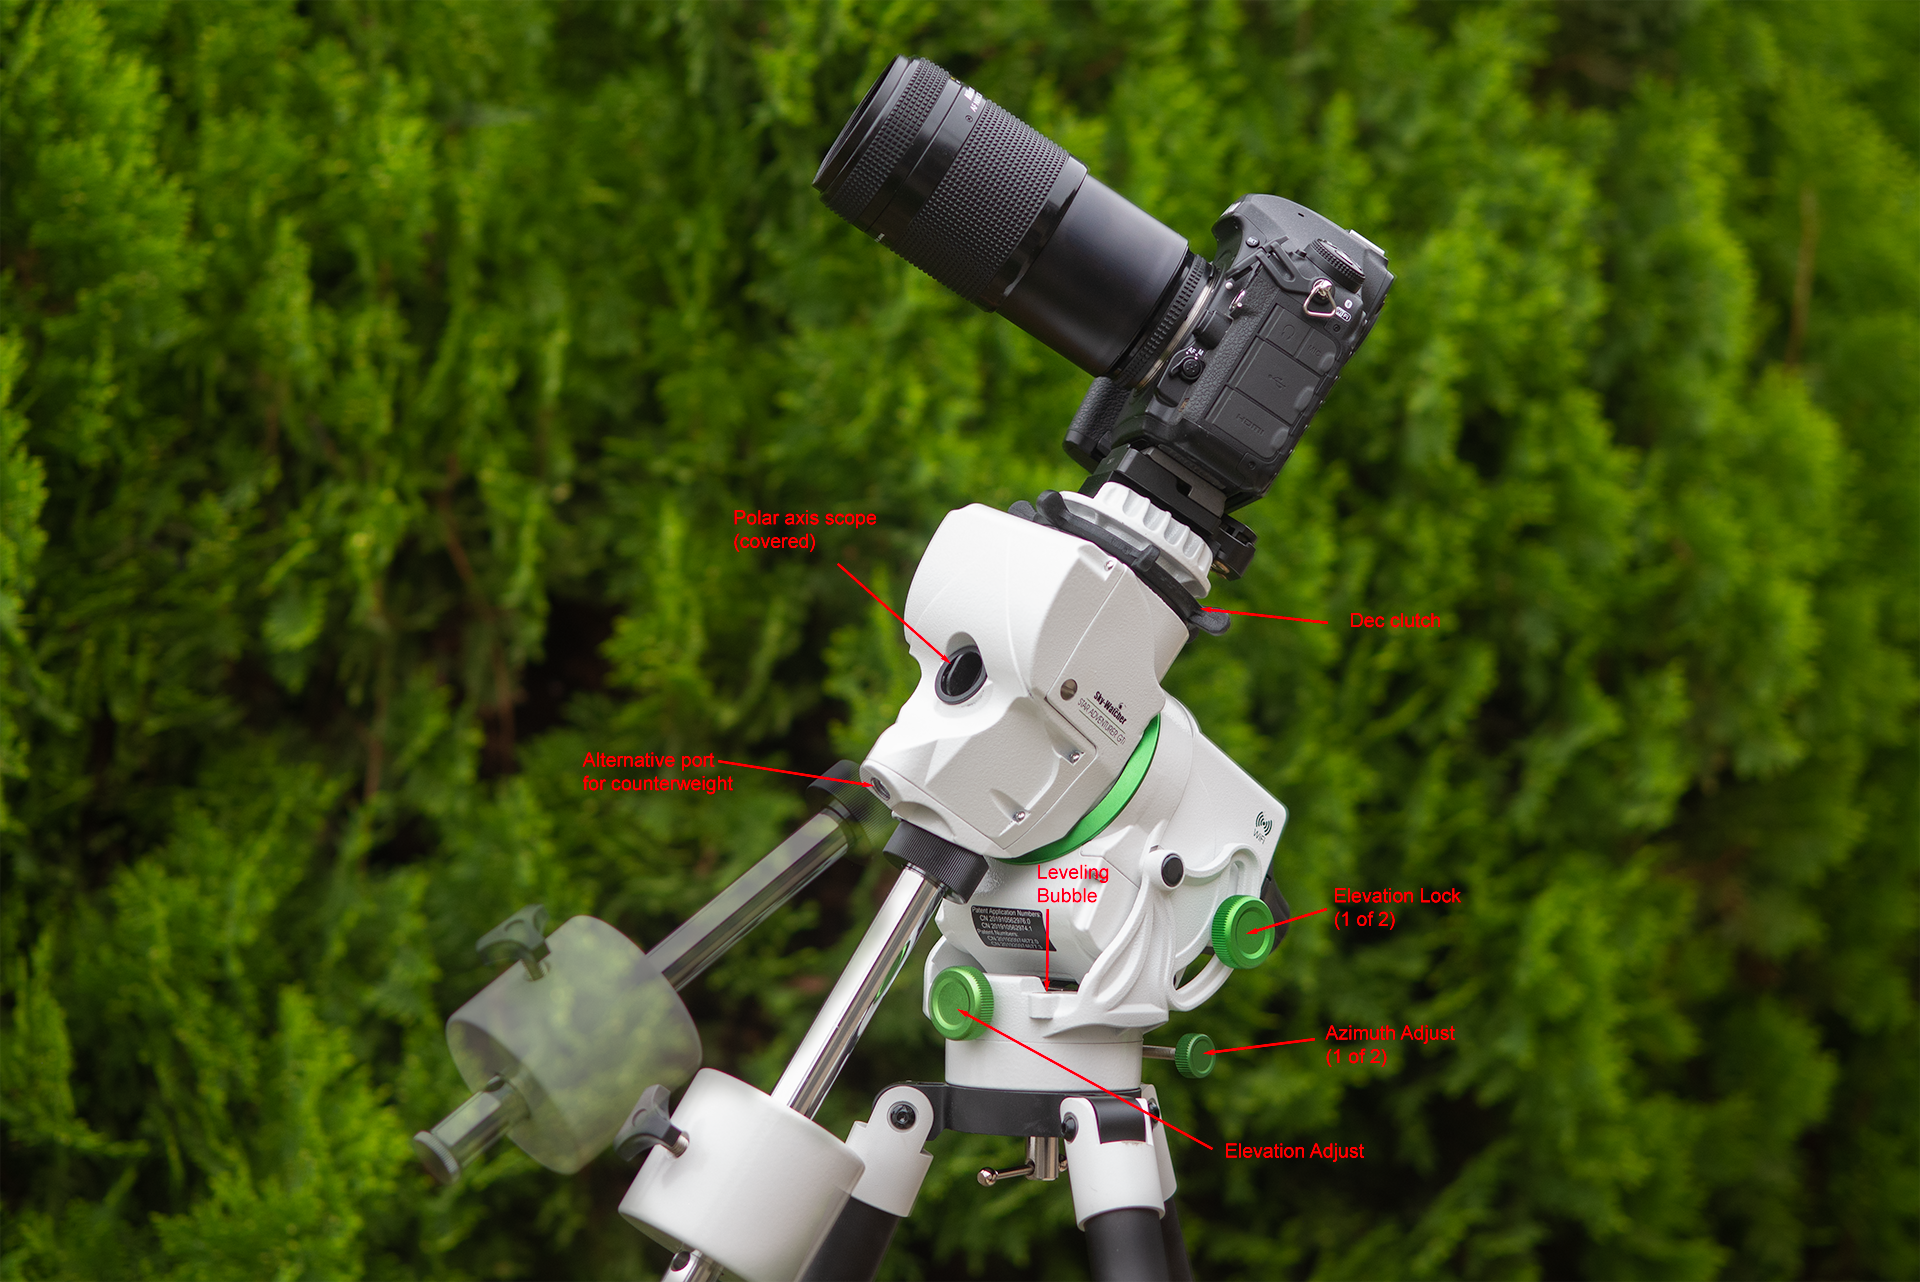
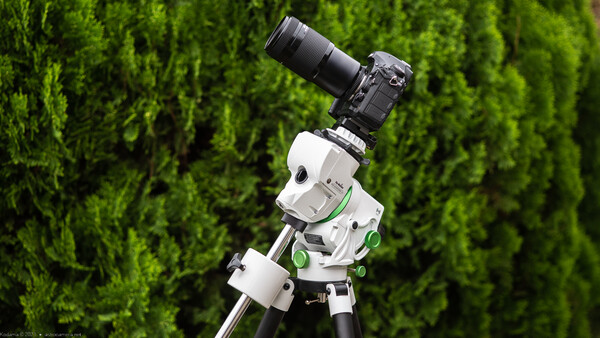
Portability
On the topic of portability, I give the Star Adventurer GTi mount head a big thumbs up. It’s about as light and compact as one can get. It easily fits into a small carry-on luggage bag or daypack without many odd protrusions. And except for the obvious counterweight and bar, it is very lightweight. On a serious expedition, I would ditch the counterweight and improvise something at the destination (e.g. duct tape and water bottles filled with sand). The counterweight bar is also thoughtfully designed so that it can be screwed into the mount in two positions so a low latitude location doesn’t cause a counterweight and tripod collision. However, even at my latitude of ~32 degrees having the counterweight at the top of the bar will cause a collision with the elevation adjustment knob.
The integrated elevation and azimuth adjustments are also a welcome and compact improvement over the previous Star Adventurer trackers, which had a separate (optional) adjustment wedge.
The saddle at the top of the head is a Vixen-style dovetail, but the package does not include a dovetail rail. What I have pictured is a 3D-printed adapter to a Bogen/Manfrotto quick release plate, which I’ve standardized for my setups.
The GTi version of the Star Adventurer also is a clean design with no external wiring which has to be connected in the field. If the internal batteries are used and a camera is used on its own internal batteries, it’s possible to have a completely wire-free setup. But speaking of batteries, the GTi version of the Star Adventurer needs 8 AA batteries, which is double that of its predecessor. And while the battery holders are compactly integrated into the body of the tracker, I agree with other reviewers that the short shaft on the thumbscrew access to the batteries makes it easy to drop and lose the thumbscrew. In practice, for my own use, I will normally use the 12 VDC input to power the tracker as I’ll generally have other equipment in use which will also require 12 V power.
Another improvement over the other Star Adventurer line members is the polar scope, which is integrated into the body of the tracker along with its polar scope illuminator. The older trackers required a separate illuminator, which was not only easily misplaced, but also had a poor on/off switch (if it could be called that).
The new Star Adventurer polar scope, however, could trip up first-time astronomical mount users. Sighting on the pole requires that the declination axis be rotated until a hole in the shaft allows the polar scope to have a view of the sky.
Dual Axis 'Tracker'
The main feature I’ve been looking forward to is the addition of a declination axis motor and autoguider input. Having a dual axis motor capability and ST-4 style autoguider input potentially improves usability even when exact polar alignment is not possible.
Operation as a Tracker (No Guiding)
Operation as a tracker requires that the polar-aligned mount simply rotate the Right Ascension (RA) axis to offset the rotation of the Earth. The Declination (Dec) axis is not moved at all, which is why most simple star trackers do not have a motorized Dec axis. The Star Adventurer GTi operates exactly in the same way when not being actively guided. Thus, the accuracy of the guiding depends only on the accuracy of the polar alignment and the mechanical accuracy of the RA motor and gear system.
To test the mechanical system, one can slightly intentionally misalign the polar axis, and photograph the stars over a period of several minutes. As the polar axis misalignment causes the stars to drift in the field, the irregularities of the polar axis tracking become apparent.
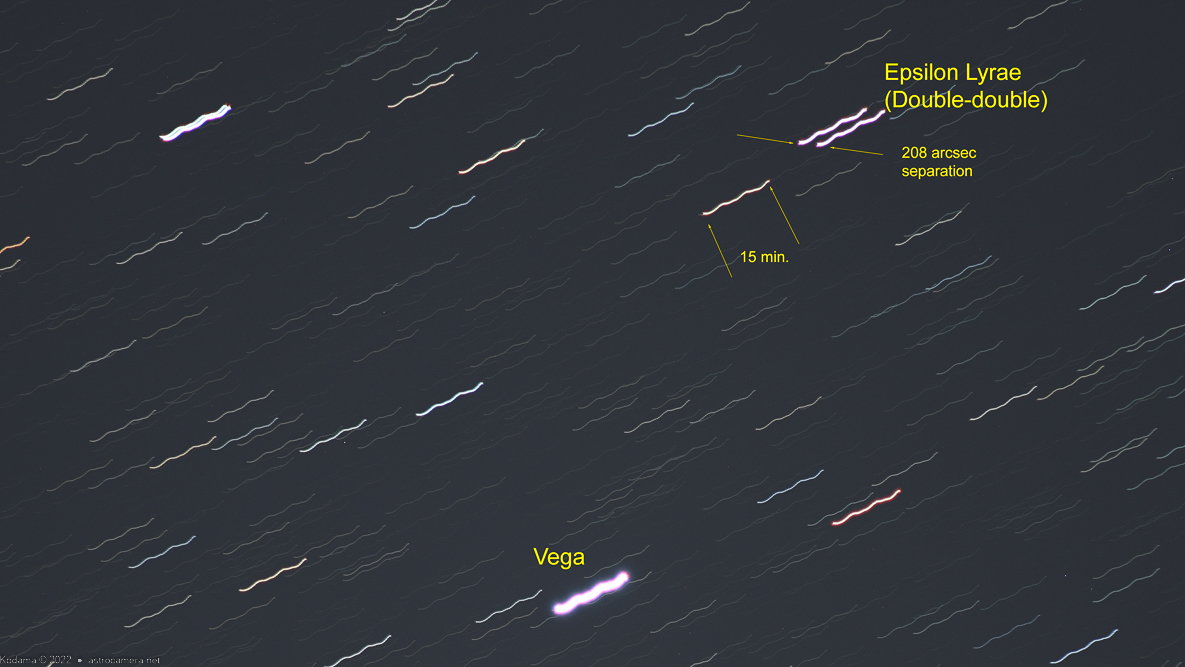
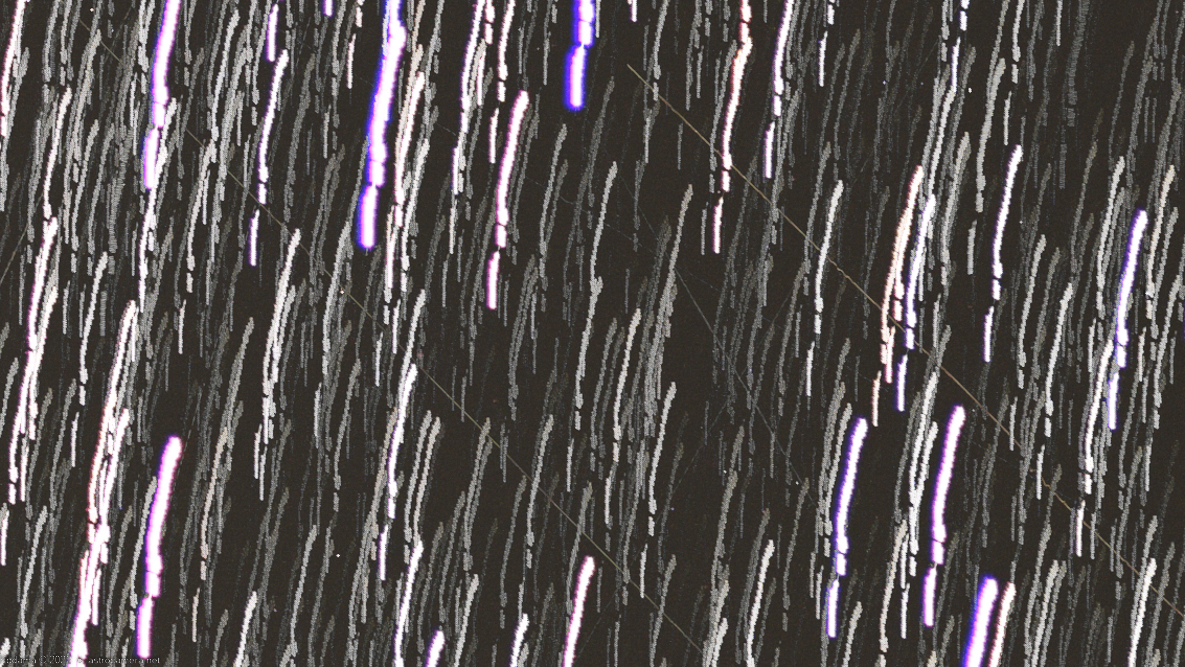
In the test above, 30-second exposures were taken over a period of 15 minutes with a telephoto lens at 210mm focal length and composited to show the irregularities in the polar axis gears. The area photographed was in the constellation Lyra, with the two stars of Epsilon Lyrae labeled (upper right). These are about 208 arcseconds apart, which gives a scale to the tracking irregularities. While the tracking errors are a little higher than I have seen with other trackers, it should work for me, and one has to remember that this is a single sample of the product line. Your own tracker may have better or worse performance, so doing a simple test like this as soon as you get it is highly advisable.
As is typical for trackers and telescope mounts, the polar axis error shows a periodicity indicating the RA worm gear’s rotation rate. As long as the tracking doesn’t show sudden jumps, the errors can be guided out with active guiding, and/or short exposures can be combined and still retain round stars.
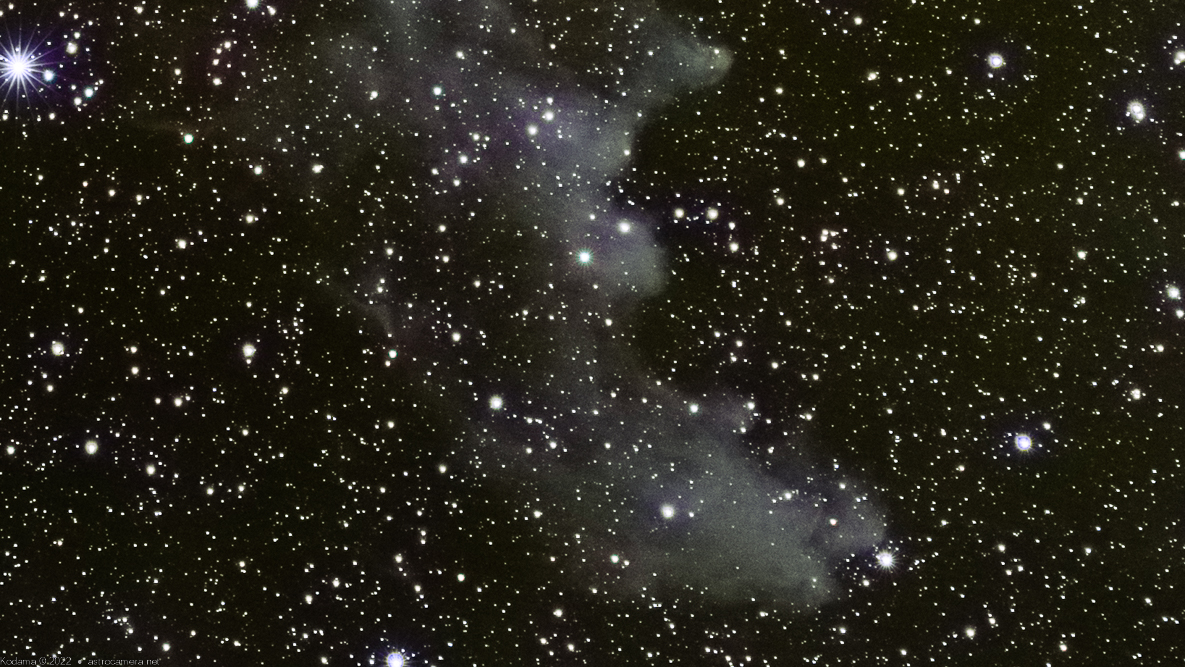
Another test shot over a period of four hours with a 180mm Nikon prime lens showed no problems when 30-second exposures were used (Nikon’s internal intervalometer’s maximum). The aligned and stacked composite shot along with an enlarged area is shown below. Only a handful of frames out of the four-hour period were not used in the stack, and those frames were ruined by me fiddling with the camera while checking for dew formation on the lens.

Operation With Active Guiding
In my particular use case for the Star Adventurer GTi, I want to use the tracker for solar astronomy. In this use, it’s generally not possible to exactly polar align, but an autoguider such as Hutech’s Hinode solar guider can be to keep the sun in view for both astronomy outreach and to create long-duration solar time lapse movies.
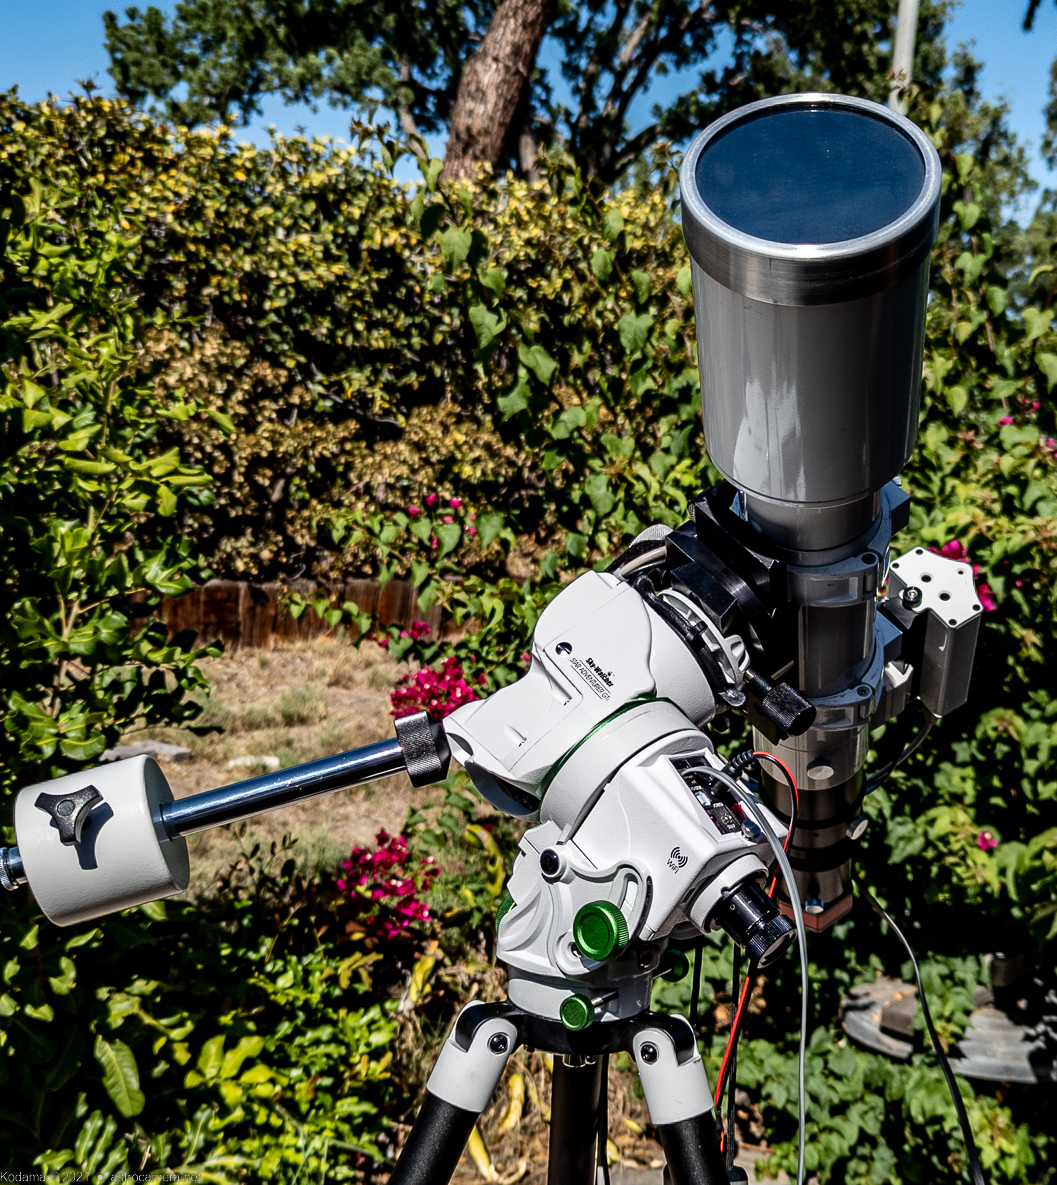
In this use scenario, I found that the GTi works fine, even when overloaded with my 100mm (640mm focal length) Borg telescope, which has been my standard solar eclipse travel scope for over 20 years. Note: I don’t actually recommend an overloaded setup like this. The whole setup was wobbly (despite the light weight of the Borg scope), and would not do well in any kind of breeze, but for this test which involved snapping solar shots at around 1/1000 second, there was no issue with the exposures. Over a period of several hours, the Hutech Hinode Solar Guider kept the sun centered with active tracking signals fed into the GTi’s ST-4 guide port, despite only a rough polar alignment setup.
Operation as a Go-To Equatorial Mount
In designing the Star Adventurer GTi for dual axis motors, Sky-Watcher went a step farther and integrated a go-to controller. This can be operated using a smart phone or tablet or PC using a wi-fi link, or by direct USB connection, or via an optional hand controller. In this respect, the SA GTi is closer to the company’s EQ series of computer controlled German equatorial mounts.
The phone/tablet apps and PC control programs leverage off the software designed for other Sky-Watcher mounts, providing not just go-to capability but also polar alignment assistance, and full connectivity with the ASCOM device driver software system running under Windows, making it possible to connect the mount control to planetarium programs such as Stellarium and automated imaging programs such as NINA. In this way, if you’re interested in dipping a toe into more advanced computer-controlled imaging setups in the future, you have a low-cost entry to practice on.
Note that while the go-to capability of the tracker might seem to make it unnecessary to learn the sky yourself, the alignment procedures depend on you to initially point at bright stars which are listed by name. Unless you are familiar with the star patterns and names, you will need a star chart showing the brighter named stars. These may also be necessary even after alignment because the go-to accuracy is limited, making it necessary to first go-to a nearby bright star before using go-to to get to a dim target.
Advanced Feature Downsides
In putting advanced features into the Star Adventurer GTi, I did come across a number of Sky-Watcher design decisions that actually reduced the functionality of the GTi as a basic tracker.
Startup
The first was that when powered on, the tracker does nothing at all. You must connect to the tracker with a phone/tablet or computer with the Sky-Watcher app (SynScan Pro) to tell the mount which hemisphere you’re in, and to start tracking. In my opinion, this could have been remedied by having a button on the tracker which could be pressed once to begin northern hemisphere sidereal tracking, or twice to begin southern hemisphere tracking. In this way, the functionality of the simpler members of the Star adventurer trackers could have been retained.
Note: If you are connecting to the GTi with a tablet or PC which does not have location information (via GPS or IP address), then you will have to manually enter your location.
Wi-Fi
My second major complaint is that out of the box, the tracker has an open wi-fi hotspot enabled. Not only does this take more power to keep active, but also is a security problem as no credentials such as a username and password are required by default. Anyone with the Sky-Watcher app that walks by could connect to the hotspot and control the mount.
A password can be assigned so that the security risk is reduced, but I found that you can’t set the password using a phone or tablet. I had to connect with a PC and Synscan Pro app in order to get to the option to set the wi-fi configuration which includes setting the password or switching to a configuration in which the GTi connects to an existing wi-fi network instead of acting as a hotspot.
Additionally, the wi-fi operates at the older 2.4 GHz frequencies, potentially interfering with other wi-fi hotspots, including other Star Adventurer GTis. At 2.4 GHz, although there are technically 13 available channels, only 3 channels can be used at the same time and still be spaced so that they don’t interfere with each other. I can easily imagine a crowded star party with several Star Adventurers causing problems with each other.
Full Automation Caveats
As noted earlier, the Star Adventurer GTi potentially provides all the capabilities available with larger equatorial mounts. But going beyond just getting your feet wet could rapidly become a frustrating experience. Adding all the components for a fully automated system will certainly overload the mount, and the limited accuracy of the go-to capability could add to frustration. If you are serious about getting deeply into automated astrophotography, you should move on to investing in a serious equatorial mount.
Solar Observing
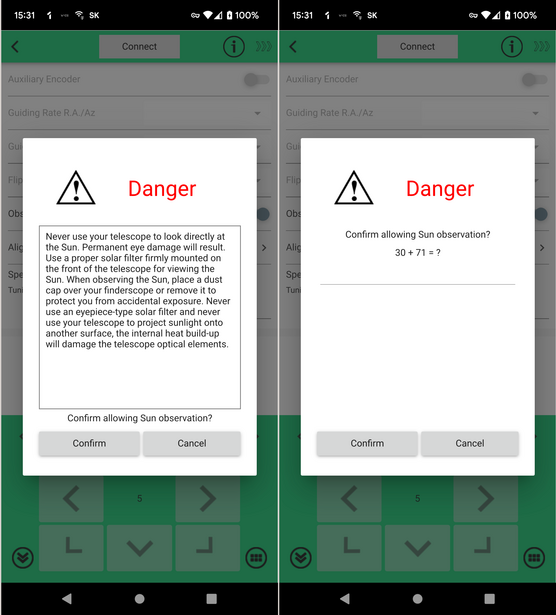
Another little annoyance to me in my use of the GTi for solar observing is the fact that the Synscan app quickly becomes a nagging annoyance in its attempt to protect us from blinding ourselves. Each time you power up and wish to track or point at the sun, it’s necessary to go into the advanced menu options:
Settings / Advanced / Observe Sun
And then you have the two additional steps to confirm that you really want to observe the sun by solving a math addition problem. Hopefully, you can add two two-digit numbers in your head, or you will be really, really annoyed each time you power up the GTi.
Conclusion
Despite the little things I’ve noted, I’m pretty happy with the Star Adventurer GTi. It fills a nice niche by providing dual axis motors and autoguiding input. Implementation as a well-integrated compact package also gets thumbs up in my book.


Join the Fstoppers community for free
-
Post comments and join in the discussions
-
Browse the site ad-free
-
Share your work and get featured in the community
-
Compete in the photo contests for fun and prizes
1 Comment
I feel like the perception that it's a telescope mount is kind of like a problem of their own making because there's no way to really distinguish that and beginner telescopes weigh so little now that a lot of people are using them that way, although from what I seen they recommend certain kinds of use be avoided not because it will completely break it or collapse but just because it won't produce good pictures because it stresses the weakest part of its motion.
I also think it's really hard to understand and grasp when you get into this that for a lot of stuff that people want to take pictures of they just need a camera like with a big ass lens. And it's hard to understand that until you do it and sort of realize like what you're actually doing when you're taking pictures of space.