
Stop motion animation is a great technique for creating attention-grabbing content to promote a brand or your own photography, or even just for fun. In this article, I am going to show you how to shoot and assemble a series of still images to create an eye-catching stop motion animation.
As an enthusiast of the still image, I have always leaned more towards photography than videography in my own work. But as much as a picture might be worth a thousand words, sometimes a moving picture can be worth a thousand views when it comes to drawing more eyes to your web content. In a sea of text and static images, stop motion animation can be an effective way of getting noticed online - bridging the gap between video and the still image to deliver a short but impactful message in a concentrated burst of fun and creativity.

Shooting the Clip
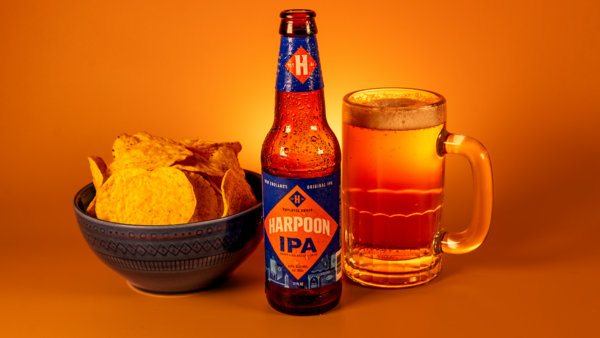
As a longtime resident of New England and someone who is partial to a cold beer, I thought it would be fun to do my own test shoot of an animated promotion for one of our fine, local brews, especially since I just happened to have a cold one in my refrigerator! My extremely simple storyboard for this 3 to 4-second clip was to start with a full bowl of tortilla chips and a full glass of beer, both of them flanking the empty bottle from which the beer was poured. Over the course of the clip, the chips would disappear from the bowl and the beer would disappear from the glass.
And that’s pretty much it - just about the simplest storyline you could possibly imagine.
To emphasize the refreshing aspect of the beer, I wanted to use a cold bottle straight from the fridge and have some of the condensation visibly dripping down it over the course of the clip. To enhance this effect, I spritzed the beer bottle with a little water at the beginning of the clip. Including this extra detail, however, meant that I would now be on the clock to shoot the clip before all of the condensation had either dripped off the cold bottle or dried out as it warmed up.
While we’re on the subject of time, one of the latitudes that you have with stop motion animation is that you don’t need to plan your clip around the frame rate that you would need to create realistic motion. Video is typically shot at frame rates upwards of 24 frames per second to achieve this. But to create the kind of signature, jittery motion that is almost de rigueur for animated GIFs, you can easily get by with frame rates of 10 to 15 frames per second. For the 3 to 4-second clip that I had in mind, I figured that I would therefore need to shoot somewhere between 30 and 60 images.
With this in mind, I could now draw up a game plan for the photo shoot. I would start with a full glass of beer and a full bowl of chips. Between each frame, I would drink a little of the beer through a straw so as not to disturb the glass, while also removing a few of the chips from the bowl now and then. Knowing how many frames I would be shooting allowed me to plan my rate of consumption of chips and beer so that both of them would be finished in the allotted time.
On a side note - having to drink a glass of beer through a straw in about 2 minutes did lead to some incredible episodes of explosive burping during the post-production process, but I guess even photographers have to suffer for their art!
The gear I used for the shoot is as follows. I lit the scene with a couple of LumeCube Studio Panel lights and a LumeCube RGB Panel Pro 2.0. I shot the scene with a Leica SL2-S camera fitted with a Leica L-mount 24-70mm zoom lens. The camera was wirelessly tethered to my Apple iPad Pro so that I could control it without having to keep stepping away from the scene, or touching the camera and risking camera shake.

Processing the Images
One of the details you need to pay attention to if you are shooting images for an animation is to maintain as much as possible, consistent color balance and lighting across all of the images in the clip. Even though the lighting for my scene was constant throughout the photo shoot, it was still important to make sure that I applied the same tonal settings across all of the images. Processing the images in Adobe Lightroom made this very easy because it allowed me to copy and paste my development settings across multiple images.
Creating the Animated GIF
There are a number of different ways to convert the final images into frames and assemble them into an animated GIF. Many video-processing software packages offer an option to export clips as animated GIFS, but I thought I would use Adobe Photoshop since I use the suite of Adobe photography software extensively for my own work, and I’m assuming that many of you probably do as well.
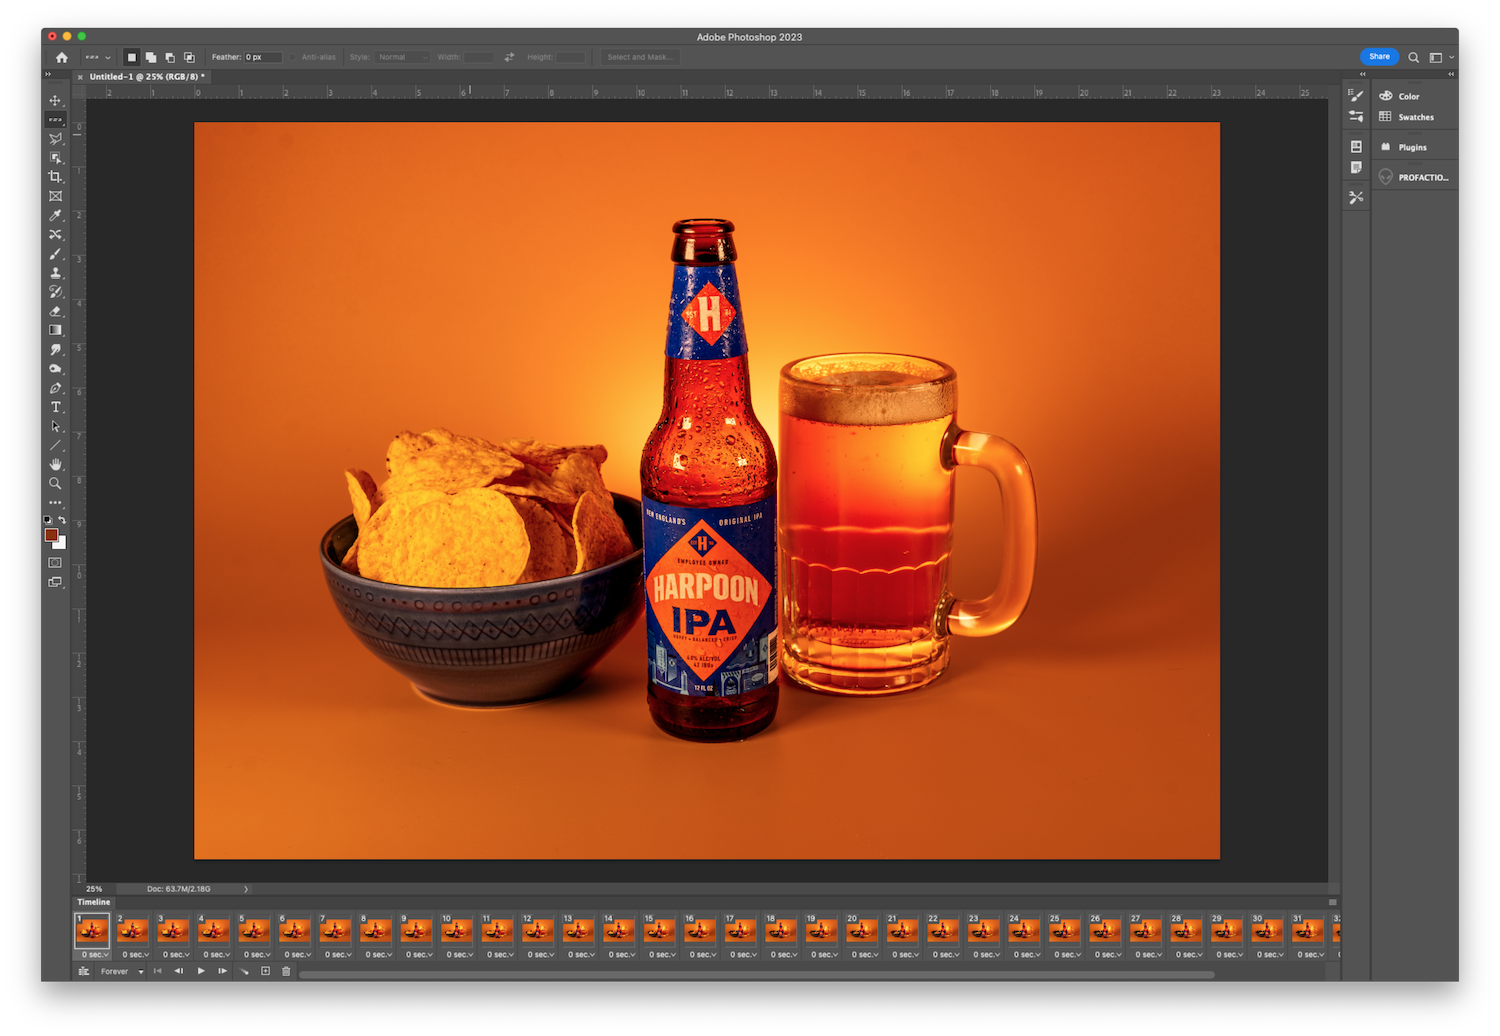
The first step is to load the processed images that you want to use in your GIF, as stacked layers in a single image in Photoshop. With the images sorted in correct, chronological order in a folder, use the File > Scripts > Load Files into Stack menu command to load the images as layers. Beware though! When you come to create your clip, you will find that the chronological order of the files in the folder yields a clip that starts at the end and runs to the beginning, so you will need to reverse the layer order. The menu commands Select > All Layers and Layer > Arrange > Reverse will fix this for you.
Now you are ready to create your clip.
The menu command Window > Timeline will open the Photoshop Timeline panel at the bottom of the Photoshop window. If the small menu in the middle of the Timeline panel does not already say Create Frame Animation, choose this option and then (with all layers still selected) click on this menu to load your layers into the Timeline. Initially, you will only see one frame, but if you click on the Timeline menu (the three little bars at the upper right of the Timeline panel) and choose the option Make Frames From Layers, you will see all of the frames in your clip arranged in the Timeline (like this).
Next, you need to set the duration of each frame to get the total timing you want for your clip. I ended up with 35 processed images, so I set the frame duration to 0.1 seconds to create a 3.5-second clip. Select all frames by clicking on the first frame and then - while holding down the Shift key - clicking on the last frame. With all of the frames selected, you can use the little dropdown menu on any frame (that looks like a down arrow) to choose the frame duration.
Finally - use the File > Export > Save for Web (Legacy) menu command to export your clip as an animated GIF. The dialogue that appears will give you the option to resize your animated GIF if necessary, and be sure to choose Forever in the Looping Options menu if you want your clip to replay over and over.
The extremely simple example presented here demonstrates the basic steps in creating a stop frame animation, but the complexity of the animations you create is really only limited by your imagination, and by the time and effort you are willing to invest planning your storyline and adjusting your scene between frames.

Join the Fstoppers community for free
-
Post comments and join in the discussions
-
Browse the site ad-free
-
Share your work and get featured in the community
-
Compete in the photo contests for fun and prizes
2 Comments
So happy you shared it. Doing it my way but this is much better!! Will try.
Thank you!
Thank you Annett, I'm so glad you enjoyed the article.