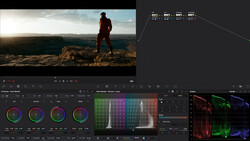
The Mango Street YouTube channel has been a great source for learning some new skills, or for teaching you more efficient ways of achieving certain effects. In this video, they show how they make videos in Premiere for the channel, which is a great insight into their workflow and process.
What I Learnt
Saving certain mundane tasks like zooming in and out to hide a mistake when you're speaking to the camera can be done much easier than I thought. You can save it as a preset and drag and drop it on the footage which is a huge time saver in the long run.
Usually, I cut and move the footage to where it needs to be, but their use of the Ripple Trim To Previous Play Head shortcut, which is "Q", is a great way to move large parts of the clips in your timeline to the end of the last clip when you're removing parts of the video. Again, this saves a lot of time and speeds up your process, which should have you export sooner, which is much more enjoyable. The same goes for the Ripple Trim to Next shortcut, "W".
With regards to sound, you only need one microphone and if your camera has two inputs, you can set the one up to also use the same mic, but at a lower volume. Doing it this way guarantees that you will have a backup in case you clipped the main input's recording if you spoke too loudly.
Although it's small things, they are certainly worth implementing. And, perhaps you even found something else that will be useful for you.


1 Comment
Hands-on-tip, Always appreciated !