
It has been gone since fall, but the galactic core of the Milky Way is back and rising up in the early morning. Spring is a great time to learn how to photograph the Milky Way in the Northern hemisphere, so you can have your process perfected and be ready when the galactic core reaches peak altitude in July and August.
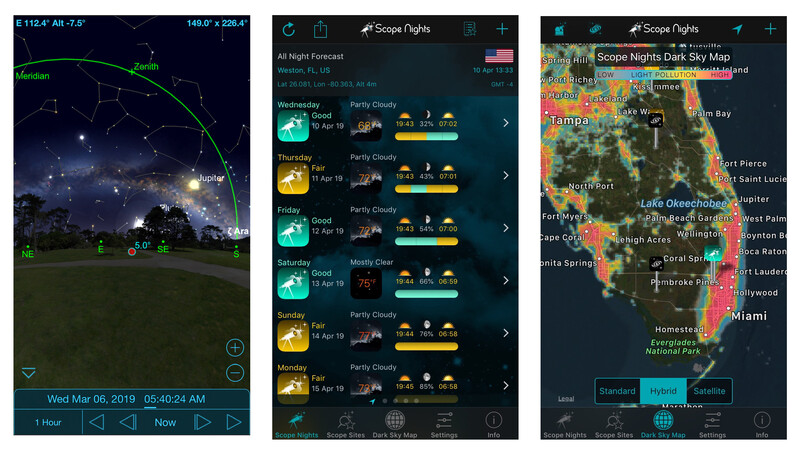
Check a Moon Calendar to make sure it will not be visible (waning crescent moon before new moon is ok) or use any of the following apps such as SkySafari, PhotoPills, Scope Nights and Astrospheric which provide information on weather, cloud coverage, wind speed, moon rise, moon set, light pollution maps, and more. The next new moon is Saturday May 4th, and the window to photograph the Milky Way in the early morning would be May 2nd - May 16th when the moon sets at 4:30am in the west. That gives a large window to find a date with clear skies.
Tips When at Location
Scout your location first during the day, especially if you are trying to compose something interesting in the foreground. A compass or one of the above apps like Photopills or Skysafari have a built in compass to help preplan your composition. Don't forget to bring a headlamp at night, preferably one with red illumination so your eyes can maintain dark adaptation allowing you to appreciate the night sky.
To prevent vibrations with your camera on the tripod, tether your camera using an intervalometer, smart phone if the camera supports wireless tethering, USB cable to laptop or alternatively just set a 2 second delay on your shutter button. Hanging a bag on the tripod or using a tripod stone bag is also a good idea, especially if it is windy or you accidentally bump into the tripod in the dark. My stone bag ends up with battery banks, cables, head lamps, lens bags, etc and is now indispensable.
For focusing, infinity focus on your lens is usually close but not perfect. After setting focus to infinity try this: max your ISO and aperture, switch to live view, and center a bright star in the sky. Manually focus in live view and zoom in with 5x - 10x zoom to get the bright star as small as possible. Focus should be close to perfect in live view when dimmer surrounding stars suddenly become visible as tiny pin points. These dim stars are usually not visible in live view if not in perfect infinity focus. The amount needed to achieve perfect focus can be 1/10th of a mm turn so try to make very small adjustments and get it just right.
ISO settings will vary depending on your camera and how dark the sky is. You should aim to get a clear separation from the left of the histogram to separate the signal from the cameras read noise. Ideally expose between 1/4 to 1/3 from the left of the histogram. A normal usable ISO range would be 2000 - 4000. If using a tracker, you can use a lower ISO (I use 1,600 when tracking). If stacking un-tracked photos for noise reduction, you can stay a bit lower around 2,000-2,500. This will prevent clipping stars (blowing out the highlights which can not be recovered in post). For single shots, you probably need to be at ISO3000 or higher.
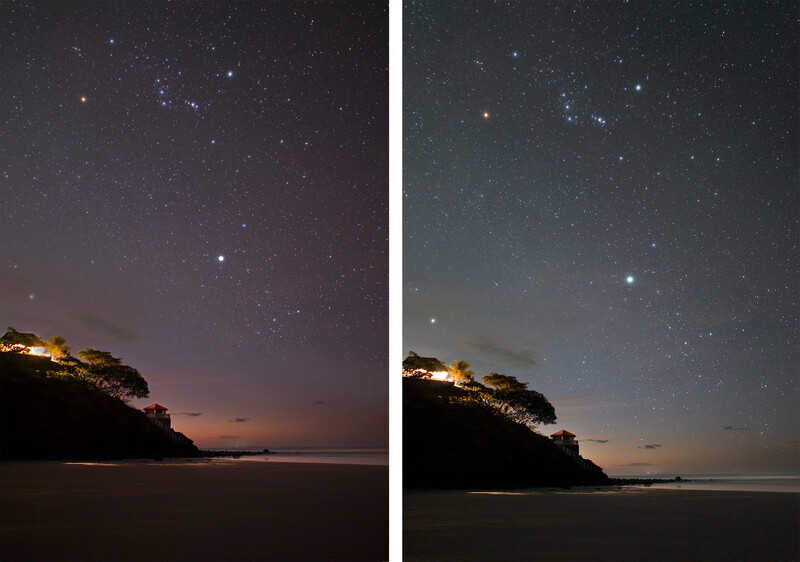
I can start to see a slight blue shift on the histogram starting about 65 minutes before sunrise, so that is usually my cutoff time for capturing photos. You can then wait 15 minutes into the blue hour to capture a foreground photo if needed.
Humidity can be a problem, especially early in the AM. Humidity tends to be lowest at sunset, and highest at dawn. USB powered dew heater lens strips are recommended if the humidity is forecast to be over 80%. They are available for under $20 and can be powered with a cellphone battery bank. Here in Florida they are a necessity! If it is very humid and you do not have a dew heater, keep your lens in its bag as long as possible or as a last resort, run hot air from a car vent on the front of the lens to keep it warmer than the dew point outside.
As studio photographers want perfect skin tones and lighting, astrophotograhpers should strive for round, in focus stars with minimal aberrations and coma. Some elongation is ok if not using a tracker, and the amount is up to personal preference. Budget lenses that are known to work well are the Rokinon / Samyang primes, followed by Irix and Sigma Art lenses. These recommended primes lenses are usually very sharp, minimize coma and produce good star shapes into the corners. Mel Martin wrote an Fstoppers article on budget astrophotography using Rokinon primes, if you missed it you can check it out here. LonelySpeck also has their Ultimate List of Best AP Lenses.
Also pay attention to the white balance and color of the sky in post. If the aurora borealis is not present, the sky will probably not be green, purple or any other vibrant color. The exception would be blue hour photos of course. There is a free PS plug-in for removing green cast from astro images called Hasta La Vista Green, by Rogelio Bernal Andrero that will remove green cast from your image. This can be common, and is very easy to fix with the plugin. Here is an example of a purple cast removed with a white balance adjustment in LR.
The image below was taken without tracking using a Rokinon 24mm T1.5 cine lens at T2 with a Canon 6D at ISO2500 on a tripod. The commonly used "500 / focal length rule" would have suggested a 500 / 24mm = 20s exposure. I have a low tolerance for elongated stars so tried 20s, then 15s and eventually settled with 13s exposures to keep my stars as sharp and round as possible. Ten images were stacked with PS CC to reduce noise. This shows you can get good results even at 24mm (or 35mm) without a tracker when using a f/1.4 lens under very dark skies. The location in Florida was International Dark Sky Certified. Use this link to find an Int'l Dark Sky Certified location near you.
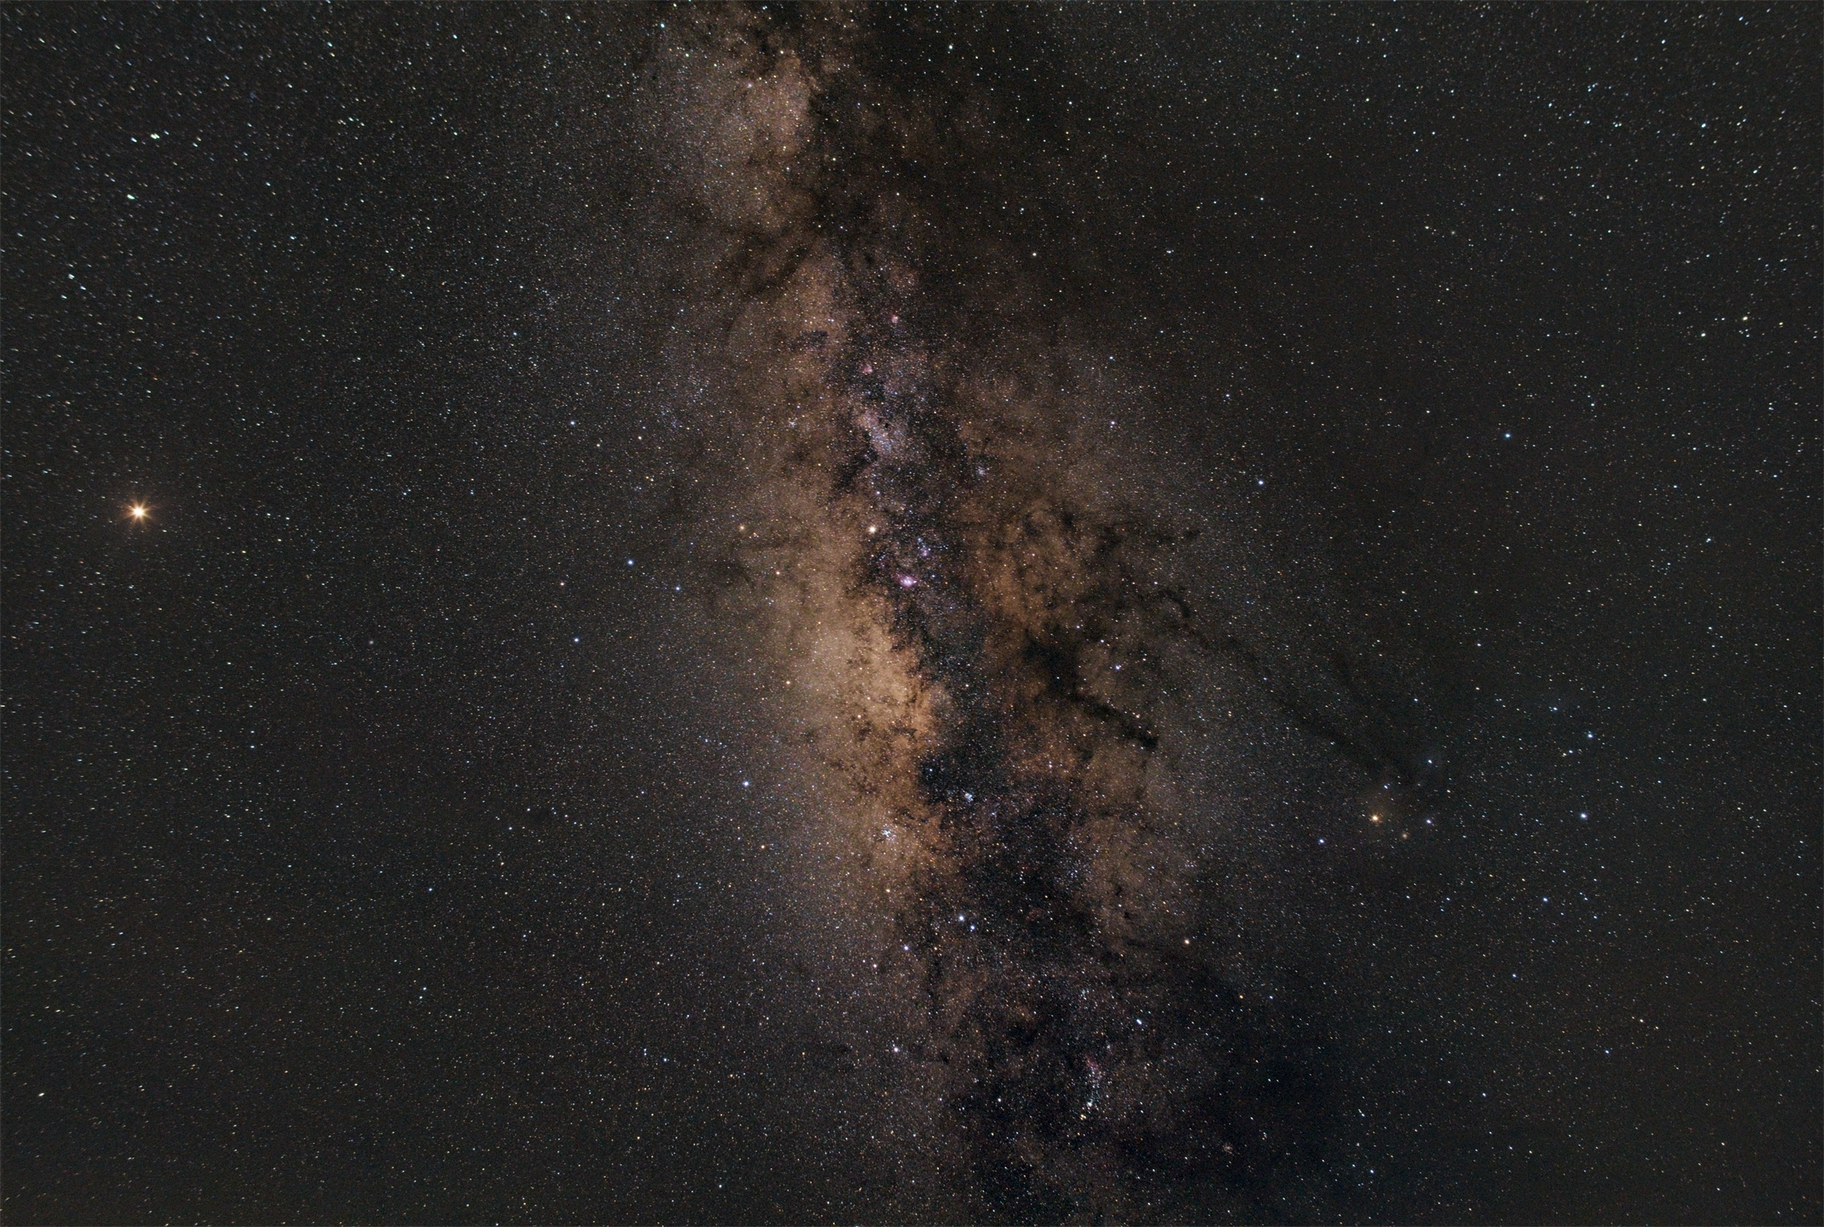
A Hoya red intensifier filter was also used to reduce a minor light pollution gradient caused by a small town in the direction I was imaging. The red intensifier blocks the orange part of the visible spectrum that is emitted by high pressure sodium street lamps. Read a review about the Hoya red intensifier for astro at Lonely Speck. Other filters are also available for Sony, Nikon and Canon that clip in to the body of the camera like the STC filter Daniel Laan reviewed for Fstoppers.
Another filter that can give a neat effect is a double fog filter. It for the most part does not over enlarge small stars, but gives brighter stars in constellations a dreamy look. Dr. Nicholas Rommelt specializes in adventure landscape photography and used a double fog filter in this nightscape.
This next image was with an EF 50mm f/1.8 STM lens stopped down to f/4.5 to reduce coma in the corners. Exposure time was 30 x 60s, ISO1600 with a Star Adventure Mini just south of the light dome from Orlando Florida. LightPollutionMap.info indicated a SQM value of 20.8. Without tracking, the quality of the stars would start to degrade after 7-8 seconds at 50mm so you can see the value of using a tracker with focal lengths above 35mm with full frame and 20mm with APS-C cameras. It also shows the advantage of not having to travel far away and camp under pristine dark skies when using a tracker.
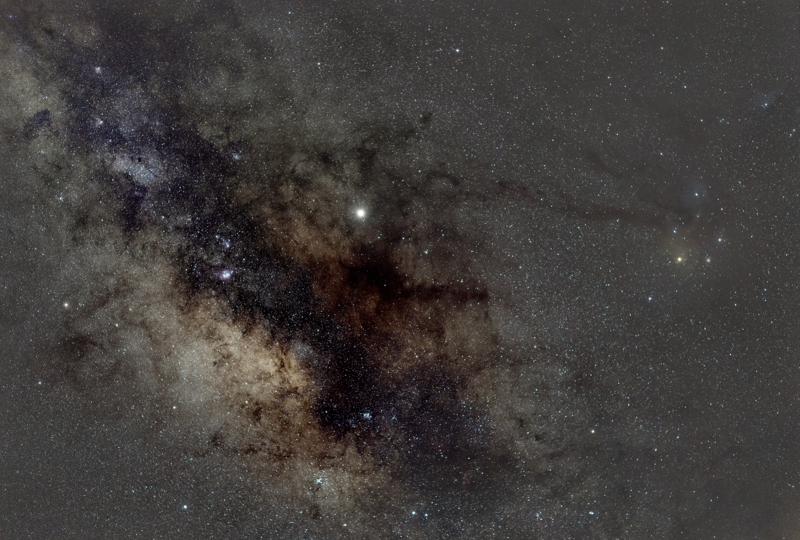
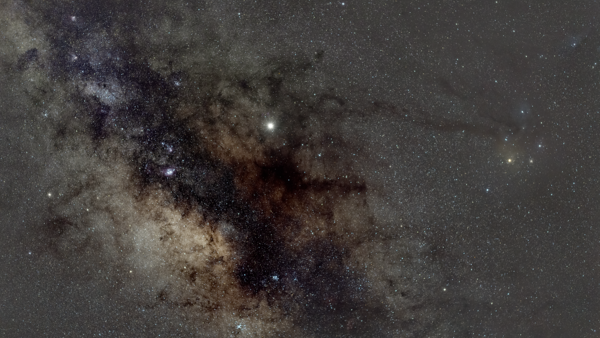
At center is Jupiter and the Dark Horse. Directly left is the Lagoon and Trifid nebulas. Top left are the Omega and Eagle nebulas. To the right is Rho Ophiucus, the star Antares and above it the Blue Horse head is faintly visible.
Stay tuned, articles to follow will review how to auto guide with basic trackers like the Star Adventurer / Sky Guider Pro and more advanced trackers with go to capability, astro stacking programs, how to use calibration frames and other ways to take your astrophotography to the next level of deep sky photography. If you have any tips on getting started in Milky Way photography or other pitfalls to avoid, please post them in the comments section!

Join the Fstoppers community for free
-
Post comments and join in the discussions
-
Browse the site ad-free
-
Share your work and get featured in the community
-
Compete in the photo contests for fun and prizes
4 Comments
Hello,
I enjoyed your article and also the reminder about the approaching MW season. I had hoped to go out and get a shot of the Galaxy last month in the early morning, but the ridiculous amount of snow in the Sierra prevented that. I'll just wait for the snows to leave, maybe sometime around the 4th of July!
One question I have is about your description of sky brightness. You say that a mag 21 sky (per sq arc second) is ten times darker than a 20 mag sky. But magnitudes are defined such that every five magnitudes is a factor of 100 in brightness, so each step in magnitude is equal to a factor of the fifth root of 100, or approximately 2.512. So shouldn't a mag 21 sky be about 2.5 times dimmer (per square arcsecond) than a mag 20 sky?
you may be correct and I will investigate. In my line of surgical / scientific work, an order of magnitude = a factor of 10. I know first hand a crystal clear Mag 22 sky is like an out of body experience compared to a mag 20 suburban sky and would think it would be a lot darker than 6.25x
thanks, you were correct and article is updated. I calculated that Miami or any other red/white zone sky is 50x brighter than blue zone skies ;)
Yes, it's confusing. Magnitudes are not the same as "order of magnitude." Astronomy is littered with confusing jargon like this, unfortunately.
One reason that dark skies are so much more breathtaking than brighter skies is that the number of stars increases strongly as stars become intrinsically dimmer. At the same time, the volume of space you are sampling also goes up strongly as you go to fainter limiting magnitudes (you can see stars farther away). Combined, those two effects make a dark sky explode with stars, whereas in a bright sky, like probably in Miami (or Union Square in San Francisco!) you might only be able to see the brightest handful of stars in the sky at that time of your viewing. It's too bad that more people cannot experience a pristine dark sky. It really is mind blowing.
Thanks for the nice article.