We've previewed this very special filter before, and now come back with results from testing it in the field. The STC's Astro-Multispectra Filter blocks out artificial light of our modern world in the form of light pollution and increases contrast to reveal faint deep-sky objects. While available for Canon too, Taiwanese STC brings an exclusive filter to Nikon full-frame to capture wide-angle shots of the night sky.
Installation
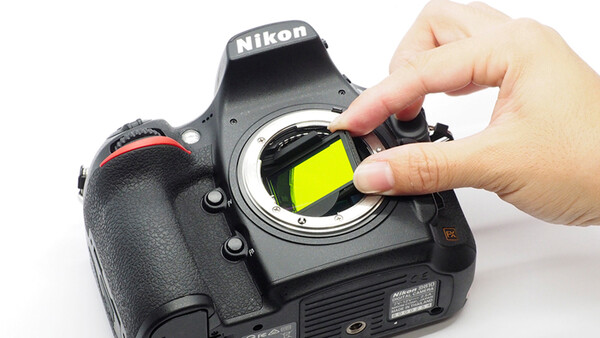
Most DSLR users get hysterical when something has to be placed over the sensor. So, before we go any further, let’s get that out of the way. This is important. You do not place this filter on the sensor, but over it. Nothing touches the sensor, so nothing potentially scratches it. There’s about 2 centimeters clearance between the filter and the shutter (behind which you find the sensor). The filter sits in place of the mirror, directly behind the lens.
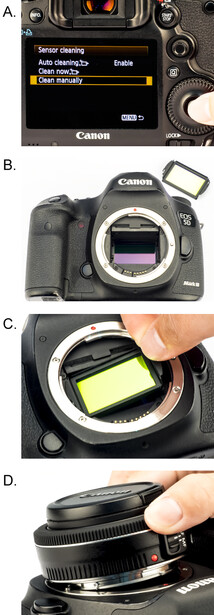
Fstoppers readers Sagar Solanki and Armando Morales have expressed concerns about installing and using this filter. Because of the unorthodox form factor of this filter, installation occurs by either locking up the mirror in sensor cleaning mode or switching to Live View when there’s no lens attached. You then gently slide the filter into the body. It’s a snug fit, so you will have to find a good angle to put it in. My tip is to not install the filter in the field the first time. At night, it’s usually cold and dark, so it’s easy for your cold fingers to lose dexterity and make a slip up. I advise you to get comfortable with the installation and it’s as easy as changing a lens.
One of the questions asked was: “Can the camera be turned off safely once the filter is installed?” Well, you won’t damage the filter or the mirror, as the mirror’s movement is prevented by the frame of the filter. There is a sensor in camera that detects the position of the mirror. When the clip filter is installed, the mirror will not be able to flip down completely and thus the camera will not take pictures knowing that the mirror is not in the required position. So let’s remind ourselves that shooting is only available in Live View, because the filter is in the way of the mirror.
When the camera is powered off, the mirror will still flip down and rest against the clip filter frame. The mirror will not hit the glass, so your filter and (maybe more importantly), your mirror are safe.
The Benefit of a Clip-in Filter
Have you ever noticed gradients in the sky when shooting with wide-angle lenses and polarizers? Those uneven skies occur because of the extreme angles of light hitting the polarizer filter. If you would imagine a polarizer at the back of the lens, rather than in front of it, those gradients would disappear. It’s the same idea with using this filter. Light gathered from extreme and opposite angles focus differently on the sensor. In addition, certain colors from the same extreme angle “arrive” at slightly different times than others. This results in chromatic aberration which is corrected by specialized glass elements in more expensive lenses.
You should be using a clip-in filter when shooting the night sky with a wide-angle lens, because front-mounted filters add another layer of material that render those specialized glass elements useless. Think of chromatic aberration times 100 and you’re in the ballpark of results. The more extreme the angle of the incoming light of different colors, the harder it is for light to focus in one area.
Thus, the benefit of a filter behind the lens is that the light has already been gathered in the right spot (the sensor), creating sharp results. Another benefit is of course that you can also use this clip-in filter with more than one lens, whether your glass has a filter thread or not.
STC’s filter material is available as a clip-in filter for both Canon and Nikon full-frame cameras and comes in a 48mm and 77mm lens mounted screw-in filters that can be used with telephoto lenses.
Focus
Say that you want the benefit of the filter’s ability to block light pollution, but still expose the foreground without it appearing all blue and discolored. You could of course composite two shots. I almost always do that anyway for a simple reason: the sky’s exposure length is limited to the focal length you’re using. The 500-rule states that you could only expose the sky for 21 seconds at 24mm, before stars begin to trail (500 / focal length = max shutter speed). Naturally, you would want to shoot at the maximum aperture for the stars, but is that a good idea for a sharp foreground? A shutter speed of 3 minutes at f/8 will get you the same exposure value, but with more sharpness front to back.
Anyway, here’s a side effect that you would have to consider when you want to composite images for nightscape shots. When the filter is installed, the focus is off. You would have to readjust focus to get sharp results. So every comparison you see next, is one where I have readjusted focus.
Flare
There is one point of criticism that I want to share with you. Upon returning home, I fired up Lightroom to have a good look at the results. What I found was that there are flare-like artifacts around bright stars, which are particularly visible in long-exposure (tracked) images. Here’s an example of Betelgeuse in the constellation of Orion, shot at 90mm:
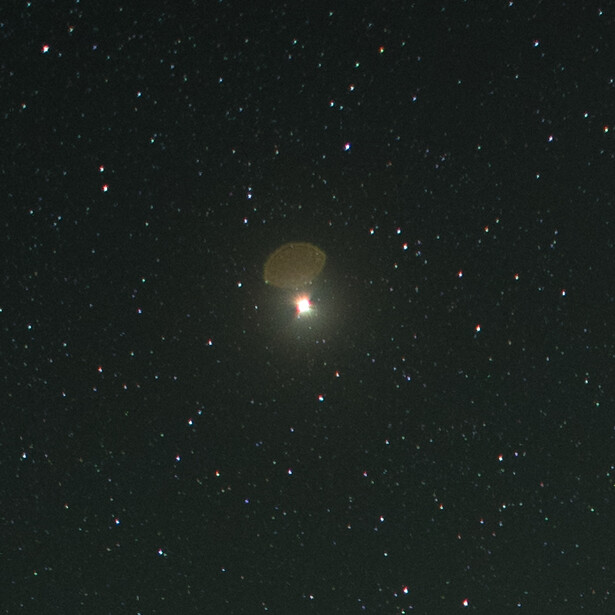
Now, because Betelgeuse was in the top left of this image and the flare appears to originate from the center. That had me thinking that we’re actually looking at reflections from inside the camera. Maybe these are reflections from between the lens and filter, or between the filter and sensor. I know this isn’t pretty, but shorter exposures aren’t that prone to this artifact. In my wide field shots of about 30 seconds, I didn’t see this at all around stars. However, city lights on the horizon do exhibit this effect a great deal, to the point of resembling Christmas lights:
Light Pollution
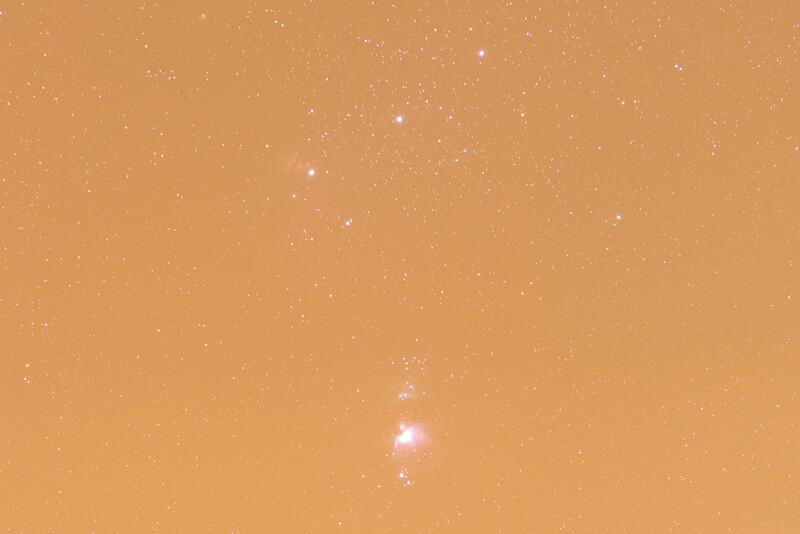
Although the Astro-Multispectra filter is marketed as a filter for astrophotographers, I wanted to find out if this filter is any good for so-called nightscape shots too. I did get a fair warning from STC in advance saying that the resulting color cast in your landscape isn’t very appealing, so they wouldn’t want to get my (or your) hopes up.
The STC Astro-Multispectra filter is designed to be opaque to sodium and mercury emissions. Fstoppers reader Paul Janovec asked me specifically about the use of this filter in a location with lots of LED lighting to see if it has any use in a world that’s “soon” to be lit entirely by LED street lamps.
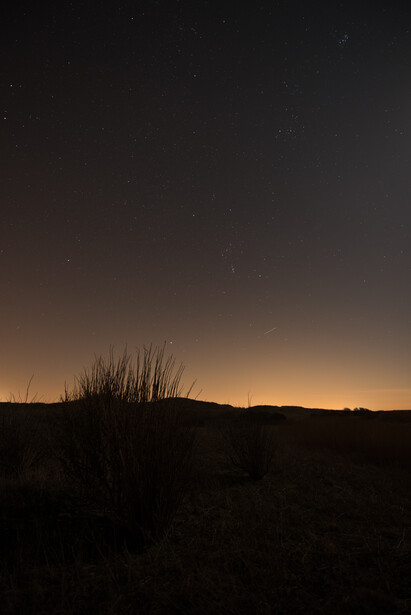
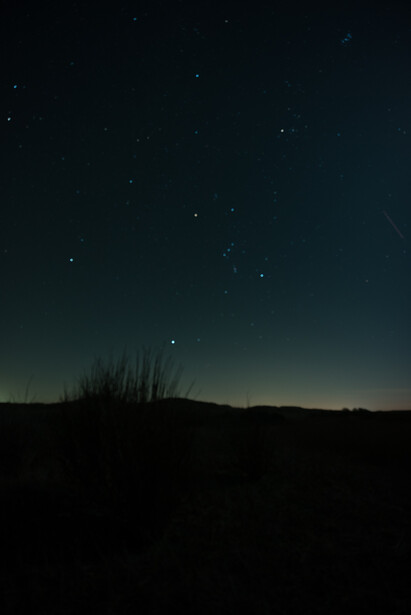
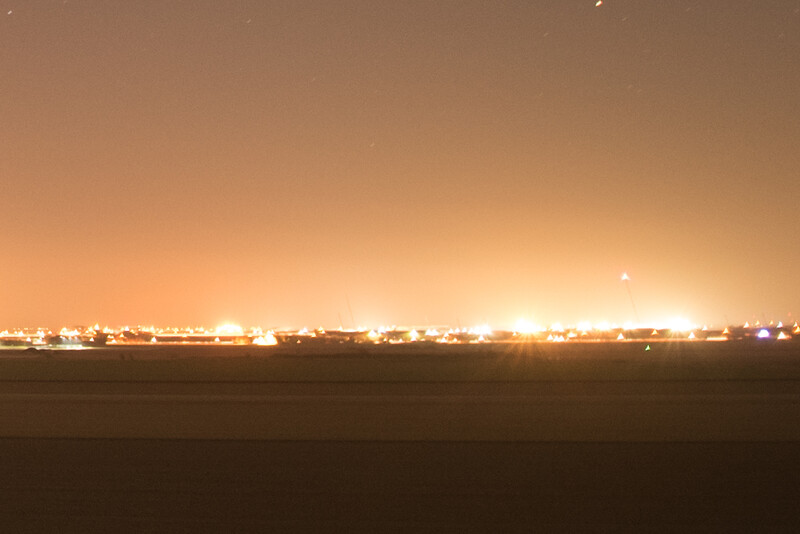
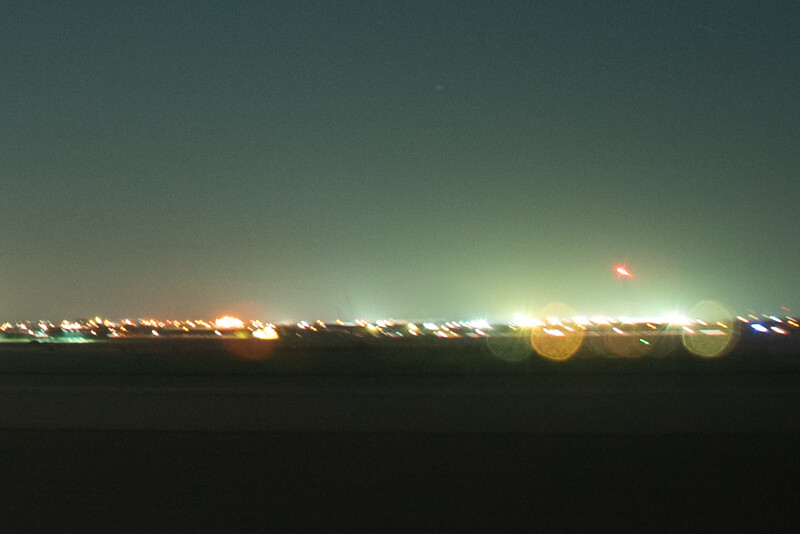
To be honest, I did not find a location with full LED lighting under clear skies during the review period. But this view over my home town of Den Helder, the Netherlands does show all kinds of light pollution; From sodium to LED, and from mercury to actual fire (natural gas flaring). Here’s the previous shot, uncropped:
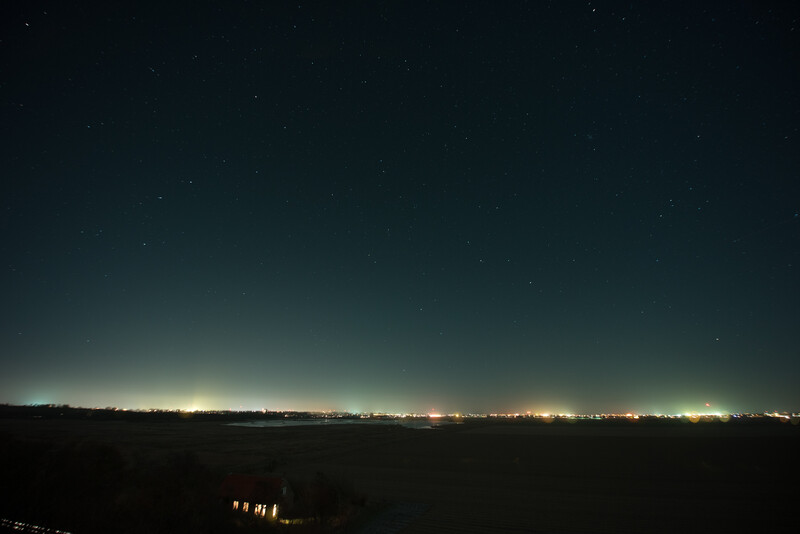
Mind that this was shot at the same white balance (5700 K). The differences are quite clear. There’s a significant reduction in light pollution in the sky, and it even reveals individual colors of the city lights; lights that aren’t blocked out effectively.
Notice that the light pollution domes that rise from the horizon and cast orange hues into the night sky all but disappear when we install the filter over our sensor.
The light that doesn’t get blocked out is most likely LED light pollution. In theory, it’s easy to think of a sheet of material that blocks one or two very specific colors (emission lines). Especially when those are exactly the same, no matter the circumstances. But it is neigh impossible to engineer material that both blocks LED light and is transparent to natural starlight. In the first place, LED lights come in all sort of colors: white, yellow, blue, and all hues in between. That’s easy to see in the image above. Apart from that, LEDs are notoriously difficult to calibrate well. After doing some digging, I’ve found that typical LEDs can have a huge variation from one to another, ranging in the tens, even hundreds of nanometers if we analyze them through spectroscopy. On top of that, LED color is under the influence of ambient temperatures as well.
I’m sure you’re beginning to see that it isn’t a coincidence that there isn’t an LED filter out there yet. Before there will ever be such a filter, LED technology has to mature more and there has to be some sort of consensus to find the best color for street lighting. Today, the resulting colors of burning sodium and mercury are much more predictable and this is why we find this type of filter to be very useful.
Not Magic, Just Really Good
Don’t use this filter as an excuse to point your camera up to the sky from downtown New York City. While you would still have to travel to a more rural location to find the best starry skies, you probably won’t have to travel as far to get the same results as without this filter. The primary reason though is not to bring out more or brighter stars (we’ll cover that in a bit), but to get the color of the night sky just right. The Astro-Multispectra filter increases contrast and therefor saturation, while blocking the hazy orange and green tints of light pollution.
It does make your image a bit darker. When I increase the filtered image exposure in post to match the unfiltered one, I’d say that +0.3 stops would make them appear as bright. You could either compensate by exposing for longer or consider using a motorized mount, which, if you’re serious about astrophotography, you own anyway.
A Filter for Astrophotography
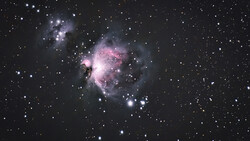
All this time we’ve paid attention to nightscape photography. But where the Astro-Multispectra filter is really coming into its own, is deep sky astrophotography. With this filter, you are about to reveal the unobscured color of the night sky.
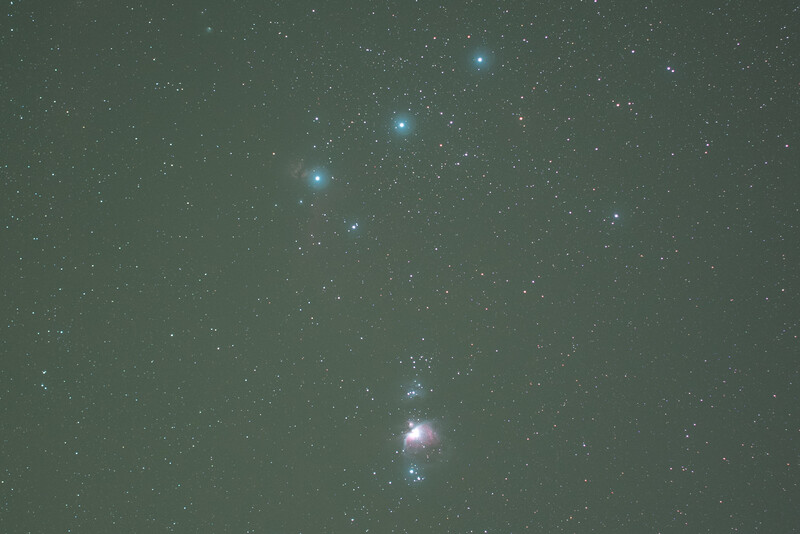
Again, there are halos around the stars (flares), but those can be corrected with a little knowledge of Photoshop. And as an astrophotographer, you’re sure to have an extensive knowledge of post-processing. Speaking of which, can we do without this filter? Well, let’s see if I can process an image just in Lightroom to see if we can bring out more detail and reduce that awful orange sky.
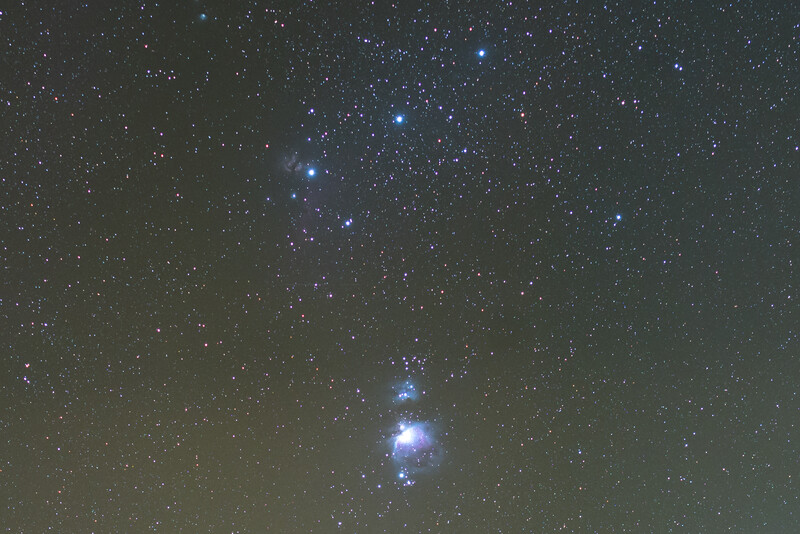
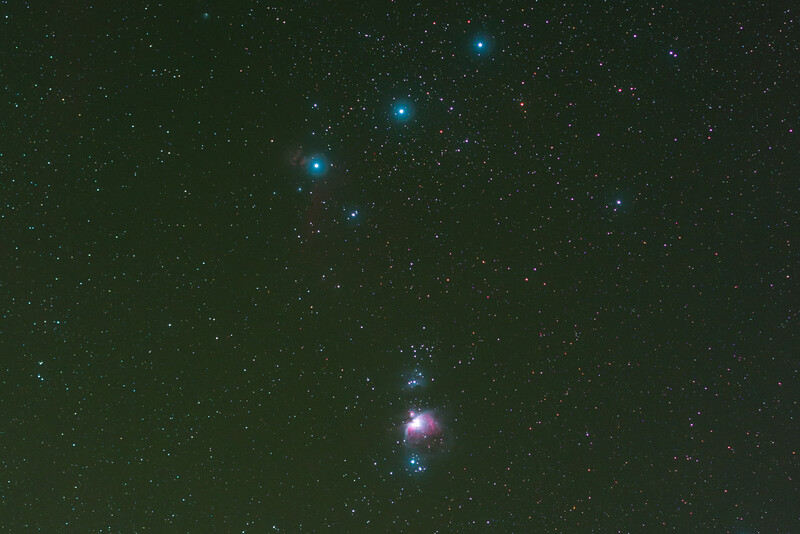
The first image shows a crop of the Orion constellation (center frame) without the filter and processed to the best of my abilities in Lightroom. The second one is a shot with the filter attached, where I increased the contrast, upped a bit of dehaze, and lowered the black point. No rocket science here. To me, the most striking difference is in the color representation. M42 (that pinkish nebula) is way more detailed in the second version and is less blown out than in the first one.
Recommendations
It’s a shame we don’t use a rating system here with Fstoppers. I’d love to see some kind of star-rating system for this occasion.
Bad jokes aside, this filter certainly opens up a host of creative possibilities and saves you time in post-processing trying to correct the white-balance while maximizing color details. But that may be offset if you try to remove the flares in bright areas.
The results are clear. With this filter over your sensor, the orange hue that prevents you from seeing any amount of color separation between stars and nebulae is gone. The effects are best seen without the horizon in your shot, but that’s exactly what this filter is actually for: astrophotography. So would I be recommending this filter to you? If you’re serious about night photography and live far away from any Dark Sky Park like me, then this really should be in your bag. But if you just admire those space shots and like to try your hand at starry night photography, this isn’t a magical piece of kit that instantly gets you better photos. For many, hours of post-processing can be a daunting task. And to get the best results in astrophotography, you’d first have to shoot for hours on end in the cold too, but more on that in this review.
After this lengthy review, I hope you’re able to make a decision if the $185 Astro-Multispectra filter is right for you. Let me know in the comments if you’re still unsure and I will be happy to help.
Join the Fstoppers community for free
-
Post comments and join in the discussions
-
Browse the site ad-free
-
Share your work and get featured in the community
-
Compete in the photo contests for fun and prizes
22 Comments
Is this thing really any different than just shooting at a cooler white balance? Would be interesting to see the two side by side with the white balance adjusted to match the colors (IE 3700k with the filter off vs 5700k with the filter on) to see if it's actually doing anything other than putting a blue cast on the image. I'm not seeing any additional stars that have shown up in the comparison images or anything.
Daniel will correct me if I'm wrong but no, it's not the same as changing the WB. This thing is a filter that blocks specific wavelengths, most likely the sodium doublet. Changing the WB will affect the white representation, not what the sensor sees.
You're right, Paolo. Both sodium and mercury in fact.
Ryan, It's certainly not the same as changing white balance, haha. That affects everything in the image, including the natural color of deep sky objects, stars and the lot.
This piece of kit is not supposed to show additional stars. It is supposed to block light pollution and increase contrast so there's more data separation to work with in post.
Although there is already such a comparison in the article, I'd love to share this image with you to show you the differences should we adjust the white balance to look like it has been filtered.
But really, the last comparison image is the one you would be interested in.
nice review... interesting product for sure
Cheers Lee. Lot of creative doors to be opened with this. I'm sure you'll like my next review even better. No spoilers apart from what's already in this one though. :)
I wish there was something as good as this, but in the form factor of a regular lens filter. I have tried several of the "sky-glow" screw on filters from astro manufacturers and had lots of artifacts. If someone knows of a solid performer I'd be interested.
Because of the way light refracts, there isn't. Those artifacts are an inherent problem of its use on wide angle lenses, this is why it was addressed in the review as well as the preview.
Thanks.
Daniel, Thanks for the review, you cleared a number of doubts I had, specially about the installation on the camera
Hi Daniel,
Thanks for this extensive interesting review! Just a quick question: it is possible to use it with a 14mm lens? STC's site says so but I've read somewhere else that it only works for 30mm and above?
Thanks in advance!
Best Regards,
Max Niessen
Hi Max, I've read that too which makes it rather confusing. Yeah, it should work. I've tested it on a 15-30mm while zooming without problems. There's enough clearance at the back of the lens. Thanks!
Ok, cool!
I might order it then. Together with the new Sigma 14/1.8 I think this will be a no brainer!
Best Regards.
late reply, but these LP filters can also be found in 72 and 78mm sizes, depending on the manufacturer. The IDAS line are some of the best...
Hello Daniel -- thank you for this review. I know there is very little information out there but how do you like this filter compared to Lonely Speck's purenight filter?
Glad you liked it Steven. Sorry for the delay. Haven't had the pleasure of reviewing that yet. :)
The PureNight does exactly the same, although its use on ultra wide lenses could be troublesome because of the way light refracts. Stars may end up with an added amount of chromatic aberration. That being said: I do believe the PureNight doesn't create as much halos around the stars with longer exposures. It's largely dependend on the filter holder you're using though.
Thanks!
EDIT: I just read that the 150mm version which is suited for ultra wide lenses goes for $399,-.... Phew, that's not cheap, is it? I don't think the clip filter is cheap either, although it can be used without any filter holder system (which is about the same price as the 150mm filter alone). Whether you attach your camera at the back end of a telescope a 600mm or a 14mm lens; it's up to you. :)
Hi,
have to tried to shoot the milky way? I'm pretty undecided between the STC Clip and the nisi filter https://nisifilters.it/filtro-natural-night-riduzione-luci-inquinamento…
http://luketscharke.com/nisi-natural-night-filter-initial-impressions/
The nisi filter cannot be mounted in many lens... (it's 100x100)
The STC Clip has not this limit...
Matteo
It's interesting that there are all kinds of filters coming out that reduce the effect of light pollution while we really should be worried about the amount of artificial light at night. Imagine what we could do as a group of night shooters.
I digress. Haven't shot the central bulge of the Milky Way yet. That rises in the early hours and it's very moist in the early morning in the Netherlands. Come April, I will drag myself to the dunes again and combine it with the tracker reviewed here: https://fstoppers.com/originals/review-next-level-astrophotography-forn…
As for your question, it's the same answer as I told Steven: Stars may end up with an added amount of chromatic aberration, but a front-mounted filter would not create as much halos around the stars with longer exposures if the filter holder you're using is any good. :)
Thanks!
Hi Daniel,i use interference filters but with wide angle lens specially,there is huge focus shift in the corners.
Actually,these filters (L pro or MS) are unusable with 14mm lens.Why don't you speak about this problem?
Hi!
Well, I did not have this problem. There is a focus shift, definitely. But there isn't an unworkable amount of shift between the corners and the image center on either 15mm, 30mm or 90mm.
Thanks!
I desperately wanted this to work with my new D850. I bought the astro-multispectral filter and followed the simple installation directions. Power on. Live view. Remove lens. Install filter. Install lens.
As soon as I installed the lens, the camera wants to come out of live view. Because the mirror is motorized on the d850, I can't figure out how to "lock it up" so that when I put the lens back on, it stays up and doesn't throw an exception (the menu screen shows ERR).
If someone has a workaround, I'd be grateful. Otherwise I may have to dump my Tamron 15-30mm in favor of a lens that I can put an external filter on.
Thanks for the great article - I understand the benefit of this type of filter compared to screw on filters, but as I already own several Light Pollution screw on filters that don't really do that much - how much improvement (if (any) I see using a clip on filter?