
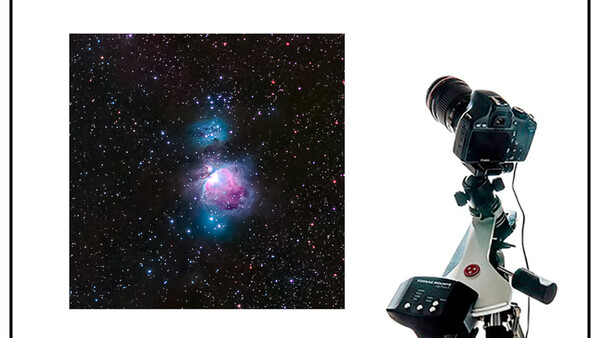
As shutter speed is the limiting factor in taking pictures of the night sky, we often seek out more expensive lenses that open up that bit more or check Fstoppers if there’s a new low-light, high-ISO king of cameras on the horizon. But what if I told you that there’s a device you can use today, with the camera and lens you already have, that has the potential to capture places that are light years away from Earth?
What Is a Motorized Mount?
DSLR astrophotography is a very limiting genre in terms of what you can do with camera settings. We’ve discussed ISO settings and noise reduction before, but today we’re going to take a look at shutter speed. Because of our planet’s rotation, the shutter speed on wide-angle lenses is limited to about 30 seconds before stars start to show signs of streaks. Before we go on, however, we’ll call shutter speed by its proper name: exposure time. “Speed” implies short exposures, and we are nowhere near 1/500 of a second throughout this article.
Here’s where specialized instruments that seek to overcome the rotation of the Earth come in.
Do you see those huge telescopes moving with the night sky? Imagine your camera at the end of a telescope and hours of exposure time that capture the very faintest objects in the night sky. You’re now about to understand the importance of accurate tracking.
These mounts are also called “trackers” because they track the stars across the night sky as the Earth rotates, freeing you of exposure time limitations. Well, not exactly, but we’ll cover this in this review of the LighTrack II from Fornax Mounts.
Photography in the Field
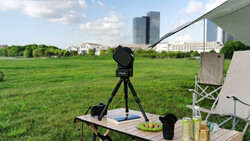
The best results can be obtained in the most remote locations. Locations that are free from light pollution, from city lights, and car lights as well. As a landscape photographer, photography means to me that I’m taking pictures away from home. You should be aware that this is a specialized device that needs its own power source. That should not be a problem when shooting from your backyard. And you can get spectacular results from doing so. But the supplied 12V cigarette lighter cable will only reach a meter or two from your car to your tripod. So you will need to buy a separate power supply for taking the LighTrack II to the most remote corners of the globe. But combine this with a light pollution filter and there are a lot of exciting subjects to photograph from your backyard alone.
The Stuff You Need
Of course there are no sharp images of stars and nebulae without a solid (that means heavy) tripod. A heavy tripod will prevent the setup to become top-heavy and ensure a good shoot. As stated before, you’re going to need a 12V DC power source to shoot away from home or your car. Fieldwork requires a battery, or a mains adapter will work for shooting from the backyard. I picked up this excellent 4 Ah (it’s enough to shoot an entire night) battery from Tracer that’s in wide use in the astro community. Also, an intervalometer is a good purchase in any sort of long-exposure photography. I’ve gone for a cheap €20 eBay option with all the bells and whistles and it is fine.
You do need to consider which package is right for you. Fornax Mounts has three available LighTrack II packages. The cheapest option comes in at €450 and only includes the mount itself. Buying this means that you already have a method of polar alignment and that you’re going to have to invest in a heavy-duty second ball head or wedge separately. The second package includes the polar scope and sets you back €499, while the full set also includes the FMW-200 wedge that enables you to track the stars with just the tripod you already have.
Installation
Putting the wedge, polar scope and the mount together takes about half an hour without looking at the instructions. It’s that simple. But a question arises when you put this hefty unity atop your tripod. How does polar alignment work exactly?
Setup
Deploy your tripod and make sure it’s level. Attach the camera to the mount and forget your camera and what you want to photograph for a minute. You are working with a precision instrument that is designed to overcome a single thing: the rotation of the Earth. In order to make the LighTrack II (or any other motorized mount) work, you’re going to need to align the rig toward a particular point in the sky. In the northern hemisphere, you’re aiming for a patch of sky near the North Star (Polaris). Yes, not the actual North Star.
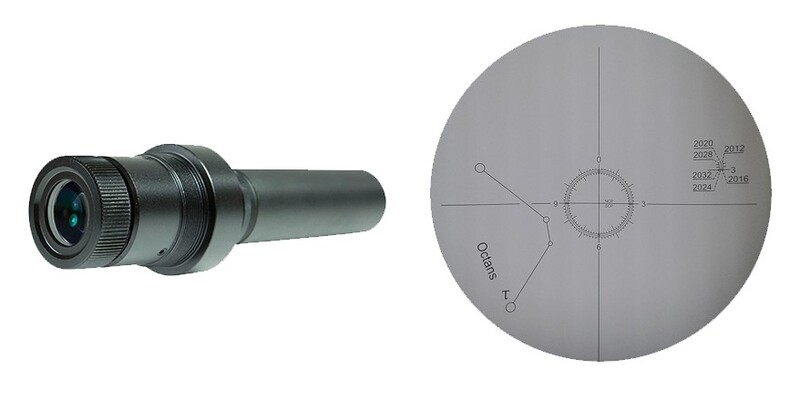
Polar alignment isn’t that difficult once you've done it once or twice. But if you aren’t familiar with telescopes, here’s a bit of beginner advice that isn’t stated anywhere in the instructions. What you see in the scope is a mirror image. I use an Android app that’s called Polar Finder, which shows the reticle of the polar scope and gives the position of Polaris based on your location and your local time. You then align the wedge exactly as the app suggests by comparing the view through the scope and the app’s graphic.
Then you will discover that the wedge doesn’t actually rotate 360 degrees and that you’ll have to reposition the entire tripod towards Polaris. This is something you might find to be a nuisance, but consider that polar alignment is a very, very precise job — of course it doesn’t rotate 360 degrees. Just be sure to roughly place your tripod so that you get it right the first time.
Two thumb screws on the wedge provide very accurate control over the rotation the mount, while a heavy duty set of knobs on the side of the wedge gives you all the control you need over the height adjustment. These two mechanical adjustments determine the azimuth and altitude of the mount in order to perfectly align your polar scope with either celestial pole.
Start Your Tracking
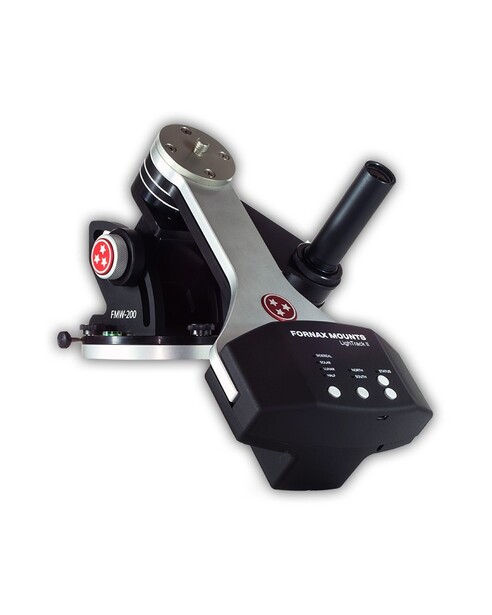
On the LighTrack II, you’ll find a set of buttons. The first button switches between tracking modes. “Sidereal” means that it follows the night sky, which is the setting for deep sky astrophotography. With the lunar and solar settings, you can track the moon and sun respectively. But a warning: do not go out and take long exposures of the sun unless you are absolutely sure what you’re doing. The final option is half sidereal tracking, which is a good starting point if you want to combine landscape and astrophotography into a single image. The next button lets you choose between the northern and southern hemispheres, and the last two buttons will slew (move) the mount toward either end of the tracking gears. The tracking starts automatically when you turn the mount on with the on/off switch on the bottom and there’s a very subtle audible signal to tell you it’s active.
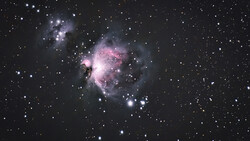
Here's a quick, single image of the difference between tracking and not tracking for 4 minutes at 90mm.
[beforeafter label1="Not Tracking" label2="Tracking"]


Specs
Speaking about the tracking gears, the LighTrack II is supposed to be one of the most accurate trackers out there at the time of writing. Unfortunately, I don’t have any comparison, so I’ll leave verification to others who do. Every unit is supplied with the results of its factory calibration in the form of a graph. And trust me when I say that if the periodic error is +/-1 arc over 8 minutes, the tracking is pretty damn accurate.
It tracks for a period of two hours before you need to slew the mount back to its starting point. The maximum recommended load is 6 kilograms and as for the maximum focal length, it’s not recommended to go above 300mm. At 300mm though, it’s safe to shoot 6 minute exposures. But with an autoguider and counter weights, it’s possible to extend these specs even further. The LighTrack II comes autoguide prepared.

Shooting
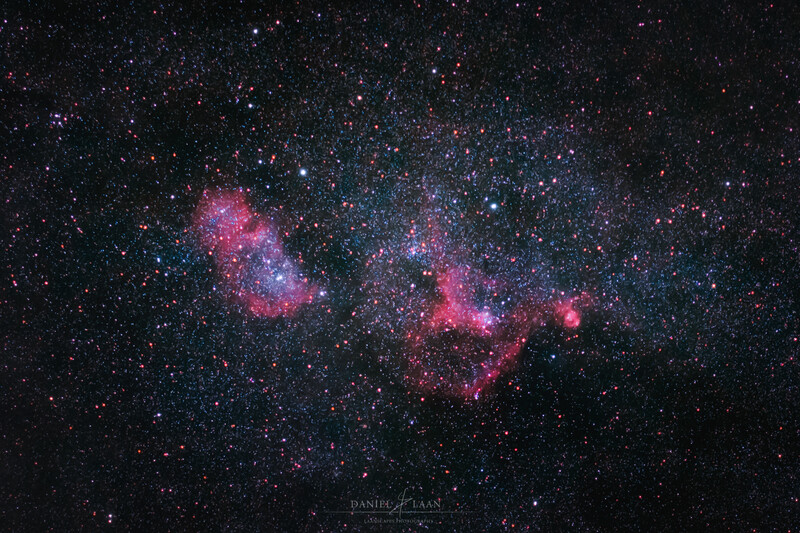
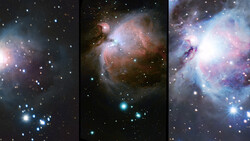
Where were we? Ah, the fun part and the waiting game. Now don’t go thinking, “Two hour exposure, check.” When we discussed noise in an earlier article, I didn’t pay much attention to long exposure noise. Or rather, thermal noise. That’s an entirely different sort of noise than signal noise. Without flooding your poor brain with another chapter on the mathematics of reducing thermal noise, I just want to tell you what you can do to get the best possible results. It’s simple: keep the sensor cool. The longer the exposure time, the longer electricity will flow through the sensor’s circuitry and the warmer it will get. As a DSLR astrophotographer, with a modern camera, you should not shoot hour-long single exposures, but shoot multiple images of the same thing with small intervals in between to let the sensor cool down again and minimize the effects of the periodic error of the tracker. You then merge the resulting images in specialized software to add all the captured photons. Take it from astronomers that this is the best way to maximize your results on DSLRs.
Processing
You’re left with a set of images that’s about two hours worth of shooting. I’ve aligned (registered) and stacked the images in the free Deep Sky Stacker and processed the result in both Lightroom and Photoshop.

The Verdict
Astrophotography isn’t a genre for beginners. You really have to invest a lot of time in learning the ropes of managing exposure, noise, polar alignment, and even develop a familiarity with the night sky. Deep sky photography is about capturing the things you do not see with the naked eye and motorized mounts are perfect to bring the science behind all this to backyard astrophotography.
The Fornax Mounts LighTrack II is a very high build quality tracking option that certainly won’t let you down in this regard. The challenge at the end of the day (pun not intended) is not the quality of LighTrack II, but to really educate yourself to handle such a specialized device. Fornax Mounts could supply more information targeted at photography enthusiasts buying their first motorized mount, because there is a lot to take in if you’ve never dabbled in astrophotography before. But once you get the hang of it, it’s going to take a very long time before you reach the limits of this mount’s top capabilities.
4.5 out of 5 stars.


Join the Fstoppers community for free
-
Post comments and join in the discussions
-
Browse the site ad-free
-
Share your work and get featured in the community
-
Compete in the photo contests for fun and prizes
11 Comments
Sweet write up! Question--have you used the iOption SkyTracker? If so, how would you say they compare? I own the iOptron but this has my eye indeed!
Thanks! Haven't had the pleasure with any other trackers. :)
The PE is greater on the ioptron. Typically around 25/30 compared to 1 or 2 for the Fornax. If your levelling of the tripod and polar alignment is really sound then you would notice a difference. If shooting at focal lengths within the region of 200-300mm then the Fornax would be much better as tracking errors are magnified, for very widefield (as in Milky way -14-25mm) then you might not see much improvement. Alternatively if portability is not such an issue and you want to be able to use heavy long focal length lenses for deep space imaging then consider something along the lines of the iOptron CEM25 Series, perhaps the P version with a PE of around 10 arc seconds or the EC version with a PE of around 5 arc seconds.
"Astronomers don’t shoot hour-long single exposures, but shoot multiple images of the same thing with small intervals in between to let the sensor cool down again."
actually astrophotographers shoot shorter exposures to reduce potential of tracking errors and eliminate overexposure of stars. Some images are shot with 20-30 minute exposures for faint objects in clear skies. Images are shot one after another, so there isn't time for the 'sensor to cool down'. Instead, dark frames are used to counteract thermal noise.
this mount looks like an update of the astrotrac, which has been around for a while, and generally thought to be a pretty good alt az mount for what it does.
I have the Astrotrac and it's brilliant, for what it is. Still no comparison to bigger mounts ofc :)
Thanks Brian. Updated the article. Although dark frames are dependant on the gear used.
The LighTrack uses completely different drive system than the Astrotrac.
LighTrack II uses friction drive (less than 1 arcsec periodic error).
"Two thumb screws on the wedge provide very accurate control over the rotation the mount, while a heavy duty set of knobs on the side of the wedge gives you all the control you need over the height adjustment. These two mechanical adjustments determine the right ascension and declination of the mount in order to perfectly align your polar scope with either celestial pole."
You only move the mount in azimuth and altitude. Nothing to do with right ascension and declination, here. ;)
But the LighTrack II is fantastic.
A really great review.
To clarify a few comments. The Astrorac and Fornax are both based on Barn-Door-Trackers, the difference is that Astrotrack runs along a machined threaded rod, while the Fornax uses a friction drive. This gives the Astrotrack a periodic error (PE) of around 5 arc seconds, the Fornax is around 1-2 arc sec. Other systems like the iOptron and Skywatcher portable trackers are around 25-30 arc sec. The PE is a measure of how much mechanical issues within the mounts drive system will cause a deviation from the ideal rotation (which translates to tracking).Compared to a fixed tripod all these systems work well, but the Fornax is exceptional with a PE of only 1-2 arc secs.
All these mounts are equatorially mounted and require a good polar alignment to work well. Typically this is where most tracking errors originate.
None of these mounts are designed to be a cheap alternative to a more substantial mount. They are designed to portable, many are no larger than a small lens and can easily be carried in a camera bag to remote sites. More substantial mounts are not really that portable, they include two motors, one each on the right ascension and declination axes. Typically they also include a computerised handset with a database of some 40,000+ objects and when aligned to the stars can find very tiny and faint objects, such mounts are called GOTO and are designed to carry much greater payloads.
For portability and relatively widefield astrophotography (14mm-300mm) portable trackers are ideal.
Daniel Lann, a couple of pointers to improve your astrophotography. Dark frames must be exactly the same ISO, aperture and exposure length as your light (normal) frames. They must also be at the same ambient temperature, so taken at the same time. If your exposure lengths are different between lights and darks you will introduce noise rather than eliminate it!
Secondly, if you don't want the blues to be bloated (and some people like this effect, including me, it is called the Akira Fujii effect) then stop down the lens 1-2 full stops. The atmospheric dispersion is much greater in the blue wavelengths compared to the red and green. This is further exaggerated by damp atmospheres and shooting at low altitudes where the column of air being imaged through is greater. Stopping down the lens will help, but you will need to increase you exposure time accordingly.
Good review, this mount looks like a solid step up from the Star Adventurer / SkyGuider Pro level and worth the extra money spent. If the periodic error is really that low... WOW just unheard of at this price point.