

If you’ve viewed deep-sky astrophotos (not landscape astrophotos), you may have noticed that extremely long exposures (not counting mosaics) are used. In extreme cases, exposures may run over 12 hours. Unless you have a space telescope, it should be obvious that multiple exposures have been used.
A century ago, back in the days of glass plates at the back end of a telescope, the only way to get a very long exposure was to expose the plate for hours while meticulously (manually) guiding the telescope to track an object. For even longer exposures, the plate would be stored in the dark until the next evening and exposed again after making sure the telescope was pointing exactly at the same place as the previous night.
In the digital age, besides using computer-guided tracking, we have the luxury of taking many shorter shots, then “stacking” them in a computer to produce one very long exposure image. In the example above, 15 five-minute exposures were combined for an effective exposure of 75 minutes. The bonus in our digital age is that additional shots can be taken on another night, even years later, and stacked to lengthen the total exposure.
Long Exposure Complications
In an ideal, simple world, if we wanted to take a long exposure, we’d simply open the camera shutter longer and come home with a single frame to touch up (ideally with no touch-up). But, as in all aspects of real life, the deeper we look into a subject, the more complications we uncover. In the real world of camera sensors, they have limited dynamic range and saturate on bright stars, and the sky background of scattered light moves into the mid-tones. So, the solution is to break our exposure up into shorter-exposure frames and add them.
But here, reality bites again. Every frame taken and saved in the camera has electronic interference added by the camera’s circuity, independent of how long the frame was exposed. There is additional electronic interference that builds up depending on the length of the exposure too, and this is dependent on the temperature of the sensor. In both cases, if there is an image pattern superimposed by these two sources, we would like to subtract them out from the final image, so there is a tradeoff to be made between the length of exposure and the number of exposures.
An additional complication is that in both sources of interference added by the camera, there is a random component (noise), which, by the nature of being random, can’t be just subtracted out, since it changes from frame to frame. But we are somewhat saved here by the fact that if we add frames together, the sum of the noise does not increase as rapidly as the fixed signal.
And yet another complication is the fact that not every sensor pixel is as sensitive to light as its neighbor. Ideally, each pixel would record twice as much signal for twice as much light falling on it. That’s not the case in the real world, but more important in general astrophotography is that we often have dust on our optics in front of the sensor, which is casting shadows, also affecting the sensitivity of some pixels. The good news is that by taking additional frames of a uniformly lit, frame-filling target (flat frames), we can compensate for this too.
So, to summarize, here’s what we need to do to take a long exposure shot:
- Take multiple exposures of the target (called “light” exposures). The exposures should be as long as possible.
- Take multiple dark exposures (lens covered) of the same length and the same temperature as the light exposures.
- Take multiple bias exposures (shortest possible exposures with the lens covered).
- Take multiple flat-frame exposures (uniformly lit exposures).
Note that the flat frames should be taken without disturbing the optical systems that were used for the light frames.
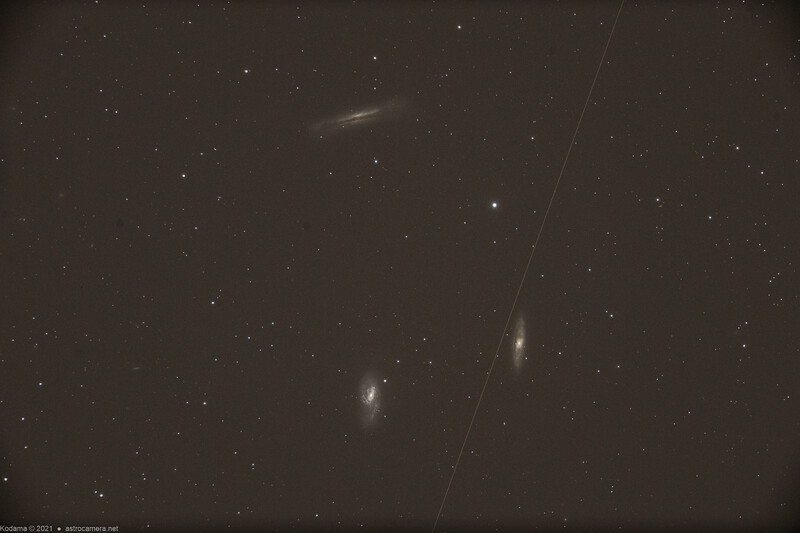
The frame above illustrates some of the problems mentioned. It is a single fie-minute exposure frame showing a few of the problems multi-frame stacking can fix. One problem not mentioned earlier is the satellite streak caught in this frame. By stacking frames, it can be selectively fixed automatically by the software that can go through each corresponding pixel in each frame (after alignment to each other) and throw out pixels that don’t conform to the average pixel value at that location in all other frames. Thus, satellites and aircraft intruding on our exposures are not as big a problem as might be imagined. Other occasional, single-frame occurrences such as cosmic ray hits can also be eliminated this way.
The frame also shows vignetting (darkening) in the corners of the frame as well as a dark area at the bottom of the frame. There are also dust shadows visible in the frame. These are all more obvious in the flat frame (averaged) shown below. The blue cast of the flat frame is due to the fact that an electroluminescent flat panel was used. A color cast is not a problem unless one of the colors is saturated.

Note that for all of the frames shown in this article, the same amount of processing has been applied by using Lightroom to copy adjustments to each of the images.
Other Multi-Frame Benefits
Another benefit of breaking a long exposure up into shorter sub-frames is that it gives us the option of using only the best frames for the final result. Wind, a stray light, an accidental bump of the mount, or mechanical imperfections of the mount can cause an individual frame to be ruined, but this is not a problem if we take the time to view each frame and weed out the bad ones.
Even a little misalignment of the mount’s polar axis can be “fixed” when the frames are registered to each other. With a small misalignment, individual frames will not show any effects, but as the night goes on, polar axis misalignment will manifest itself as a progressive rotation of each frame, centered on the guide star used — a good reason to choose a guide star in the center of your frame. If rotation of the frames becomes noticeable, a stack of frames will have to be cropped, so if the center of rotation is at the center of the frame, only the edges of the stack will have to be cropped. This may not be serious enough to require throwing out the final image since the edges of a photograph are less likely to be optically perfect anyway.
Software
For all of this specialized processing, standard image-processing programs such as Photoshop are not adequate. But to start, a popular free (PC) program called Deep Sky Stacker is available to do all of the frame-combining work virtually automatically. Google “Deep Sky Stacker” to find the download page as well as a number of YouTube tutorials. While you experiment, I strongly suggest you use a small number of frames to minimize the processing time.
The Bottom Line
To summarize, in going from the ideal to real-world of astrophotography, instead of taking a single 75-minute, 45-megapixel (Nikon D850) photo, I ended up with:
- 15 x 5-minute light frames (luckily, no rejected frames)
- 16 x 5-minute dark frames
- 43 x 1/40 sec. flat frames
- 42 x 1/8000 sec. bias frames
The number of flat and bias frames, in particular, could have been reduced, since the return on investment from averaging noise starts to decrease with additional frames. But you can see that to get one long exposure, more than 100 times more frames were shot and then processed. Be prepared to invest in a large hard drive and fast processor!


Join the Fstoppers community for free
-
Post comments and join in the discussions
-
Browse the site ad-free
-
Share your work and get featured in the community
-
Compete in the photo contests for fun and prizes
6 Comments
Are the flat frames to get a sense of dust? Does this need to be done in the field or can you just do it when you get home and point the camera at a white wall? And what are the bias frames for, to know what the sensor looks like with the minimum possible noise? And why do you need so many of each?
Ideally, flat frames should be taken right after shooting lights. Dust motes could shift, and then the flat frames might cause you more problems than they fix. Flat frames should also be taken if you are going to change lenses, or in the case of a telescope, before you rotate the camera to frame a new subject.
Bias frames are taken so we can subtract out the patterns that most cameras add to each frame way down in the shadows, which is where we want to see (hence the long exposure). It's what you see if you take a short exposure with no light. Some of this is random and can be dealt with by averaging a bunch of bias frames, but some of it might be fixed pattern of bands across the frame. Modern cameras are better than older cameras in this respect, but the more frames you stack, the more important it is to handle the bias pattern since it adds into each light frame you stack.
You want to use a lot of light frames to get the equivalent of a very long exposure. Averaging a bunch of frames at each step of processing reduces the random noise relative to the picture we want to see (signal-to-noise) improves. Try taking a bunch of shot at very high ISO. Averaging them will get you a less noisy picture than a single frame. Same idea for long exposures.
As to how many frames to use, each doubling of the number of frames stacked brings the noise down (relative to the signal) by a factor of the square root of 2. So more frames gives you improvement, but the improvement gets less and less worthwhile for the effort.
Thanks for your response! I understand the need for a lot of frames for the light shots, just not sure why they’re necessary for the bias and flat ones.
Also, is there a good Mac software you can recommend?
SIRIL works on a Mac. It will stack and do a lot of the processing for you. I like it much better than deep sky stacker
Flat frames also correct vignette / uneven illumination.
Cameras have come a long way since I did this. I used a 40D and a typical night would be 15-20 lights, a matching number of darks, flats, and bias. I had an observatory at the time, so doing the darks would take place after I was done. I just programmed the software to take X amount of darks then go to bed and wrap it up in the morning.
The cameras were really noisy and anything to help reduce that noise was done. I later switched to a purpose built CCD camera that was cooled, a huge leap forward. There was so little noise with the CCD camera that I stopped taking dark frames. It's a real challenge, but lots of fun....and frustration.