
If you’ve been shooting (landscape) astrophotos for a while but are relatively new to astronomy, you may be contemplating stepping up to a telescope for your astrophotography. But taking the next step isn’t as simple as getting a longer lens for more magnified views. You should understand the changes in your shooting and equipment that this implies.
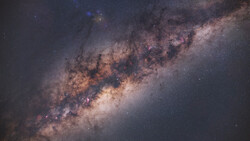
For most landscape astrophotography, much of the emphasis is on what is in the foreground — an interesting person, landscape, or city-scape, with a night sky backdrop (usually the Milky Way). But for telescopic astrophotography, unless you plan to stick to photographing only the moon and sun against the landscape, the objects in the sky itself become the primary subjects. So, before committing to the plunge into the deep end of the pool, here are some recommendations for easing in.
Learning the Sky
Needless to say, it’s important to know what objects of interest are out there, just as you must know where interesting viewpoints are on our own Earth if you’re into landscape photography. You must also know other aspects such as how large the target subject appears in the sky, how bright or dim it is, when it can be seen, etc. Learning the coordinate system of the sky (Right Ascension and Declination) is important too and is no harder than understanding latitude and longitude on Earth.
Astronomy Resources
While there seems to be an ever-growing number of YouTube videos from amateur astronomers, there is actually a great deal more to it than can be learned from a few 15-minute videos. Here, a well-organized book is a better resource. One “classic” recommendation I have is:
- The Backyard Astronomer's Guide by Terence Dickinson and Alan Dyer
While this book has been out for a while, it presents a well-organized walk through the practical aspects of amateur astronomy, including astrophotography. And if you have a little patience, the fourth edition of this book is due to be published in September 2021, undoubtedly updating the astrophotography equipment section to catch up to the rapidly moving technology changes that have occurred since 2002.
Planetarium Program: Stellarium
If you haven’t already gotten a planetarium program for your desktop PC for astrophoto planning, I recommend starting out with Stellarium. Even if you have an app on your phone or tablet (Sky Safari is a good one), I recommend using Stellarium on a desktop PC since a very widescreen with high resolution is very beneficial, allowing some labeling of objects without cluttering the display too much. With this program, you can start to become familiar with the deep sky objects — nebulae, clusters, and galaxies. Stellarium also has a provision for incorporating photos of your own horizon to create a virtual view of the sky against your familiar surroundings.
I also recommend using Stellarium to create seasonal or monthly screenshots of your own sky, then installing them as desktop wallpaper to help you in becoming familiar with the sky above you. Change them regularly and gaze at them out when you need a break from your daily tasks. The features in the sky should become as familiar to you as landmarks on the ground over time. And the next time someone asks you what that really bright light in the sky is, you’ll immediately be able to tell them it’s Venus!
Star Charts
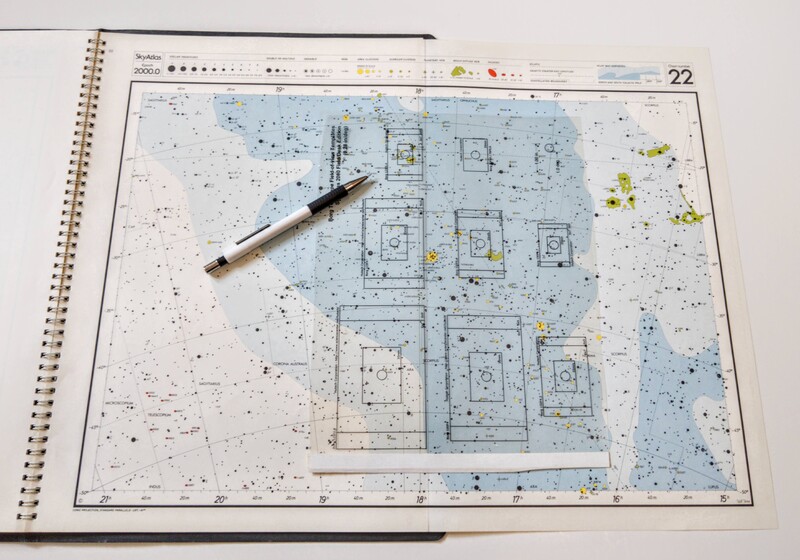
Another item I suggest you invest in is a set of printed sky charts. Why do I recommend old-school paper star charts? Access speed, wide coverage, and high resolution. Star charts that cover the entire sky in say, 20 sheets, have enough detail to locate deep-sky targets and yet see their locations relative to other objects across the sky. Unless you are constantly traveling, you can pare down to half the charts to cover your hemisphere and even down to a third of those to cover just what you’ll be able to see for a few months at a time. I have accumulated a variety of charts (I have an interest in terrestrial maps too), but I find the best compromise of scale and objects shown is Sky Publishing’s
Don’t be alarmed at the reference date of 2000. This refers to the date of the coordinates of the objects plotted. Despite nearby stars, which may be moving and coordinate changes due to the wobble of the Earth’s axis, the inaccuracies are not at a level to be of concern to amateur astrophotographers.
Alternatively, some free printable star charts are also available, but unless you have a large format printer, I recommend purchasing the Sky Atlas series, which comes on large pages with a color option.
For shoot planning, with the help of field-of-view templates printed on clear sheets of plastic, you can rapidly frame your targets or compare the fields of view for various instruments. You can do that also on a PC planetarium program such as Stellarium, but the process is slower and less convenient as you have to pan and zoom to get the same functionality. Make the templates to match the field of view for the telescopes and camera sensors you are contemplating to see how well the interesting deep-sky objects fit in your camera.
If you want a deeper look into the sky (dimmer stars and smaller objects), Stellarium or other programs are much more convenient and can include millions of dim stars not available on printed atlases, but the ultimate printed deep-sky atlas is The Millennium Star Atlas. At the image scale of this atlas, the maps had to be packaged as 3 large, thick volumes, which are inconvenient to reference, to say the least. And sadly, this classic is no longer in print and can only be found in the collectible marketplace.
Scouting the Sky Locations
Before diving into the deep end of the pool by getting a telescope, astronomical mount, and astrophoto-specific camera, there are a few warm-up steps I recommend taking.
- Get your camera (DSLR or Mirror-less) camera modified for enhanced red sensitivity. Another option is to purchase one of the few commercial models, which are factory-designed for astrophotography such as the Canon Ra.
- Get an external intervalometer that can be programmed to take multiple long exposures on your camera in “bulb” mode.
- Get a star tracker such as the Star Adventurer.
Recommendation one is to allow you to capture photos of galactic nebulae, which are often defined by the glowing gas of ionized Hydrogen. Modification is an option (mainly for Canon or Nikon cameras), done by a few camera dealers who are experienced with the insides of consumer cameras. Basically, they replace the IR blocking filter in the camera with another one that does not cut so deeply into the red end of the spectrum. Typically, this modification is done for $300-$400 and, of course, will void the manufacturer’s warranty, so you may want to do this on an older model spare body or purchase a used body for just astrophotography.
Recommendation two is something you will probably need, as most cameras cannot do exposures longer than 30 seconds and many do not have an intervalometer function built in.
The star trackers are miniature versions of astronomical mounts, which can be mounted on a standard, though heavy-duty photo tripod. They will get you acquainted with the way astronomical mounts need to be pointed at the celestial pole and allow longer exposures by tracking the stars as the Earth rotates.
With a tracker compensating for sky rotation, you will be able to do longer exposures and use longer focal length lenses, but personally, I don’t recommend going much beyond a 100mm lens due to the weight of the setup. And though some trackers have an autoguiding capability, they are only motorized in one axis and require adding even more weight to the setup because a secondary scope and electronic camera need to ride along with your imaging camera. A computer is also necessary to provide the autoguiding function.
While it’s possible to do this (you’ll see numerous examples on YouTube), I don’t recommend it, because the weight and awkwardness of the mounting introduces many chances of adding problems and frustrations that have more to do with overtaxing the mount than doing astrophotography. Of course, if you believe overcoming these sorts of problems is the character-building challenge you’re after, then go for it!
An Exercise For You
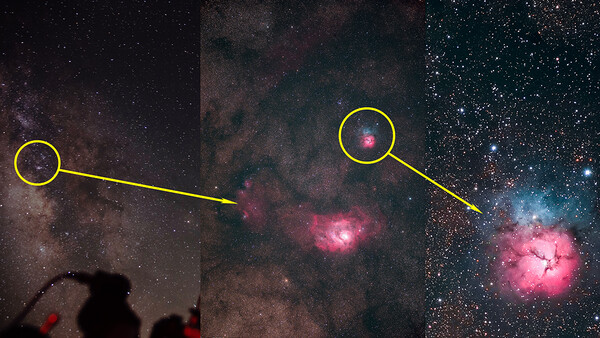
With camera, lenses, and tracking mount in hand, my suggestion is to run through an organized exercise of picking some targets in the sky, perhaps whole constellations with interesting nebulae or galaxies and systematically photograph them with the goal of processing the shots as deep-sky astrophotographers do. This includes:
- Take multiple long exposures (e.g. two-plus minutes long) of the intended target.
- Take multiple dark frames (same exposure length) with the lens covered.
- Take multiple bias frames (shortest exposures possible) with the lens covered.
- Take flat frames, which are multiple shots of an evenly illuminated white screen before adjusting anything in the optics (focus, aperture, zoom, etc.).
Start with just a few shots (say four) of each type, then work your way up to 20 or 30 to see the improvements you get with more shots in your stacks. The purpose of this exercise is to:
- Get used to the kind of post-processing necessary to get the most out of deep-sky astrophotos.
- Assemble your own photographic survey of areas of interest in the sky to get an idea of what telescopic photos will be able to pick up.
You can get an even better idea of what you can target if you stop down your lenses to match typical astronomical telescopes (f/4 to f/7).
The processing details are beyond the scope of this article, but the software you can start with is free. I recommend starting with Deep Sky Stacker, which handles all of the aspects of astronomical image processing you will need. This step is usually referred to as image pre-processing or image calibration, as you will be left with an image that should then be processed in Lightroom or Photoshop for final color balancing, contrast, and the other normal photo finishing steps.
When you do end up with your photographic survey shots, you can match the visible objects with the star charts to give you a good idea of what will be possible with a telescopic setup when your adventure really begins! The other benefit is that your shots will help to familiarize you with the sky in general. This is helpful when going out with a telescope and your planned target is shrouded in clouds. With a good familiarity with the layout of the sky, you can quickly decide on an alternative target for the evening.
As a final note, I want to add that I haven’t gotten rid of my own tracker and wide lens setup. I still use my simple wide-field setup on most nights alongside my telescopic setups. Having a wide lens on a camera snapping “free” frames all night allows me to make time-lapse movies of the sky or capture meteors. And sometimes, the sky conditions just aren’t good enough for telescopic shots, so the wide shots keep me from having to go home completely empty-handed.

Join the Fstoppers community for free
-
Post comments and join in the discussions
-
Browse the site ad-free
-
Share your work and get featured in the community
-
Compete in the photo contests for fun and prizes
14 Comments
So tempted to dive into this area of photography. Thanks for this handy resource! Hope you’ll follow up with more advanced techniques.
Same here!
Thanks! I'll be following up with more. Let me know if there's anything specific you want addressed.
Astrophotography is a blast! It is incredible what can be done with these small trackers
It's interesting that you recommend paper star maps. While it is useful to cut one's teeth on these in the daylight, to find objects of interest, in the middle of the night in the pitch dark with freezing fingers and heavy dew-fall they are useless. To find one's way around an unfamiliar bit of sky, I find Google Sky Maps on a smartphone the best utility, followed for more precise work (as you recommend) by Stellarium. Stellarium can be very cluttered but the best way to deal with this is to figure out the visible magnitude limit for any particular night (dependent on seeing, sky glow, the resolution of one's lens/telescope etc. - this does take a little practice but not much, once one is familiar with one's kit) and then set Stellarium's limit to this, or a little above. This then will give an accurate picture of what one is likely to see. Also, I don't really agree with the 100mm lens limit. When launching into astrophotography, one of the first things one should do is to figure out the field of view of one's various lenses, for the particular camera sensor one uses. This isn't difficult (count the number of full moons across the field and divide by two is an easy, if approximate way). Stellarium tells you its field of view for any zoom setting and this, combined with a moderately accurate magnitude limit, will allow you to figure out where your kit is pointed. My favourite lens is a 500mm f8 that is around forty years old, and makes wonderful images, although it does take a bit of trial and error to point it in the right direction. This is where comparing Stellarium's field of view with that shown on the tablet connected to the camera (I assume you will emphasize hands-free operation in the next installment...?) comes in handy.
Thanks for your comments. I do agree with some of your comments on paper maps. One thing I should have mentioned is that laminating them is very useful. It stops dew from ruining them as well as stiffens them so they are easier to handle. In general, for dew problems I recommend making a little covered work area. It could be as simple as a large box turned on it's side. Adding some red LED's inside also is convenient for illuminating star maps or general work such as fiddling with cameras and lenses inside it.
I have used my phone and tablet and laptop outside too, but unless you are already dealing with bad light pollution, it's difficult to get the devices' brightness down to the point where you aren't affecting your adaptation to the dark. Initially this can be an advantage for the beginner since it limits the number of stars in a dark sky which can be confusing, but for working under good, dark conditions, paper maps can be useful.
I also don't dispute that you can use a longer focal length on a star tracker, but I do think it's important to get some good images without frustration, especially when just testing the waters!
All good points. However, if one lives in a big city, as I and I assume most of your readers do, then one has to travel, sometimes a fair distance, to get away from the light pollution. Portability of the kit, and the time it takes to set it all up, calibrate it and then take it down again, are then considerable issues. The more stuff one has to lug around and the longer it takes before one can start taking pictures, the more disinclined one is to go and get decent photos.
WRT the light from the tablet and smartphone, I find the phone not an issue, although the tablet can be. I may lucky with this in that I use an Olympus camera and their android app seems designed for the task (perhaps serendipitously) in that it has a very dark interface. I don't know about other manufacturers as I haven't used their apps.
Sorry, I just had to laugh at the "don't go beyond 100mm" with the Skywatcher. I regularly use it with an 800mm lens.
You're the MAN! :)
are you using guiding though?
No. No guiding. However, I do need to keep the shutter speeds very short. I think under 4 seconds at most. So, mainly shooting planets and the moon. At that focal length star trails do show up if the exposure speed gets too long. It's fantastic for keeping the moon or sun centered during their respective eclipses though.
I just wanted to bring up a few points about auto guiding. It may seem like a hassle but as your focal length increases it becomes an extremely useful tool to maintain sharp stars. As for the equipment something like an off axis guider is a great choice for small systems since they don't require an extra scope for guiding. you do still need a guide camera though, but dedicated guide cameras are both cheap and lightweight. As to the second point for guiding requiring a computer this is something that is correct however it does not need to be a traditional computer. One of the best pieces of equipment a beginner can get is the ZWO asi air pro as it is an extremely versatile piece of equipment. For star tracker users the most useful functions are going to be auto guiding as well as the plate solving abilities. Guiding will keep the stars sharp while plate solving will add a few additional features. One of the more useful ones is the ability to check and fine tune your polar alignment, the second is the ability to know exactly where your camera is pointing which can be helpful when finding dim targets. Beyond those the air also give live stacking capabilities, lets you know what objects are currently visible in the night sky, gives the ability to add an autofocus motor, and will work as a fully functional intervalometer. as the user progresses in the hobby the air is still an extremely functional unit as it has the ability to control your mount for goto (on supported mounts), Can control filter wheels, dew band heaters all from the smart phone app.
Just my opinion, but I think if you're at this level of sophistication, you really ought to stop trying to do things with one arm tied behind your back, and just get a real astronomical mount. It doesn't have to be expensive (doesn't need go-to capability), but simply 2-axis motors, autoguider input, and better balance and load capacity.
Two of the hardest things I see beginners struggling with are proper polar alignments and finding objects in the night sky. at under $300 the air is a tool that makes things easier not harder, if anything the tracker alone would be tying one arm behind your back. someone who is a beginner is better off buying a tracker with an air first and then upgrading to a much better mount later on, having both a good portable system and a good dedicated system that can both use the air. This way skills can be developed as well as allowing the user to determine if they want to go further. if they choose to go further they can go with a much more substantial mount right away without worrying about outgrowing a cheap equatorial mount quickly