
Many photographers are dealing with stress and worrying which leads us to be up all night. During the last recession Brett Missick turned his insomnia into a lifelong project.
Inspired by the work of Portland, Oregon based photographer Ben Canales, Missick was mesmerized and wanted to know more about how to capture the night sky. Discouraged by the idea he would need more than his (at the time) Canon T1i, he felt this might not be possible. "As I began this journey down the rabbit hole, I realized that this was in fact a huge lie. New photographers always assume that a great image is because of the gear, not the talent of the person taking the image or the techniques" he wrote.
During a concert he was photographing at Red Rocks Amphitheater in Denver, he met a photographer who shot the NHL Colorado Avalanche and also for Getty Images. During the conversation he was told something that would stick with him every time he began to get "gear envy" of another photographer. "Just do the best you can with the gear you have". That really resonated with Missick still to this day. It was not always about the price of the gear.
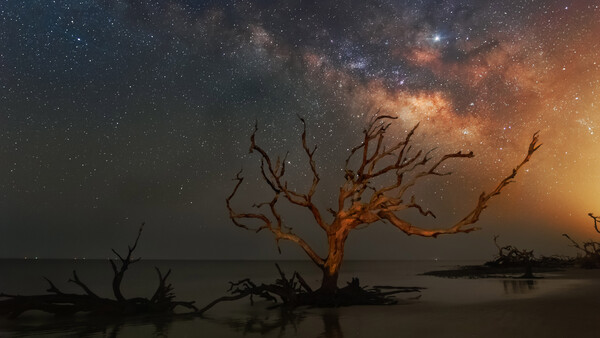
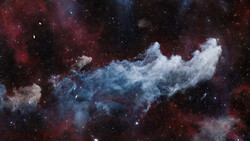
Following this advice he went out and began to scout for dark skies in his local area. Florida is not known for dark skies but he made it a mission to try and find them in his area over the years. Throw in Florida's notoriously bad summer weather and shooting anything sky related becomes a challenge. He worked more in the spring when the weather was clear and relatively dry. The core of the Milky Way begins to rise along the East horizon in early March and rises hight throughout the summer peaking in late August into early September where it is vertical in the Southern sky Missick explains.
"The Milky Way is visible year round however, the core that many people see in images and know as Milky Way is not visible in the winter months. This is because as the Earth travels around the Sun, we are looking out into the outer edges of the Milky Way and not towards the center core" he writes. As the year progresses into spring and summer, the Earth rotates back towards looking at the core which is why it is then visible.
When he first started out he had a T1i and a Tokina 11-16 mm f/2.8 which costs about $250-$300 as well as his Tamron 24-75 mm f/2.8. What he learned from his beginning adventures is that any astrophotography image on the internet are heavily processed to get the results you see. "I'm still learning and changing my editing flow as it continues to evolve" wrote Missick. His biggest tip to anyone wanting to try this is to just start. He warns not to be afraid of failure; you will fail. But, like anything in life the more you do it the easier it becomes and the better you get.
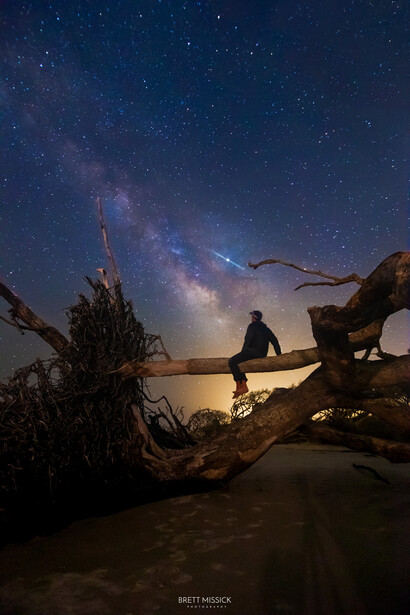
Missick admits he is by no means a professional in the genre but has been shooting for many years due to the love of astrophotography and the cosmos in general. He feels it is a serene place to be sitting out in the dark in the middle of the night sky. "The world is asleep except the sky above. It's very therapeutic. Staring up at the giant abyss as shooting stars whizz by and satellites strafe overhead while the camera shutter clicks. Use whatever gear you have. Don't get caught up in the specs too much because it will quickly turn into a morale crushing thing" he wrote.
He feels anyone with an entry level DSLR and a kit lens can try this type of photography in the beginning. He does suggest that while normal kit lens come with a f/3.5, it is better to have a higher aperture of f/2.8 or greater. Most prime lens come with f/1.8 which will yeld better results.
If you are going to be serious about astrophotography you will need a solid tripod. Missick uses an Induro carbon tripod with Smith-Victor BH5 Metal Alloy Ball Head which costs about $50. The next thing you will need to practice is focusing in the dark. Today's newer cameras and lenses typically do a great job with auto focus. However, the process uses the ability to detect contrast between two objects and when you are shooting the sky there isn't any, so the camera will auto focus in and out as it struggles to find something to focus on.
- Turning the auto focus off on the lens is best. The next step is to find something in the distance that is bright. It could be a bright object like Jupiter or even Venus or maybe a distant street light to use to manually focus on. He writes to switch on your live view and magnify it to the largest you can. On his Canon 6D now it is 10X.
- Find that bright target then slowly turn the focus ring until that object goes from a round blur to a sharp pinpoint. All lenses have an infinity mark on it that looks like a figure 8. Take your time to get the focus because if this is not perfect the rest of what you do will not be worth it.
- He started using electrical tape to tape the focus ring in place once so that it will not accidentally get bumped while moving camera around. "The slightest nudge can throw it off and you'll likely never know until you take a shot and zoom into 100x or worse, you get home and throw the images onto your computer to find every single one out of focus" he wrote.
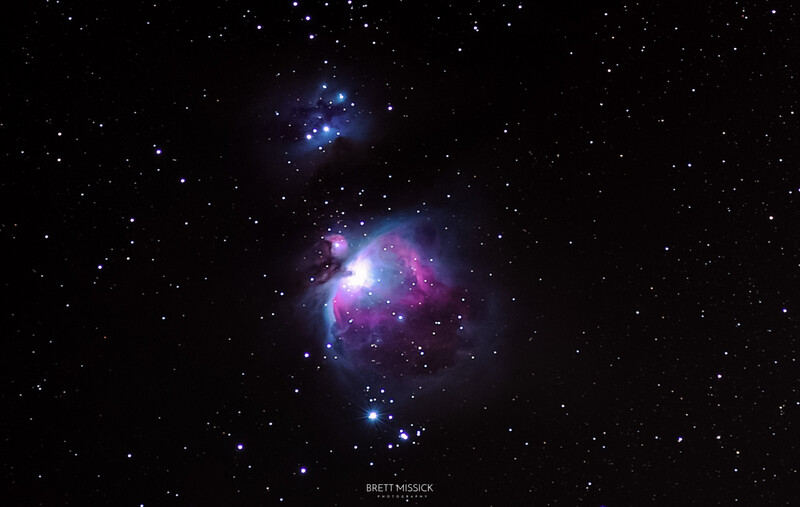
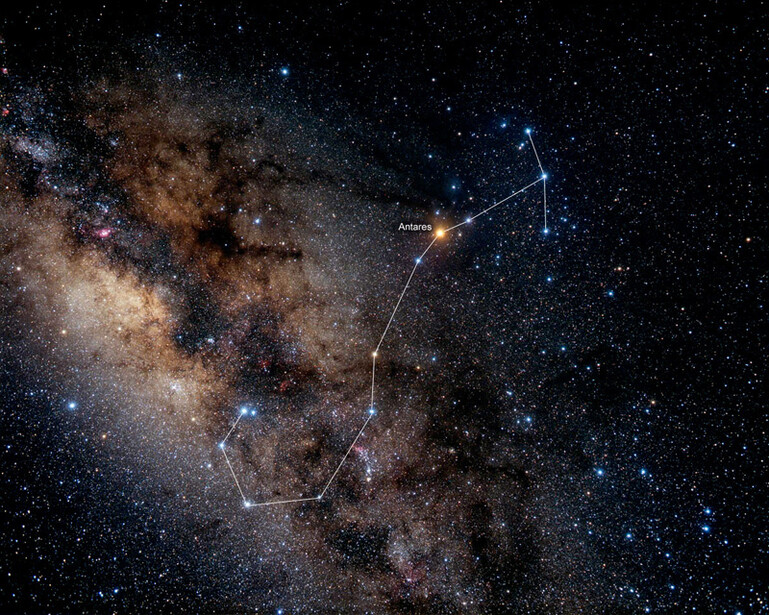
Once you get focus you need to know where Milky Way is in the sky. It will start out coming over the southeastern horizon in early spring and by summer it's mostly due south rising in the constellation Scorpio. He always use the 3 stars that make up the Scorpions head which are fairly easy to identify according to Missick and then he follows the stars down into the tail where are this point the tail points directly into the Milky Way.

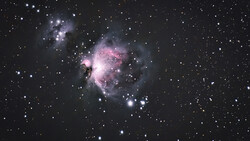
He explains that once you find the Milky Way you are ready to shoot. Test shots are best to see if you are where you need to be. For this, he uses a very high ISO around 6400-10,000 depending on location and exposure of 8-15 seconds. At this point he says not to worry about what it looks like. Your are just looking to adjust your composition and make sure that your stars are sharp. Using the image review on the back screen of your camera zoom into 100% and look at the stars. He says that they should be pinpoints of light. If they look hazy or blurry go back to the prior steps for finding focus.

"From this point most will state a general starting point of f/2.8 (or lower if you've got a lens that will allow it. Or, if you only have kit lens use f/3.5 at the widest angle possible usually 18mm or so) and ISO 3200-6400 with exposure time of anywhere from 12-30 seconds" he writes.
You do want to minimize exposure time though to keep stars from trailing and ruining that pinpoint source. He suggest not shooting any longer then 30 seconds though without use of a star tracker as you will get blurring of stars. A star tracker is a device which sits on your tripod and you place your camera on it which will follow the stars as they rotate.
He suggests using the Star Adventurer which costs about $300. If you are serious about getting to the next level of astrophotography this is a great tool, however he does not recommend if you are just starting out. It is very time consuming and adds one more level of struggle with in the dark of the night to get it right. If you're already an experienced photographer you can try using panorama and stitching individual images together to create a larger image.
"Being outside is part of the journey. You won't always hit a home run. I very often come home near empty handed but it's part of the fun" he writes. This will take practice so practice. Reading instructions online or a video of how-to is great, however doing it in the dark of the night is an entirely different. Most people will fail with the finding focus aspect. Practice in your yard at night before driving hours into the dark of night and struggling.

Bonus Tips from Missick
- Scout your location in the daytime. Getting out in the dark can be dangerous not to mention time consuming if you have not had time to scout various locations and compositions.
- While gear is not everything he would highly recommend investing in a lens defogger. It's a device that costs $20 that wraps around the end of your lens. It will heat the end of the lens up which will stop the lens from fogging and runs off a USB power bank like what you charge a cell phone with.
- Probably the biggest thing he admits to wishing he knew from the start is to take multiple images of same scene at the same settings so that he could go back and stack them in Photoshop (or another application like Sequator to reduce ISO noise). Shooting single images at high ISO will create noise in the shadow areas. Stacking allows you to minimize this by averaging out the noise pixels. Shoot minimum or 10 shots to get best results.
- Get familiar with the night sky. Download the free application called Stellarium on your computer. You can see the sky in real time and plan your outings much easier from home and see where and when the Milky Way will appear and be at any given time.
Missick also recommend The Lonely Speck as a useful place for resources
If you have started into this genre leave an image in the comment section to show off your work!
Join the Fstoppers community for free
-
Post comments and join in the discussions
-
Browse the site ad-free
-
Share your work and get featured in the community
-
Compete in the photo contests for fun and prizes
15 Comments
If you want to take photos of the Milky Way, the moon and a few other large, bright objects in the sky, you can definitely get away with a half decent camera and a tripod. With time and creativity, you can get some amazing shots. To hit some of the major nebula and the Andromeda/Triangulum (*maybe* a few others) galaxies, an entry level tracker as mentioned and some practice will get the job done, to a degree. Past that, it gets expensive and fast. Lens/scopes that don't have coma issues, go-to mounts, adapters, guide scopes, etc...it goes on and on down a very deep rabbit hole. How do I know? I'm headed down that hole now!
Once things improve with regards to Covid19 in Florida, I want to go out into the glades with some photography friends and find some dark skies to try this. I have a sigma 16mm f1.4 that I've been itching to try for astrophotography.
...just watch out for them 'gators... ;-)
I'd be more worried about the pythons to tell you the truth.
"Florida is not known for dark skies but he made it a mission to try and find them in his area over the years."
That's not entirely true, although depending on where you live in Florida you may have to travel some distance for it. Florida's best skies are Bortle 2 (the cyan and blue areas on the map below), which is quite excellent. Even the (green zone) Bortle 3 skies are quite nice. Weather permitting, of course.
BTW, for those of you not familiar with it and are considering doing some astrophotography, the Light Pollution Map website can help you map out a potential dark sight, either locally or more distant from you:
https://www.lightpollutionmap.info
I'm about 45-60 minutes drive from some dark skies, not bad. Definitely worth planning a trip on the night of a new moon (weather dependent of course, its still Floriduh lol)
Even Bortle 4 skies (yellows) can yield very good results. I shot the image here of Andromeda under Bortle 4 skies. Granted, there is significant post-processing, but you get the idea. :-)
Photographed back on 2017 stacking and stitching, shot at 70mm on a 6D.
Last year I really wanted to get a Milky Way shot. Found a decently dark place a couple hours from home and found a weekend night with not much moon. The pictures turned out just ok. Not bad for a kit lens that only opens to 3.5 and with no stacking at all. But the experience was so much fun. Being out in a really dark place the amount of stars you can see is amazing, especially after your eyes adjust. You can faintly see the Milky Way with the naked eye if you know where to look. Makes you realize how small we are in this huge universe. Humbling really. Hit the only place open on the way home for some late night breakfast, got home 3 or 4am. Just a fun night. My next lens purchase will be a prime that can open to at least 2.0. Can't wait to give it another go!
Nice pic. If you have Photoshop, GIMP, or Affinity Photo, you may want to just add some color and luminosity noise reduction. If you don't have a raw file use the Camera Raw filter and adjust while viewing at 100%. You'll need more color than luminosity noise reducton, but depending on your original resolution, just be judicious about it and you'll preserve your color and luminosity subtleties. I did a mild process to your low res file here for comparison.
I used Capture One for post processing. It's been several months, so I honestly don't remember exactly what I did on the edit. Thanks for the advice.
You can use the NR engine in CO to do the same.
Glad to see another florida photographer shooting the MW!!! Get PhotoPills app lets you plan and see where it is from anywhere, a VR mode uses devices camera to see where it will be in the sky and scroll for a time, it has the moon info, most importantly Spot Stars section, do not use the 500 rule (old film stuff), using camera info and lens mm find SS for no star trailing exp. for Rokinon 14mm f/2.8 (low cost starter lens) on a Sony A7S (astro king) 23.41" to best 11.71. Or a kit APS-C 18mm = 35mm at f/3.5 10.19" to 5.10", but the longer lens can be used for a two layer pano using the faster shots. If the new moon starts at the end of the month in a year then the end of January is the season start if at the beginning of the month then February is the start. Living along the US coast you have dark skies over the ocean from Maine to Florida to the southeast at rise time, the Gulf Coast all year. Lr has all the best tools, use portrait profile for best MW colors (print a jpg using AWB to see the colors to end with), Adjust the photo and foreground, then use graduated for sky cool temp., use radial (inverted) for over the MW (warm temp - use left shadows/dark, right white/highlight) and noise control. Photo use Topaz Denoise AI then you get a new image in Lr where you can again brighten, bring out shadows etc.. Use Planit Pro to view pano with lens mm also see the tides (start at high tide for a clean beach later in the morning!) Do a 180 degree for a rainbow MW early season. You have a week to two weeks, early while there is a crescent moon you get a moon rise below the MW late and you get setting moon shine on your foreground. If a lot of lights in foreground just use Aperture mode and adjust ISO for SS. Lastly go with a friend or two, use green headlamp not red, change lenses with camera in a clear trash bag if you need to, use a big photo vest for gear and pads (never use apps on phone, drains batt), bear spray for gators and two legged, only take camera and tripod never leave anything in car, in Florida week day hotels cost less. oh to see where the MW is while out use Star Walk 2 scan the sky with device and also capture a blue hour first light and sunrise a threefer night. In Feb. the Florida keys hosts night sky viewing and Photography. For a planetarium in your hands SkySafari app and your computer Stellarium (free). To see cloud cover in the future Clear Outside and MeteoEarth apps and a good weather app showing clouds, do not fear fog either dehaze works wonders.
Also use old film lenses like Canon FD 20mm f/2.8 or 24mm f/1.4 with adapters (also speed adapters 2.8 to a 1.8 ) even a 35mm f/2 great for Panoramas!!! Or just to start at low cost (not cheap just frugal). Old film lenses f/1.2 to f/2 great buys and a lot so low cost!! And Full Frame!!!!
In winter look west and do a panorama from south to north to capture our arm of Orion of the galaxy, Really good for West Coasters in winter! With stars do 75% coverage so pano program can stich better. Just use a laser pointer pointed on the ground every time you move one 1/3 block on LCD screen. PTGui the best and free updates for ever!!