
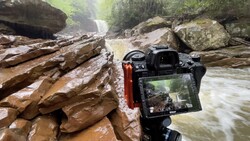
One of the most exhilarating aspects of environmental portraiture, especially when out on assignment, is that you never quite know what your shooting environment is going to look like. If I had a nickel for every time I walked into an awesome location, only to be quickly shuttled off to a closet-like space to do my work... Well, I'd be able to buy a sandwich. But a really nice sandwich. Here are some tips that may save your sanity while trying to compose an interesting portrait in a postage stamp sized room.
1. Have some sort of artificial light with you.
I know, I know. A lot of you are "natural light" photographers. That's great, but sometimes you need to be flexible. A little kiss of light from an off camera flash can be the difference between a mediocre shot and a magazine cover. I'm all for using the available light in the space, but you have a job to do. Don't half-ass it because of principle. Your job is to get the best shot possible, and sometimes the environmental light needs a little help. You'll also have far more flexibility with shutter speed and maybe you won't be stuck to a tripod when you get assigned to shoot in the middle of a cave.
Lighting doesn't have to be expensive. Although I use larger studio lights, I also have some cheapo flashes that I can use in a pinch for tight spaces. You don't have to be a lighting master with them, but know how to use them when you're in a bind.
2. Don't get stuck shooting from the entrance to the room.
When you walk into a small room, the temptation is huge to plant yourself in the doorway so that you can get as much of the room in your field of view as possible. While that's a totally valid approach, don't forget the opposite viewpoint, shooting toward that same doorway. A room looks larger if it appears to lead somewhere else. You minimize the claustrophobic feeling you can get when shooting in small spaces because it seems like there's a way out.
That being said, don't forget to light that next room! If there's a way out, but it looks black, that doesn't help in opening up your photo.

3. Resist the temptation to zoom in.
When a room is plain, you may just give up and say, "Well, I'll just zoom in on the subject's face and make it a classic portrait instead of an environmental portrait." That may work, but if the spec sheet you get from your editor says "environmental portrait," and you send in close up portraits, that may be the last time you shoot for that client. On that note...
4. Don't be afraid to use a wide angle lens.
Too often I hear people complain about wide angle lenses as not being suitable for portraits. Of course they are! But use caution. Any lens can be used to take a portrait. Yes, wider angles will distort features and may be unflattering if used in a careless way, but there are a few things you can keep in mind while using one that may help your chances of success. First, if you're shooting wide in a small space, get as far away as you can. Distortion on your subject will be minimized if you keep them towards the center. Not necessarily dead center, but the farther from the center you get, the more distortion you're likely to have. A lot of that distortion can be fine for the environment, but may be the kiss of death for your subject's features. The wider the angle, the smaller your adjustments need to be to keep distortion at a minimum. I like to shoot from slightly below to give a "hero" perspective for the shot. Shooting down on the subject will give a bit of a bobble-head look if you're too close.


5. Get there early.
This one can't be stressed enough. If you get to a shoot early enough, there's almost no problem that can't be solved. Give yourself the time to get creative. You can map out where to put lights, take some test shots, use a stand-in if available, grab a water, and mentally prepare yourself. Also, if the room just absolutely won't work, you may have time to find an alternate space to shoot in. Don't roll in five minutes before your subject arrives and then complain about the space. You had it coming.
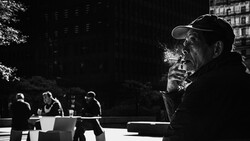
Thanks to Patrick Andrade of Relic Fine Art Photography, for volunteering his mug for the shots and video above.
Does anyone have any other tips for shooting in tight spaces for the burgeoning photographers out there?

Join the Fstoppers community for free
-
Post comments and join in the discussions
-
Browse the site ad-free
-
Share your work and get featured in the community
-
Compete in the photo contests for fun and prizes
19 Comments
Great article Hans. Thanks for the useful info!! I love a wide angle lens for portraits personally; the background adds to the story.
I've supplemented my 16-35 with a 15mm. Bring on the small rooms! I think this office is about 8 feet wide.
Haha. Nice! Where there's a will there's a way
I shot that the day I bought the lens, just to test it indoors. Not only did I get a great deal on the lens, but I may end up doing some work with them. Win/win.
Thanks for the article Hans, really useful.
Glad you found it useful! More to come in the same vein!
Part 1 seems like an attack on natural light photographers or just people using what they already got in equipment to the best to their abilities. I don't shoot outdoor on-location environmental portraits unless I have someone holding and move the light for me which isn't ALWAYS available. Indoors its a little different and if its controllable indoor environment (not crowded by the public) then assistant is entirely necessary then I can bring 2-3 speedlight/modifier setups. Even when I have the ability to do it, I may decide not to based on the moodboard's dictation on the light. If I don't own a giant modifier to give me ultra soft light from my artificial light then natural light is the next best thing, especially with today's great quality in high ISO on most modern DSLRs 4000-6400 ISO is decent on my Canon 6D, not perfect like ISO 400 or so but still great than it was on past generation models.
But when possible, I agree artificial would be better to lower that ISO to give much cleaner shots or better highlights/shadows.
Definitely not attacking photographers who prefer to shoot in natural light. I think the problem comes when people use a label as an excuse to avoid expanding their available toolset. Take, for example, lighting an area in the photo that appears too dark with only ambient light. Frequently we dont have access to the lighting controls for individual rooms, so we might be screwed if we have no way to light it ourselves. Expertise isnt necessary, but a $30 flash will go miles towards bringing an image to life if used correctly.
I mean I would love to shoot in artificial ultra (like natural light) soft light, but without spending more cash its not just not possible unless you're super handy to DIY literally everything like modifiers/flags, etc. I really love shooting natural light because artificial light takes time and other resources (like remote controlled lightstands) which I did not have the ability to get during tough times. Now yea, after a full year of just shooting natural light outdoors in environmental portraits I am slowly using more artificial as I got more funds to pay an assistant (since nobody in the area are willing to do it for knowledge).
I very rarely use assistants for day to day shooting, so I know you can do it with a little sweat. What kind of lights are you using?
At first it was strobes, but then tried speedlites to keep the load light and moving quick and easy. I may be able to get away with using speedlites with a boom arm stand with 2-5 sandbags in a secluded area. But in a busy street/city, etc. area with people around, I'll need an assistant to ensure the light is safe and secured.
Thanks for sharing, haven't had the chance to really shoot in a super tight space yet but will keep this in mind. What focal length you recommend actually? I was thinking of renting the 20mm 1.4 sigma or a 14mm canon.
Depends on the format! If you're shooting on full frame, 35mm or so seems to be the gold standard for getting a bit wider without causing too much distortion. That would put you at 23 or 24mm or so on a crop sensor. I like to shoot zooms rather than primes for the most part. That being said, you can go as wide as you need to as long as you take care that you're sensitive to the overall aesthetic of the shoot. So if you're shooting a model, distorting her features may be undesirable, but shooting a musician with a fisheye might be cool!
This is why group skill-building workshops can be so effective. Round up a group of locals with diverse gear, find a place to shoot, and swap lenses or whatever to see what you like, and what works for you. More fun than renting a bunch of lenses and testing them all by yourself.
I totally agree, but time to build a group locally is not feasible, and tried joining (the one and only) one but they weren't any portrait phootgraphers.
Do you shoot Canon?
Yes.
If you're ever in Utah, let me know. I'm slowly collecting most of the significant Canon lenses from 15mm to 200+. You're welcome to try them all.
very nice thanks a lot :-)