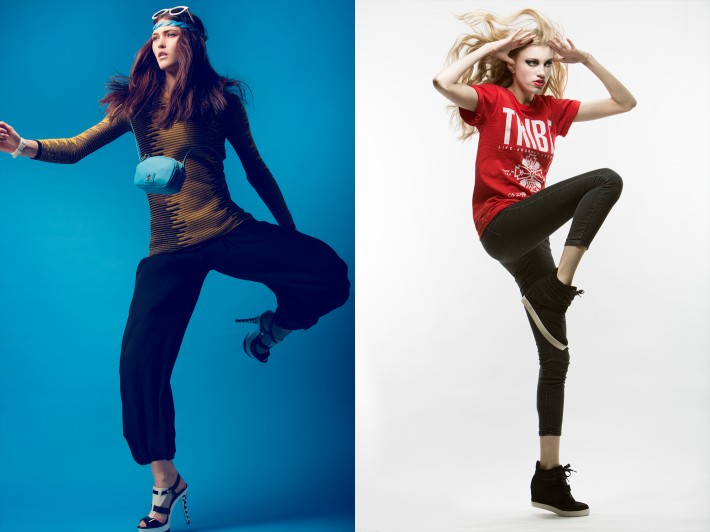
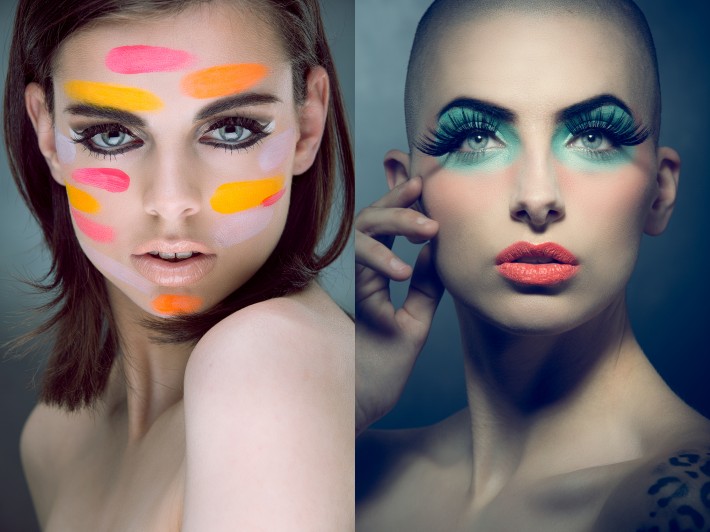
As photographers we face challenges day in and day out, but one of the toughest facets of the job is posing our subject. Regardless of experience, when a model steps in front of your lens for the first time he or she will expect some direction. It’s up to you to give that proper guidance, otherwise your images will just come up short. There is nothing more awkward than a clueless model and a quiet photographer. Your team is not only depending on you, but so are your peers and clients. It’s a lot of pressure, but a great image can be captured by following a few of these “ground rules.”
I've seen it time and time again, the first instinct for a new model is to place their hand on their hip and raise their chin sky high and give some sort of angry blank expression. Boom, model mode, right? Wrong. The hand on the hip reeks “sorority girl" and the high chin may elongate the neck but it does nothing to help the jawline. There is a right way, but you the photographer must take the wheel.
Pull Poses & Mood
Do your research beforehand and plan accordingly. Pull inspirational poses (photos) and have your model emulate those poses. I like keep an ongoing inspiration wall full “tearsheets” and ads I see in magazine such as Vogue, W, Glamour or V Magazine. I also use visual discovery tools like Google or Pinterest to save influential images, which are organized into folders or bulletin boards such as “Pose,” “Hair,” “Makeup” or “Light.”
Follow The Nose
All amateur models instantly feel the need to keep their eyes to the camera, but with my style I prefer the opposite. A model glancing off camera plays to my structured aesthetic; I constantly preach “follow your nose with your eyes,” as it reduces the amount of white in the eye and eliminates the awkward over rotating eyeball. Also, I always want to see color, contrast and catch lights in the eyes, if the model simply follows their nose the color and catch lights will be there.
Bounce The Shoulders
Shoulders are often overlooked, but they play a crucial role in framing the face of a model. Popping a shoulder up and forward can make all the difference, especially in beauty work. Just raising one shoulder higher than another will add dimension and strength to the image.
Chin Out and Down
A camera can only see in two dimensions, meaning a photograph is not three dimensional unless it’s shot three dimensional. Therefore, when a model pushes her chin forward and then down and is faced directly towards the camera, from the photographers perspective the jawline is extended and stronger lines have been formed. However, if the model were to move to their side profile, he or she would resemble a turtle poking its head out of the shell. It will feel incredibly awkward for the model, so be aware of the models torso and stance before asking to bring her chin out and down.
Open The Mouth
It can set a completely different mood and photograph. With the mouth closed, the jawline clenches and adds extra weight to the sides of their face. It can also give negative energy to an image, a bored neutral look. With the mouth slightly open, the jawline is elongated and gives a subtle intimate invite to the viewer.
Shake the Concrete Feet
In fashion photography, shoes are a crucial piece to the wardrobe. But, they are often overlooked because legs and feet are never easy to pose. So, many photographers avoid the full body shot and go right for an easy three-quarter image. But, when you have to capture the full body and the shoes, implement motion. Get the model moving; jump, walk, lunge and shake the heavy feet. An easy starting point is walking forward or pacing back and forth in a continuous manner.
https://www.youtube.com/watch?v=HpocKl5ncGk
Ballet Hands
I grabbed this term from one of my favorite photographers and educators Sue Bryce. She has a way with posing women that is unmatched; her images are ethereal and real. Hands are one of the more challenging aspects of posing and can make or break an image if shown incorrectly. The model should relax their hands as if they were in a ballet, spreading the fingers lightly, slightly broken at the joints. From there, depending on the aesthetic of the shoot, hands should be placed in a position that works with the image. Under the chin, over the shoulder, to the side or through the hair are some common positions for hands.
All About Subtleties
“A very subtle difference can make the picture or not.” - Annie Leibovitz
It’s true; it’s all in the subtle details. It’s important that the model move slow and sly, as big movements and gestures can have a negative impact. When you lock-in a strong pose, the last thing you want is the model to make a drastic change to her body or face. So it’s important to condition the model to make small steps and only slight differences in gestures.
Get Low & Talk
A common mistake made by many portraiture photographers is completely ignoring their own height and shooting a model from above or eye-level. When shooting three-quarter or full body, get low to the ground and shoot high. This style not only increases the height of the model, but also creates a more dramatic “hero” look to the image. And, positive reinforcement is everything. If you aren’t talking, you aren’t directing and if you aren’t directing then you’re not getting the shot! Play to her confidence and after every 2 to 3 snaps hype the shots with a “buzz word” such as “fabulous, great, beautiful, excellent or love.” Yes, it really does work. But, don’t be a creep.
Stop Chimping
Chimping, a term used in digital photography to describe the habit of checking every photo on the camera display (LCD) immediately after capture.
Chimping is deadly habit that can kill the energy of a shoot and I've seen it first hand countless times. Photographer takes a shot, looks at the back of the camera, takes another shot, looks at the back of the camera. All this time the model is getting bored and losing energy, he or she is also questioning their confidence and wondering what the photographer is seeing. If you have to check the LCD, talk to the model at the same time and give out positive reinforcement. Best practice is to snap the shutter 3-4 times then pause for a quick glance at the LCD, all the while you're maintaining communication. This will keep the energy high and push the model.
Your mission as a photographer is to create stunning imagery and sell a product. In order to accomplish such imagery, you need to focus on forming lines; lines in the frame also lines of the body. Direct your model to use their legs to compliment parallel lines of the arms or use the hands to form shapes surrounding the body. Pay attention, lines are a crucial piece to the puzzle.
Be confident in what you tell a model and if it just doesn't work move on to something else. Keep experimenting and keep talking. Connect with your model and be patient, because unless you’re working with Coco Rocha, if you stop talking, you’ll never get that perfect pose.
Clay Cook | Facebook | YouTube | Instagram | Twitter
If you want to learn more about working with models, we offer a full course on Swimwear photography with Joey Wright. Make sure to save 15% by using code "ARTICLE" at checkout. Save even more with the purchase of other tutorials in our store.


Awesome tips!
Thank you!
Awesome article! Great tips, at least for a beginner in this particular field of photography!
Thank you for reading Veldask!
Boom! Clay Cook drops another knowledge bomb! Nice job as usual clay
Thank you Bert! Means a lot my man! I've actually heard that twice now, someone actually called me Vincent once. Ha!
Bro...you are bringing the heat article after article....keep it up!
Great Work!
Thank you Matthew! Much appreciated!
I've chosen a fashion portraiture brief for uni (it's all new to me) and this article is just what I needed. Nice one!
Thank you for reading! Good luck out there!
Clay, again with an awesome article! Seriously looking forward to every time you post! Thanks!
Mean s a lot Keegan! Thanks as always for the comment and feedback!
Really helpful post! Love the video. Check out my vlog would love some feedback :) Fstoppers has got me through my degree
https://www.youtube.com/watch?v=T3eAv1vM23Y&feature=youtu.be
Cool George! Keep up the awesome work and tips!
Thanks man :) Gonna do another one today!
Clay, what's the giant lens shade you're using in the pics? Great article by the way!
Lee Filters Universal Hood if I'm not mistaken. It also can hold square filters.
Flilp is correct! It's the LEE Filters System. The matte box is the attachment that holds the rectangular filters in place. Thanks for reading!
I love this, especially because it holds for any type of photography with people, not just fashion. When I'm practicing photography with my family and friends, or even my 5 - year old, I'm always worried that the poses are gonna break the whole shoot. This really helps a lot Clay!! Loving these articles!!
Thanks Stephanie! Really appreciate that!
Great read Clay!
Thanks Mark!
That was great tips Clay ! Thanks for sharing !
Thanks Frederic!
Good stuff!
Thanks for reading Nick!
Great post! Thank you for sharing.
Thanks Adeola, thanks for checking it out!
Excellent article Clay, this will definitely help me out.
Thanks Joel! Means a lot!
a lot of valuable information here, thanks clay
Thank you JT!
Superb article!
Thanks Aden!
Haha I'm glad you're not totally negative on chimping. There's nothing worse than getting home from a shoot only to realize that one of my favorite shots is just slightly OOF when I probably would have caught it had I zoomed in on the tiny LCD.
True, that is why I always recommend tethering with CamRanger! An amazing device, check out my blog post on CamRanger: http://bit.ly/1dTKlwE
Thanks for reading!
...or buy the same exact box for $30 and use the DSLR Remote app for $8.
Since we are talking of directing models in a photoshoot, I think we cannot forget to mention the beautiful Antonioni's movie "Blowup"!
@claycookphoto:disqus good post bro. keep them coming.
Thanks Paul! Please keep reading! :)
Very good! This information gave me new knowledge :)
Thank you!
One of the best posing articles I have read. Thanks so much Clay! I will be implementing some of these awesome tips when I shoot next :)
Thanks Kylie!
Thanks for the great tips!
Thanks for reading!
Very helpful..!!
You missed the very first rule:
Find a model that can follow direction.
im studying fashion photography... and the most difficult think for me is talk to the model. and getting nice posses.... thank you for this article ill help me a lot in my next shoot... thank you, thank you,, and thank you
Thanks Clay! Can you please clarify what you mean by "follow your nose with your eyes"?