
As wedding photographers, we always find ourselves walking the high wire between art and popular demand. But then, is the balance hard to achieve? In my opinion, I’d say it is wise to just put the thought, sincere effort, and presence of mind into your photos. What you capture will be loved equally by the artist in you as well as the couple you shoot - who seek nothing less than spectacular. The picture we are going to dissect is a product of this belief.
I happened to shoot a lovely couple in a one-star hotel recently. I created a dozen images during their pre-wedding shoot, out of which, I made eleven that were in sync with popular demand and one in sync with my interest. Yet, because it was beautiful, the couple loved it too as well as the rest of the lot. Now let’s get down to brass-tacks!
The Idea of a Dramatic Couple Silhouette Portrait
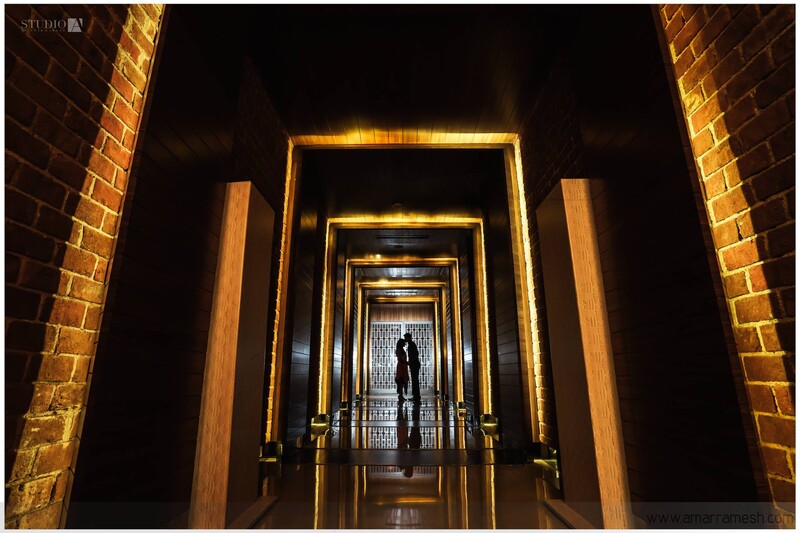
While we were scouting around for the location in the hotel that we were shooting, I found a passageway to a cellar/bar. It looked like any other normal place until I had a second look and it felt like it had all the ingredients for a dramatic image. Symmetry, lit arches, patterned walls, and a mysterious glass door with patterns at the far end – these were the elements that struck my interest. I was excited already and started constructing an image in my mind.
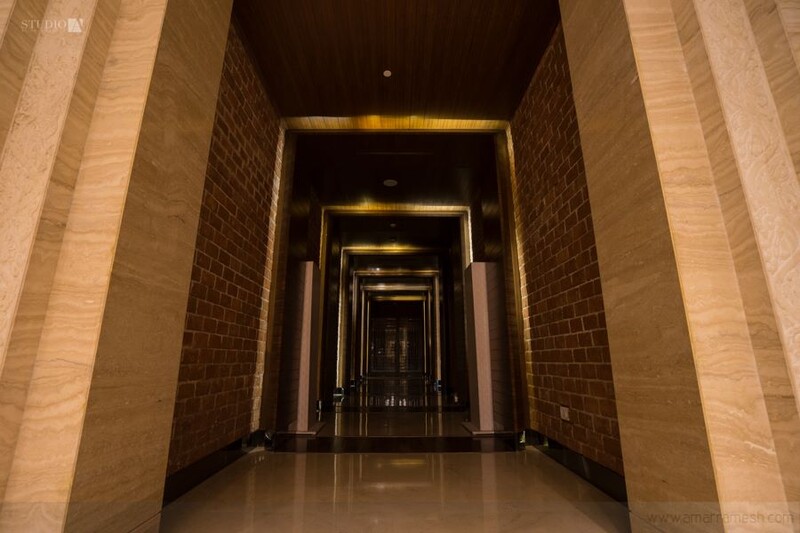
Like always, I could have settled for a “well-lit” image with the couple properly exposed - but that wasn’t my idea. I wanted to make an image that highlighted the beauty of the walls, the lights and the arches, and the interesting door - besides drawing focus on the couple. I wanted to craft a breathtaking moment yet keep it simple without a lot of complications. I decided to use only one speedlight, and that meant controlling the exposure wasn’t going to be difficult. The first thing I did was expose for the highlights in the frame to make the base exposure dramatic.
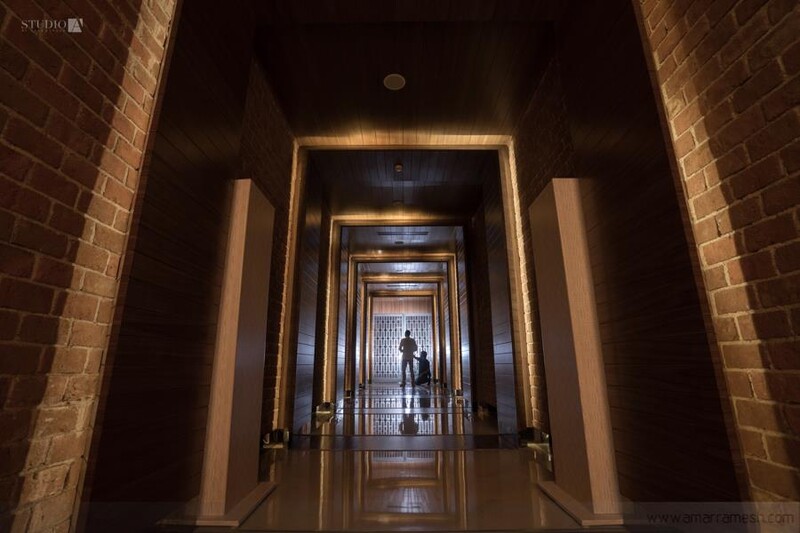
Lighting Arrangement
The next step was to light the door up. I set the speedlight on a stand that was positioned close to the couple and a few feet away from the door to spread the light wide. I made essential adjustments to the flash exposure to ensure that the details in the door aren’t blown out, while the silhouette is properly demarcated at the same time.
Preparation Essentials
The key here is finalizing your exposure before moving the couple into position. It is very important that you discuss the vision you have in mind with the couple, and make them involved in the process. That way they’d know that they’re posing for and will be more confident. So to complement their cooperation and maintain their patience levels, make sure you have your light set up and tested much in advance.
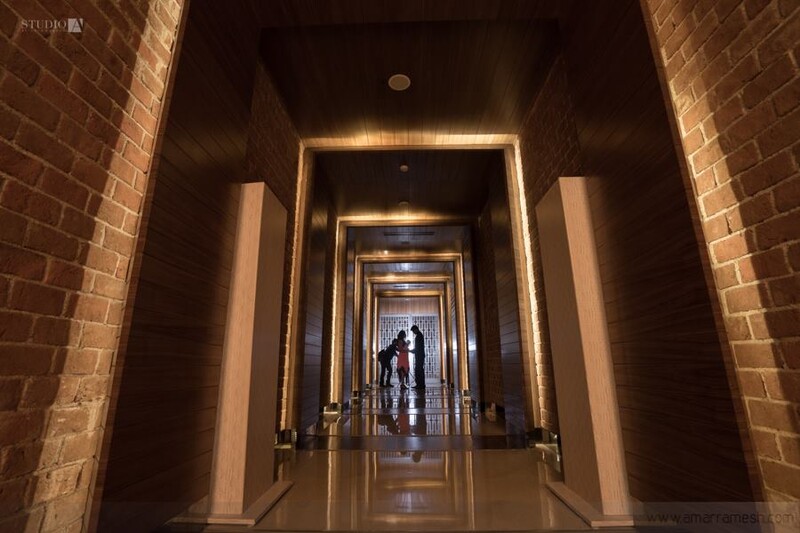
An additional tip: In dark corridors such as this, you’ll need to use your live view to adjust the focus and ensure that your subject is sharp. A sweet-spot aperture of F8.0 is also recommended. For clear reflections, make sure you shoot close to the reflective surface - in this case, the floor of the passageway. Likewise, all the elements that caught my interest were properly used one after the other in the image. And the couple with a lot of heart and love for the image posed at ease.
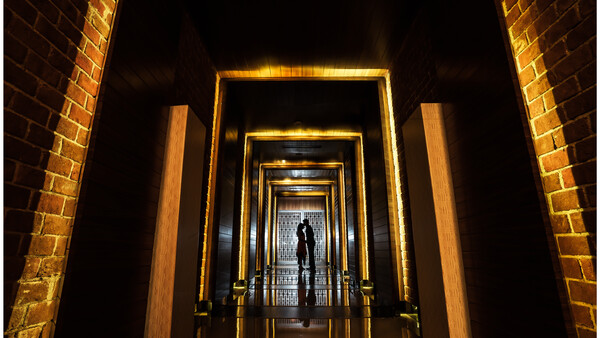
The Final Image
In the post-production process, I increased the contrast and vibrancy of the image. The light stand had to be cloned out as well. Because the straight out of camera exposure was exactly what I wanted, the edits were easy to accomplish. I loved it. The couple liked it too. Interestingly, this couple had paid us for the copyrights of their images and made it clear that their faces should never make it to the online space. This image being a silhouette shot, they did give a green light to use the image as we wished. We went on to submit to few photography competitions and guess what? It did win a few awards to its name.
Highlights
As you can see, making images off the beat isn’t exactly rocket science. All you need is a little imagination and lots of confidence in your vision. In the hindsight, here are the quick pointers to run through:
- Scout your location well and look out for that uncommon, less-seen spot which has a hidden opportunity to be explored.
- Visualize the image in your mind, and consider all the possibilities and challenges. This pre-meditation is very important.
- Once you have the vision clearly mapped in your mind, the key is to involve the couple in the process and get going. Their support means a lot to the breathtaking image you intend to make.
- Make sure you have the essential setups done before you move the couple into the position. This is critical to avoid any enduring hassles on the set.
- Throughout the process, look out for ways on how well you can include the surrounding elements to complement the mood of the image. The collective construction is the master factor of the image’s holistic finish.
- Also, make sure you keep it simple without complications. The more simple you tend to approach an image, the more artistic and interesting it is bound to get.
As wedding photographers, a lot of times we are stuck in a silo where we find it difficult to come up with fresher perspectives when shooting outdoors. Especially when it happens that it is the same venue that you’d have shot for "n" number of times, then it becomes a real challenge to innovate. In such instances, these thought-driven image ideas would come real handy.
With some practice and a clear vision of what you want and how to get there, you’ll be able to turn any mediocre image into a memory that you and the couple will cherish for a long time.


Join the Fstoppers community for free
-
Post comments and join in the discussions
-
Browse the site ad-free
-
Share your work and get featured in the community
-
Compete in the photo contests for fun and prizes
14 Comments
Edgy? I'm not seeing it.
Nice photo otherwise, although the real estate photographer in me naturally cringes a bit at the verticals. :P
I like the processing of this actually, brings out the existing lighting nicely (a little fiery). The one thing that really bothers me is how the couple isn't exactly centered. Simple adjustment...
Thank you for your thought, Chris. Yes, the centering is something I shall take care next time.
Sure Micheal :) There are parts of it that I wish to improvise when I look at it now.
I'm sorry, but this image is not edgy or exceptional. To me anyways. The couple is too far away. Can't really tell whats behind them. The boxes or cases on the side in the front is distracting. The couple being off centered is noticeable. The orange highlight on the floor stands out.
I think cropping the image would help a lot. Taking the brick out of the foreground would make the couple stand out. As it sits, the brick is the most noticeable thing in the picture.
The tips you provide are excellent though, and I like your reasoning and thinking behind the process.
Hello Gabe! Thank you for the thoughts. Have taken note of it. Like you said in the end, the point of the article was mainly the reasoning behind the shot. Sure, will strive to make the images real edgy ahead :)
cool yes, edgy no.
Nice try, backlighted silhouette could work here, yet your lines are stronger and brighter then door behind couple so my eyes are kind of lost in here and it needs more to get to the edgy side :) the ambience light of the place and exposure ratio with the flash could be done better IMO - nice work on your site, this could be pushed further to match it :) happy shooting
Thank you for the points Jofez. Will work on the lags. Also, this shot was taken years ago. And the previsualization process before taking a shot is what I wanted to drive in this article. Thank you so much for taking the time to go through my work. In me.amarramesh.com you can find all the work I have been doing recently :)
It's a cool picture and I enjoyed the article.
I would prefer a tighter composition but nobody has asked my opinion. One thing I learned as a newspaper photographer, its often important to factor in how a picture will be used or published. This picture and others like it need to printed or published very large to see all the small details.
Increasingly pictures are published online so I tend to shoot tighter than I used to because pictures run small. Before many of my assignments I asked editors about available space. I avoided wide, loose shots when space was limited.
Agree on cropping a bit. I don't know if it's just me but I frequently pinch to zoom on all photos social media based because I like to discover things, or see better. For better or worse I guess...
Lovely article as usual Amar. :)
A Lot of helpful tips.
"Like always, I could have settled for a “well-lit” image with the couple properly exposed - but that wasn’t my idea."
Getting out of comfort zone is a bit difficult thing I find, but I think now I should try more to make something stand out.
Hey Arun, glad you connected with the crux of this article. Certainly, it is all about getting out of the comfort zone and trying things out. Things will fall into place.
I like the image and the concept. I'd probably crop it to where the top portion of the image is just over the 1st "light arch". Too much dark negative space, for me at least. Also, you could've had one of the subjects holding the flash on the backside, away from the camera. That way, they could still be holding hands on the camera-side, but holding the flash on the backside and eliminating the need for a lightstand and the subsequent cloning. But good job!